1. Uvod
This manual provides essential instructions for the safe and effective use of your Ken-A-Vision T-17541C Digital CoreScope 2 Compound Microscope. Designed for biological and educational applications, this digital microscope features a monocular head, LED illumination, and a 1.3-megapixel camera for capturing still images and video. Please read this manual thoroughly before operating the device and retain it for future reference.
2. Sigurnosne informacije
- Električna sigurnost: Ensure the power supply is connected to a grounded outlet. Do not operate the microscope with wet hands or in damp environments. Disconnect power before cleaning or servicing.
- Rukovanje: Always carry the microscope by its base and arm. Avoid sudden impacts or vibrations.
- Optical Care: Do not touch optical surfaces with bare fingers. Use only approved lens cleaning materials.
- Ventilacija: Osigurajte odgovarajuću ventilaciju oko mikroskopa kako biste spriječili pregrijavanje.
- djeca: This device is not a toy. Adult supervision is recommended when used by children.
3. Sadržaj paketa
Provjerite jesu li sve dolje navedene stavke prisutne u vašem paketu:
- Ken-A-Vision CoreScope 2 Digital Microscope
- Napajanje
- Applied Vision 4 Software (for Windows, Mac, and Linux)
- Microscope Cover
- Allen Wrench
- Upute (ovaj priručnik)
4. Proizvod je gotovview
The Ken-A-Vision T-17541C CoreScope 2 is a robust digital compound microscope designed for clarity and ease of use. Key components include:
- Monocular Head: Features a fixed 45-degree incline for comfortable viewing and 360-degree rotation.
- Okular: 10x widefield eyepiece with a pointer for easy observation.
- Ciljevi: Reverse-mounted 4x, 10x, and 40xS DIN achromatic lens objectives, protected against humidity and climate variations.
- Floating Stage: Okrugli stage with spring-loaded clips to secure slides and a stop mechanism to prevent damage.
- Gumbi za fokusiranje: Separate coaxial coarse and fine focus controls for precise adjustments.
- LED osvjetljenje: Built-in bright and cool white LED light with dimmer and on/off switch.
- Digitalna kamera: Integrated 1.3-megapixel (MP), 720P high-definition (HD) CMOS camera with a built-in USB port for direct connection to a computer or monitor.

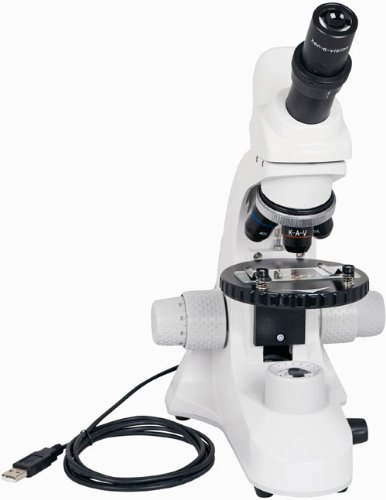
Slika 1: Prednja strana view of the Ken-A-Vision T-17541C Digital CoreScope 2 Compound Microscope, showing the monocular head, objective lenses, floating stage, focus knobs, and connected USB cable.
Slika 2: Pod kutom view of the Ken-A-Vision T-17541C Digital CoreScope 2 Compound Microscope, highlighting the compact design and the position of the objective lenses and stage.
5. Postavljanje
- Raspakiranje: Carefully remove the microscope and all accessories from the packaging.
- Plasman: Postavite mikroskop na stabilnu, ravnu površinu, dalje od izravne sunčeve svjetlosti, prekomjerne topline ili vibracija.
- Priključak za napajanje: Connect the provided power supply to the microscope and then plug it into a standard electrical outlet (120-240V). The microscope can also be powered via a low voltage USB computer connection.
- Instalacija softvera: For digital imaging, install the Applied Vision 4 software on your computer. The software is compatible with Windows (XP SP2 or later, Vista, 7), Mac (OS 10.5 or later), and Linux. Follow the on-screen instructions during installation.
- USB veza: Connect the microscope's built-in USB port to your computer using a USB cable. This connection enables the digital camera functionality and can also provide power.
- Ukloni poklopac: Remove the microscope cover before use.
6. Upute za rad
- Uključivanje: Turn on the microscope using the on/off switch for the LED illumination.
- Podešavanje osvjetljenja: Use the dimmer control to adjust the brightness of the LED light to a comfortable level for viewing your specimen.
- Mjesto uzorka: Place your prepared slide on the floating stage, securing it with the spring-loaded clips.
- Odaberite cilj: Rotate the nosepiece to select the desired objective lens (4x, 10x, or 40xS). Start with the lowest magnification (4x) for initial viewing.
- Fokusiranje:
- Koristite coarse focus knob (larger knob) to bring the specimen into approximate focus.
- Zatim upotrijebite fine focus knob (smaller knob) for precise focusing and to achieve a sharp image.
- Podešavanje okulara: Adjust the variable diopter on the eyepiece for optimal visual clarity.
- Rotate Head: The monocular head can be rotated 360 degrees for shared viewing or comfortable positioning.
- Digital Imaging (with software):
- Ensure the microscope is connected to your computer via USB and the Applied Vision 4 software is running.
- The software will display the live feed from the 1.3 MP HD CMOS camera.
- Use the software interface to capture still images or record video. Refer to the Applied Vision 4 software manual for detailed instructions on its features.
- Isključivanje: When finished, turn off the LED illumination and disconnect the power supply. Cover the microscope with the provided dust cover.
7. Održavanje
- Čišćenje organizma: Obrišite tijelo mikroskopa mekom,amp tkanina. Izbjegavajte korištenje jakih kemikalija ili otapala.
- Čišćenje leća: Use a soft lens brush to remove dust. For smudges, use a specialized lens cleaning solution and lens paper. Do not use abrasive materials.
- Skladištenje: Always cover the microscope with the dust cover when not in use to protect it from dust and debris. Store in a dry environment.
- Kontrola vlažnosti: The objective lenses are designed with humidity and climate control protection, but prolonged exposure to extreme conditions should be avoided.
8. Rješavanje problema
- Bez osvjetljenja: Check if the power supply is properly connected and the on/off switch is engaged. Ensure the dimmer is not set to its lowest setting.
- Slika je mutna: Adjust both the coarse and fine focus knobs. Ensure the objective lens is properly clicked into place. Clean the eyepiece and objective lenses if smudges are present.
- No Image on Computer Screen: Verify the USB cable is securely connected to both the microscope and the computer. Ensure the Applied Vision 4 software is installed and running correctly. Check your computer's device manager to confirm the camera is recognized.
- Specimen Not Centered: Gently adjust the position of the slide on the floating stage.
9. Specifikacije
| Značajka | Specifikacija |
|---|---|
| Broj modela | T-17541C |
| Viewkonfiguracija | Monocular with 45-degree incline, 360-degree rotation |
| Okular | 10x widefield with pointer |
| Objektivi | 4x, 10x, 40xS DIN Achromatic |
| Maksimalno povećanje | 400x |
| Osvjetljenje | Bright and cool LED white light with dimmer and on/off switch |
| Fokus | Coaxial coarse and fine focus |
| Digitalna kamera | 1.3 MP, 720P HD CMOS, USB 2.0 |
| Kompatibilnost softvera | Applied Vision 4 (Windows XP SP2+, Vista, 7; Mac OS 10.5+; Linux) |
| Stage | Round floating stage with 2 spring-loaded clips |
| Izvor napajanja | Niski volumentage USB computer connection or external USB power plug, 120-240V |
| Materijal | Aluminij |
| Dimenzije proizvoda (V x Š x D) | 40.0 x 30.48 x 22.86 cm (15.75 x 12 x 9 inča) |
| Težina | 2.31 kg (5.1 lb) |
| Certifikati | ISO:9001 – 2000, CE, CSA, RoHS |
10. Jamstvo i podrška
The Ken-A-Vision T-17541C Digital CoreScope 2 Compound Microscope is manufactured by Ken-A-Vision Manufacturing, headquartered in Kansas City, MO. For warranty information, technical support, or service inquiries, please refer to the official Ken-A-Vision website or contact their customer service department directly. Please have your model number (T-17541C) and purchase date available when contacting support.