
Uvod
This manual provides detailed instructions for the setup, operation, and maintenance of your Digoo DG-C3 Wireless Weather Station. This device integrates a hygrometer, thermometer, weather forecast station, and alarm clock functions, offering comprehensive environmental monitoring and timekeeping capabilities. Please read this manual thoroughly before using the product to ensure correct operation and to maximize its features.
Sadržaj paketa
- Digoo DG-C3 Wireless Weather Station Unit
- USB kabel za napajanje
- Korisnički priručnik (ovaj dokument)
Napomena: Baterije (3x AAA) nisu uključene i moraju se kupiti zasebno.
Proizvod gotovview
Familiarize yourself with the various components of your Digoo DG-C3 weather station.
Prednji zaslon
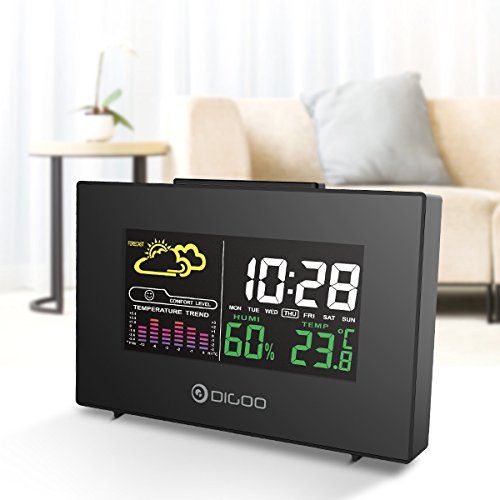
The front display features a color backlit screen showing the current time, day of the week, indoor humidity, indoor temperature, and a weather forecast icon. It also includes a comfort level indicator and a temperature trend graph.
- Vrijeme i datum: Digital display of current time and day.
- Vremenska prognoza: Ikone koje označavaju predviđene vremenske uvjete (npr. sunčano, oblačno, kišovito).
- Razina udobnosti: Indicates indoor comfort based on temperature and humidity.
- Temperature Trend: Bar graph showing recent temperature changes.
- Vlažnost: Percentage display of indoor humidity.
- Temperatura: Digital display of indoor temperature (Celsius or Fahrenheit).
Stražnja ploča
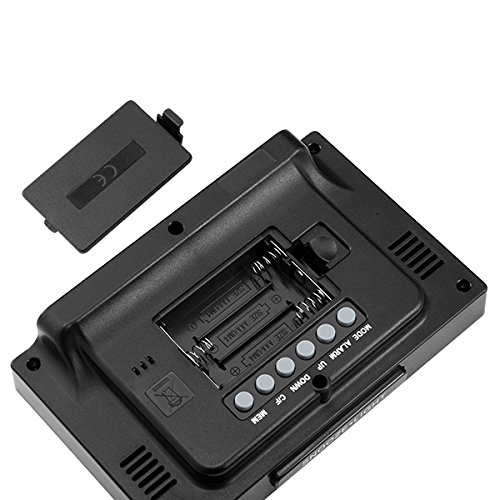
The back of the unit houses the battery compartment and various control buttons for setting the device.
- Odjeljak za baterije: Holds 3x AAA batteries for power backup.
- Gumb MODE: Used to switch between display modes and enter setting mode.
- Gumb ALARM: Koristi se za postavljanje i aktiviranje/deaktiviranje alarma.
- Gumb GORE: Used to increase values during settings or view maximum records.
- Tipka DOLJE: Used to decrease values during settings or view minimum records.
- Gumb °C/°F: Prebacuje se između Celzijusa i Fahrenheita temperaturnih jedinica.
- Gumb MEM: Naviknut view memory records for temperature and humidity.
Gornja ploča
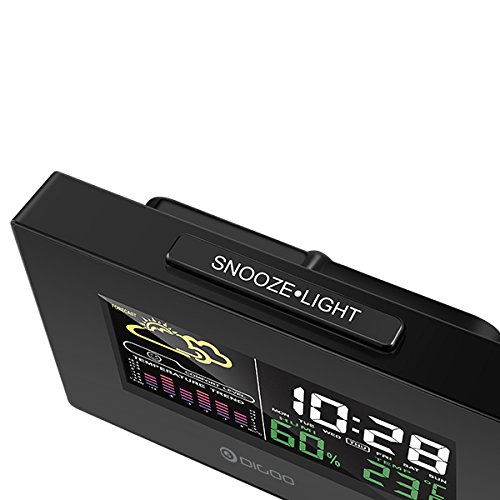
The top of the unit features a single button for snooze and backlight functions.
- SNOOZE·LIGHT Button: Press to activate the backlight or snooze the alarm.
Postavljanje
1. Uključivanje
- Ugradnja baterije: Open the battery compartment cover on the back of the unit. Insert 3x AAA batteries, ensuring correct polarity (+/-). Close the cover. Batteries provide backup power and allow for portability.
- USB priključak za napajanje: For continuous power and backlight, connect the provided USB cable to the USB port on the unit and to a compatible USB power adapter (not included) or a computer USB port.
- The display will light up and show default settings.
2. Initial Settings (Time, Date, Unit)
- Postavka vremena:
- Pritisnite i držite NAČIN RADA button for approximately 3 seconds to enter time setting mode. The hour digit will flash.
- Koristite UP or DOLJE tipke za podešavanje sata.
- Pritisnite NAČIN RADA again to confirm the hour and move to minute setting. The minute digit will flash.
- Koristite UP or DOLJE tipke za podešavanje minuta.
- Pritisnite NAČIN RADA again to confirm and move to 12/24 hour format selection.
- Koristite UP or DOLJE buttons to select 12-hour or 24-hour format.
- Pritisnite NAČIN RADA za potvrdu i izlaz iz podešavanja vremena.
- Postavljanje datuma:
- Nakon postavljanja vremena pritisnite NAČIN RADA again to enter date setting mode. The year will flash.
- Koristite UP or DOLJE tipke za podešavanje godine.
- Pritisnite NAČIN RADA to confirm and move to month setting.
- Koristite UP or DOLJE tipke za podešavanje mjeseca.
- Pritisnite NAČIN RADA to confirm and move to day setting.
- Koristite UP or DOLJE tipke za podešavanje dana.
- Pritisnite NAČIN RADA to confirm and exit date setting.
- Odabir jedinice temperature:
- Pritisnite tipku ° C / ° F button on the back of the unit to switch between Celsius (°C) and Fahrenheit (°F) temperature display.
Upute za rad
1. Funkcija budilice
- Postavljanje alarma:
- Pritisnite tipku ALARM jednom pritisnite tipku za prikaz trenutnog vremena alarma.
- Pritisnite i držite ALARM button for approximately 3 seconds. The hour digit will flash.
- Koristite UP or DOLJE tipke za podešavanje sata alarma.
- Pritisnite ALARM again to confirm the hour and move to minute setting. The minute digit will flash.
- Koristite UP or DOLJE tipke za podešavanje minuta alarma.
- Pritisnite ALARM za potvrdu i izlaz iz postavke alarma.
- Aktiviranje/deaktiviranje alarma:
- Dok ste u normalnom načinu prikaza vremena, pritisnite ALARM button repeatedly to toggle the alarm ON or OFF. An alarm icon will appear on the display when the alarm is active.
- Odgoda funkcija:
- Kad se oglasi alarm, pritisnite DRIJEMKA·SVJETLO button on the top of the unit to activate the snooze function. The alarm will temporarily stop and sound again after a few minutes (typically 5-10 minutes).
- To stop the alarm completely, press any other button on the back panel.
2. Vremenska prognoza
The weather station provides a weather forecast based on internal atmospheric pressure changes. The forecast icons (e.g., sunny, cloudy, rainy) are predictions for the next 12-24 hours and may not always match local weather services, which use more comprehensive data.
- The forecast icon is displayed on the upper left of the screen.
- The device requires a period of stable operation (typically 24 hours) to calibrate and provide accurate forecasts.
3. Prikaz temperature i vlažnosti
- The current indoor temperature and humidity are continuously displayed on the screen.
- Viewing Min/Max Records:
- Pritisnite tipku MEM button once to display the maximum recorded temperature and humidity.
- Pritisnite MEM again to display the minimum recorded temperature and humidity.
- Pritisnite MEM a third time to return to current readings.
- To clear the min/max records, press and hold the MEM tipku na 3 sekunde viewuvođenje zapisa.
4. Upravljanje pozadinskim osvjetljenjem
- When powered by USB, the backlight will remain on.
- When powered by batteries only, press the DRIJEMKA·SVJETLO button to temporarily activate the backlight for a few seconds.
Održavanje
- Čišćenje: Wipe the unit with a soft, dry cloth. Do not use abrasive cleaners or solvents. Avoid getting moisture into the unit.
- Zamjena baterije: When the display becomes dim or functions irregularly, replace the 3x AAA batteries in the back compartment. Ensure correct polarity.
- Skladištenje: If not using the device for an extended period, remove the batteries to prevent leakage. Store in a cool, dry place.
Rješavanje problema
| Problem | Mogući uzrok | Otopina |
|---|---|---|
| Zaslon je prazan ili taman. | Low batteries or no power connection. | Replace batteries or connect the USB power cable. |
| Netočno vrijeme/datum. | Time/date not set correctly after power loss or initial setup. | Slijedite odjeljak "Početne postavke" za resetiranje vremena i datuma. |
| Vremenska prognoza izgleda netočna. | Device needs calibration time; local conditions may differ from pressure-based forecast. | Allow 24 hours for calibration. Understand that the forecast is based on internal pressure changes. |
| Alarm se ne oglašava. | Alarm is not activated or volume is too low (if adjustable). | Provjerite je li prikazana ikona alarma. Provjerite postavke alarma. |
Tehnički podaci
| Model: | DG-C3 |
| Povezivost: | USB (za napajanje) |
| Izvor napajanja: | 3x AAA Batteries (not included) or USB Power |
| Posebne karakteristike: | Hygrometer, Thermometer, Weather Forecast, Alarm Clock, Color Backlight, Portable |
| Prikaz: | Color Backlit LCD |
| Jedinica temperature: | °C / °F odabirljivo |
Jamstvo i podrška
Za informacije o jamstvu ili tehničku podršku, molimo pogledajte dokumentaciju koju ste dobili prilikom kupnje ili se obratite prodavaču. Sačuvajte račun kao dokaz o kupnji.