
1. Uvod
This manual provides detailed instructions for the installation, operation, and maintenance of your Vibe Powerbox Micro Mono Amplifier, model POWERBOX400.1M-V7. Please read this manual thoroughly before attempting installation or operation to ensure proper use and to prevent damage to the unit or your vehicle's audio system.
The Vibe Powerbox Micro Mono Amplifier is a compact, high-performance Class D amplifier designed for car audio systems. It delivers up to 400W RMS, making it suitable for powering subwoofers. Its small footprint allows for flexible installation options.
2. Sigurnosne informacije
- Uvijek odspojite negativni pol akumulatora vozila prije početka bilo kakvih električnih radova.
- Ensure all wiring is correctly routed and secured to prevent damage from moving parts or sharp edges.
- Use appropriate gauge wiring for power and speaker connections as specified in this manual to prevent overheating and potential fire hazards.
- Nemojte montirati ampuređaj na mjestima izloženim izravnoj sunčevoj svjetlosti, prekomjernoj toplini, vlazi ili prašini.
- Ako niste sigurni u bilo koji dio postupka instalacije, obratite se profesionalnom instalateru auto audio sustava.
- Upravljanje amplifier at excessively high volumes for prolonged periods can cause hearing damage.
3. Sadržaj paketa
Prije nego što nastavite s instalacijom, provjerite jesu li svi elementi prisutni u paketu:
- Vibe Powerbox Micro Mono Amplifier (POWERBOX400.1M-V7)
- Remote Gain Control Unit
- RCA audio kablovi
- Mounting Hardware (screws, connectors)
- korisnički priručnik

4. Značajke proizvoda
- Class D Micro Amplifier design for high efficiency and compact size.
- Ultra-compact footprint for easy and discreet installation.
- Output: 1 x 400W RMS at 1 ohm, with a maximum output of 800W.
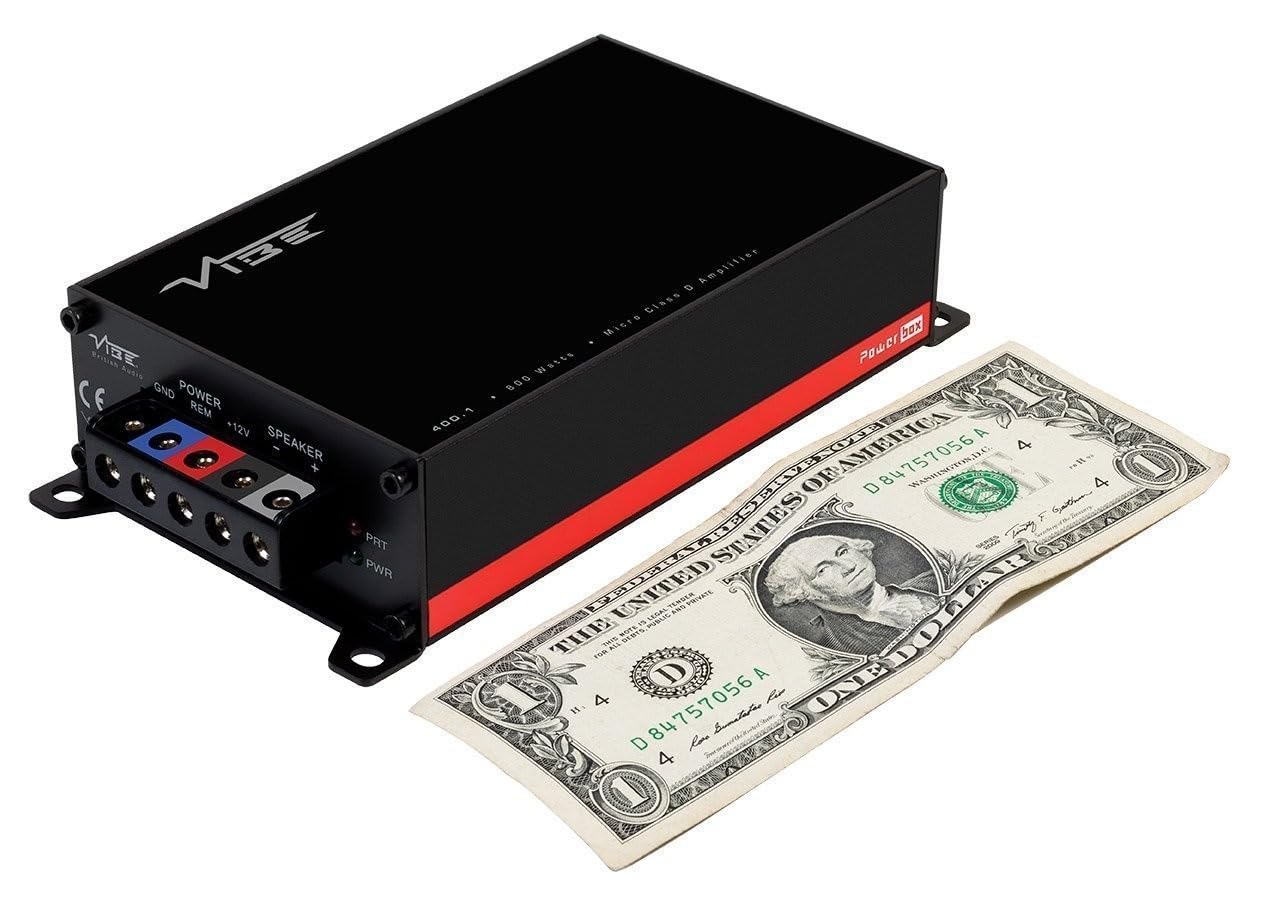
- Dimensions: 37 x 157 x 82mm (approximately 1.46 x 6.18 x 3.23 inches).
- Compatible with Critical Link Rapid kits for simplified integration.
- Features Deltabox™ Connectivity auto turn-on.
- VIBE Sound Studio™ Active crossovers.
- 1 Ohm Stable operation.
5. Identifikacija komponente
5.1 Priključci za napajanje i zvučnike

The power input section includes terminals for Ground (GND), Remote Turn-On (REM), and +12V power. The speaker output section provides terminals for connecting your subwoofer.
5.2 Ulazna i upravljačka ploča
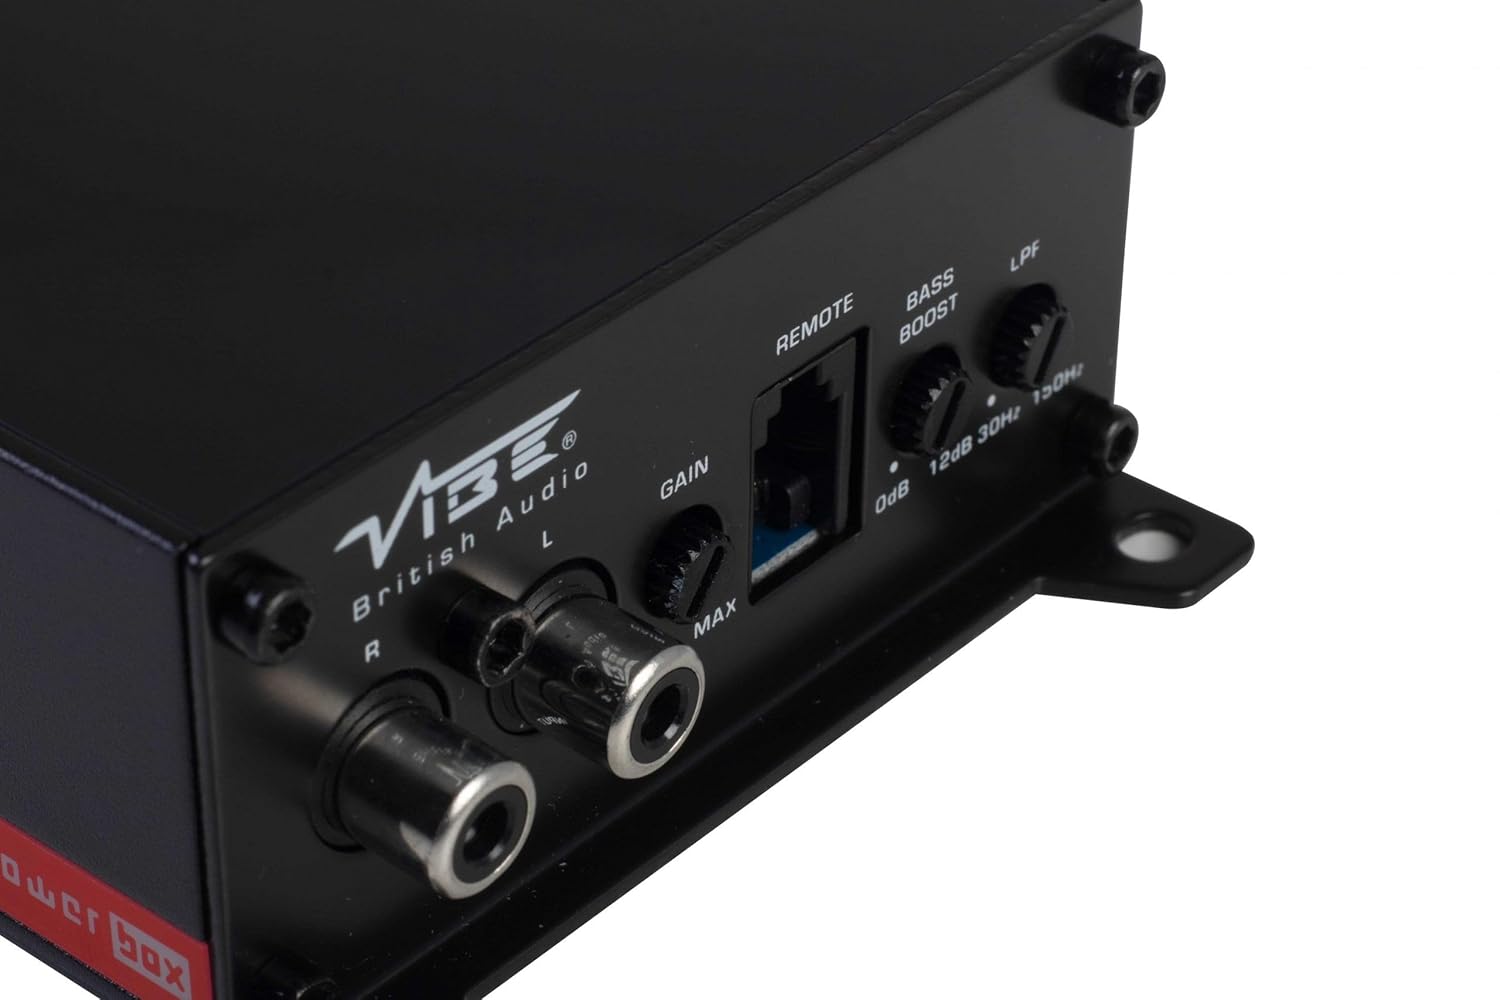
This panel features the RCA input jacks for audio signal, a Gain control knob to match the amplifier's input sensitivity to your head unit's output, a dedicated port for the remote gain control, a Bass Boost switch for enhancing low frequencies, and an LPF (Low Pass Filter) control to adjust the upper frequency limit for the subwoofer.
5.3 Remote Gain Control

The remote gain control unit connects to the amplifier via the 'REMOTE' port and allows for convenient adjustment of the subwoofer's output level from the vehicle's cabin.
6. Postavljanje i instalacija
Proper installation is crucial for optimal performance and safety. If you are not confident in your ability to install the amplifier, seek professional assistance.
6.1 Mjesto montiranja
Choose a mounting location that is dry, well-ventilated, and away from direct heat sources. The compact size of the Powerbox Micro allows for installation under seats, behind trim panels, or in other discreet locations. Ensure there is sufficient airflow around the amplifier za hlađenje.
6.2 Spajanje ožičenja
Ožičenje napajanja:
- Spojite +12V terminal to the vehicle's positive battery terminal using a suitable gauge power cable (e.g., 8 AWG or 10 AWG). Install an in-line fuse holder within 18 inches (45 cm) of the battery.
- Spojite GND terminal to a clean, unpainted metal surface on the vehicle's chassis. Ensure a good electrical connection. The ground cable should be of the same gauge as the power cable and as short as possible.
- Spojite REM (Remote Turn-On) terminal to the remote output of your head unit. This wire signals the amplifier to turn on and off with your stereo. If your head unit lacks a remote output, you can use an accessory wire that turns on with the ignition, or utilize the amplifier's auto-sense feature if applicable.
Ožičenje zvučnika:
- Spojite subwoofer na Izlaz zvučnika terminals (+ and -). Ensure correct polarity. This amplifier is 1 Ohm stable, allowing flexibility in subwoofer impedance configurations. Refer to your subwoofer's specifications for optimal impedance matching.
Signal Input (RCA):
- Connect the RCA output from your head unit or signal processor to the INPUT (L/R) RCA jacks on the ampsredstvo za podsticanje.
Daljinska kontrola pojačanja:
- Plug the remote gain control unit into the dedicated DALJINSKI luka na amplifier. Route the cable to a convenient location for adjustment.
ISO T Harness / ISOAWK Kit:
- For simplified installation with existing stereo looms, an optional ISOAWK kit (available separately) can be used to make the amplifier compatible with an ISO T harness. This allows for plug-and-play integration for audio signal, power, and ground, potentially eliminating the need for separate battery connections.
7. Operacija
7.1 Početno uključivanje
Nakon što su svi spojevi uspostavljeni i provjereni, ponovno spojite akumulator vozila. Uključite glavnu jedinicu. amplifier's power indicator (PWR) should illuminate green. If the protection indicator (PRT) illuminates red, refer to the troubleshooting section.
7.2 Podešavanje pojačanja
The Gain control matches the ampulazna osjetljivost pretvarača na izlazni volumentagvaše glavne jedinice. Za podešavanje pojačanja:
- Okrenite amplifier's Gain control to its minimum (MIN) setting.
- Set your head unit's volume to about 75-80% of its maximum.
- Svirajte dinamičan glazbeni komad.
- Polako povećavajte amplifier's Gain control until you hear distortion, then back it off slightly until the sound is clear.
The remote gain control unit allows for real-time adjustment of the subwoofer level without affecting the main system volume.
7.3 niskopropusni filtar (LPF)
The LPF control sets the upper frequency limit for the amplifier's output. This is essential for subwoofers, ensuring they only reproduce low frequencies. Adjust the LPF knob (typically 30Hz to 150Hz) to blend the subwoofer's output seamlessly with your main speakers. A common starting point is around 80-100Hz.
7.4 Pojačanje basa
The Bass Boost switch provides an adjustable low-frequency enhancement. Use this feature sparingly, as excessive bass boost can lead to distortion and potential damage to your subwoofer. Adjust the boost level (0dB to 12dB) to your preference.
8. Održavanje
- Čišćenje: Povremeno obrišite ampVanjski dio uređaja obrišite mekom, suhom krpom. Nemojte koristiti jake kemikalije ili abrazivna sredstva za čišćenje.
- Veze: Regularly check all power, ground, and speaker connections to ensure they are secure and free from corrosion. Loose connections can cause performance issues or damage.
- Ventilacija: Osigurajte da ampRebra za hlađenje ispušnog uređaja nisu začepljena kako bi se održalo pravilno odvođenje topline.
9. Rješavanje problema
| Problem | Mogući uzrok | Otopina |
|---|---|---|
| Nema napajanja (LED PWR isključen) | Pregorjeli osigurač, labav spoj napajanja/uzemljenja, nema daljinskog signala. | Check in-line fuse, verify +12V, GND, and REM connections. |
| Način zaštite (PRT LED uključen) | Pregrijavanje, kratki spoj u ožičenju zvučnika, preniska impedancija. | Ensure proper ventilation, check speaker wiring for shorts, verify speaker impedance. |
| Nema zvuka | Nema ulaznog signala, pojačanje prenisko, žice zvučnika isključene. | Check RCA input connections, adjust gain, verify speaker wiring. |
| Izobličen zvuk | Gain set too high, LPF incorrectly set, poor ground connection. | Reduce gain, adjust LPF, check ground connection. |
10. Specifikacije
- Broj modela: POWERBOX400.1M-V7
- Ampvrsta dizalice: Klasa D Mono Amplifter
- RMS izlazna snaga: 1 x 400W RMS @ 1 Ohm
- Maksimalna izlazna snaga: 800 W
- Dimenzije proizvoda (D x Š x V): Približno 157 x 82 x 37 mm (6.18 x 3.23 x 1.46 inča)
- Težina: Otprilike 1.54 funti
- Voltage: 12 volti (nominalno)
- Maksimalni opskrbni volumentage: 12 volti
- Vrsta montaže: Površinska montaža
- Proizvođač: Vibe Audio
- Datum prve dostupnosti: 21. srpnja 2018
11. Jamstvo i podrška
Vibe Audio products are designed and manufactured to the highest standards. For warranty information and technical support, please refer to the warranty card included with your product or visit the official Vibe Audio webstranicu. Sačuvajte dokaz o kupnji za slučaj reklamacije.