
1. Uvod
The Vello FreeWave Micro Wireless Remote Shutter Release is designed to trigger your Nikon DSLR camera from a distance, reducing camera shake and enabling various shooting scenarios such as wildlife photography, sports, and self-portraits. This system operates on a 2.4 GHz frequency, offering an extended operating range and reduced radio interference.
The kit includes a compact transmitter and receiver, both designed for portability and ease of use. The receiver is powered directly by the camera, eliminating the need for additional batteries.
2. Sadržaj paketa
- FreeWave Micro Transmitter
- FreeWave Micro Receiver
- AAA Battery (for Transmitter)
- Uklonjiva vrpca
- Torbica za pohranu
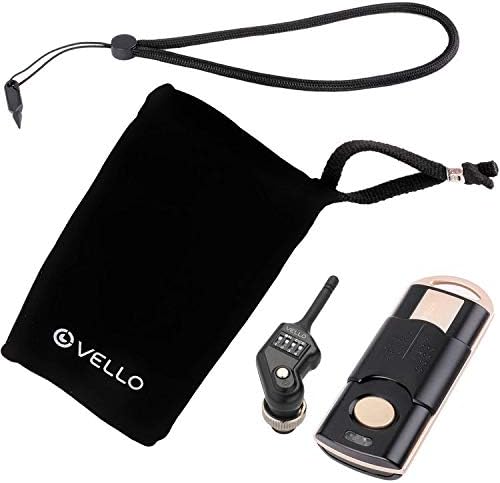
Image: All components of the Vello FreeWave Micro Wireless Remote Shutter Release, including the transmitter, receiver, lanyard, and storage pouch.
3. Postavljanje
3.1. Ugradnja baterije odašiljača
- Pronađite odjeljak za baterije na stražnjoj strani odašiljača.
- Otvorite poklopac odjeljka za baterije.
- Umetnite jednu AAA bateriju, pazeći na ispravan polaritet (+/-).
- Čvrsto zatvorite poklopac odjeljka za baterije.

Image: A hand inserting an AAA battery into the Vello FreeWave Micro transmitter, showing the open battery compartment.
3.2. Attaching the Receiver to Your Camera
- Locate the 10-pin port on your Nikon DSLR camera.
- Align the receiver's connector with the camera's 10-pin port.
- Gently push the receiver into the port and twist the locking ring clockwise to secure it. The receiver draws power directly from the camera.

Slika: Krupni plan view of the Vello FreeWave Micro receiver, highlighting its 10-pin connector for camera attachment.

Image: The Vello FreeWave Micro receiver securely attached to the 10-pin port of a Nikon DSLR camera.
3.3. Odabir kanala
Both the transmitter and receiver feature 16 selectable channels to prevent interference. Ensure both devices are set to the same channel for proper communication.
- On the receiver, use a small pointed object (like the included tool or a pen) to adjust the DIP switches to select a channel.
- On the transmitter, open the battery compartment to access the channel selection switches and set them to match the receiver.
Image: A hand using a small tool to adjust the channel selection switches on the Vello FreeWave Micro receiver, which is attached to a camera.
Image: A hand adjusting the channel switches located inside the battery compartment of the Vello FreeWave Micro transmitter.
4. Upute za rad
4.1. Basic Shutter Release
The transmitter features a dual-function shutter release button:
- Pritisak do pola: Press the button halfway down to activate your camera's autofocus and metering system. The Focus LED on the transmitter will illuminate.
- Cijeli tisak: Press the button completely down to trigger the camera's shutter. The Shutter LED on the transmitter will illuminate.

Image: A hand holding the Vello FreeWave Micro transmitter, aiming it towards a Nikon DSLR camera, demonstrating remote triggering.
4.2. Bulb Mode Shooting
For long exposures, set your camera to Bulb mode. Press and hold the transmitter's shutter release button for the desired exposure time. Release the button to end the exposure.
4.3. Kontinuirano snimanje
Set your camera to continuous shooting mode. Half-press the transmitter button to focus, then fully press and hold the button to capture a series of images. Release the button to stop continuous shooting.
4.4. Advanced Timer Functions (Demonstration with similar product)
While the Vello FreeWave Micro offers core remote shutter functions, other advanced timer features like delay, interval, and long exposure timers are common in similar devices. The following video demonstrates these capabilities using a comparable product, providing insight into potential advanced usage scenarios.
Video: Demonstration of various shooting modes and timer functions (single, continuous, bulb, 2-second delay, self-timer, long exposure, interval timer, number of exposures, auto bracketing, and lock key) using an AODELAN Wireless Shutter Release Timer Remote Control. This video illustrates functionalities that may be present or similar in the Vello FreeWave Micro.
Video: A PROfezzion Wireless Shutter Remote Control demonstrating battery installation, pairing, single shot, continuous shot, bulb shot, and 5-second delay. It also shows the receiver acting as a cable switch and a removable clip for attachment.
5. Održavanje
5.1. Čišćenje
Wipe the transmitter and receiver with a soft, dry cloth. Do not use abrasive cleaners or solvents. Avoid exposing the devices to excessive moisture.
5.2. Zamjena baterije
Replace the AAA battery in the transmitter when the indicator light dims or the device fails to respond. Refer to section 3.1 for battery installation instructions.
5.3. Skladištenje
When not in use for extended periods, remove the battery from the transmitter to prevent leakage. Store the remote in the provided pouch in a cool, dry place away from direct sunlight and extreme temperatures.
6. Rješavanje problema
- Device not triggering camera:
- Ensure both transmitter and receiver are set to the same channel.
- Provjerite bateriju odašiljača i po potrebi je zamijenite.
- Verify the receiver is securely connected to the camera's 10-pin port.
- Confirm your camera is powered on and in a compatible shooting mode.
- Ograničeni domet ili povremena veza:
- Provjerite da nema značajnih prepreka između odašiljača i prijemnika.
- Move away from sources of strong radio interference (e.g., Wi-Fi routers, other wireless devices).
- Try switching to a different channel.
- LED indikatori ne rade:
- Provjerite bateriju odašiljača.
- Ensure the receiver is properly connected to the camera, as it is camera-powered.
7. Specifikacije
| Značajka | Opis |
|---|---|
| Model | FWM-N2 |
| Bežična frekvencija | 2.4 GHz |
| Kanali | 16 |
| Bežični raspon | Up to 328' / 100 m |
| Izvor napajanja prijemnika | Fotoaparat |
| Dimenzije prijemnika | 2.3 x 0.9 x 0.9" / 58.4 x 22.9 x 22.9 mm |
| Težina prijemnika | 0.35 oz / 10 g |
| Izvor napajanja odašiljača | 1 x AAA baterija |
| Dimenzije odašiljača | 3.2 x 1.3 x 0.7" / 81.3 x 33.0 x 17.8 mm |
| Težina odašiljača | 0.6 oz / 17 g |
| Povezivanje kamere | Nikon 10-pin |
8. Jamstvo
This Vello product is warranted to the original purchaser to be free from defects in materials and workmanship under normal consumer use for a period of one (1) year from the original purchase date or thirty (30) days after replacement, whichever occurs later. The provider's responsibility with respect to this limited warranty shall be limited solely to repair or replacement, at its option, of any product that fails during normal use of this product in its intended manner and in its intended environment.
9. Podrška
For technical support or warranty service, please contact Vello customer service. Keep your proof of purchase for warranty claims.