Uvod
This manual provides comprehensive instructions for the setup, operation, and maintenance of your Reloop RP-7000 MK2 Professional Upper Torque Turntable System. Please read this manual thoroughly before using the product to ensure proper functionality and longevity.
Sigurnosne upute
- Ensure the turntable is placed on a stable, level surface away from direct sunlight, heat sources, and excessive moisture.
- Ne izlažite uređaj kiši ili vlazi kako biste spriječili požar ili strujni udar.
- Always disconnect the power cord from the outlet before cleaning or performing any maintenance.
- Ne pokušavajte sami servisirati uređaj. Za sve servisne radove obratite se kvalificiranom servisnom osoblju.
- Čuvati izvan dohvata djece.
Sadržaj paketa
Your Reloop RP-7000 MK2 Professional Upper Torque Turntable System package should include the following items:
- 2 x Reloop RP-7000 MK2 Professional Upper Torque Turntable System
- 2 x Reloop Dust Cover for RP-7000/8000
- Knox Gear Vinyl Record Care System (includes brush, velvet cleaner, stylus brush, and cleaning solution)
- Kablovi za napajanje
- RCA kablovi
- Protuutezi
- Slipmats
- korisnički priručnik

Image: The complete bundle including two Reloop RP-7000 MK2 turntables, two dust covers, and the Knox Gear vinyl record care solution.
Postavljanje
1. Raspakiranje i postavljanje
Carefully remove all components from the packaging. Place the turntable on a flat, stable surface. Ensure there is adequate space around the unit for ventilation and cable connections.

Slika: Kutna view of the Reloop RP-7000 MK2 turntable, highlighting its main components.
2. Attaching the Dust Cover
Gently place the dust cover onto the turntable. The dust cover helps protect the platter and tonearm from dust and debris when the turntable is not in use.
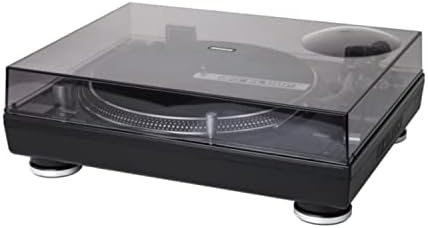
Image: The Reloop RP-7000 MK2 turntable with its protective dust cover in place.
3. Spajanje audio kabela
Connect the RCA cables from the turntable's output to the appropriate input on your mixer or amplifier. Ensure the ground wire is also connected to prevent hum.

Image: Rear panel of the Reloop RP-7000 MK2, displaying the RCA audio outputs, ground terminal, and power connection.
4. Priključak za napajanje
Connect the power cable to the turntable and then to a suitable power outlet. Ensure the power switch is in the OFF position before connecting.
Upute za rad
1. Uključivanje i isključivanje
To power on the turntable, flip the power switch located on the front left side to the ON position. To power off, flip the switch back to OFF.

Slika: Nadzemna view of the Reloop RP-7000 MK2 turntable, illustrating the arrangement of its controls and components.
2. Reprodukcija zapisa
- Stavite ploču na tanjur.
- Select the appropriate speed (33, 45, or 78 RPM) using the speed buttons.
- Pritisnite tipku START/STOP gumb za početak rotacije tanjura.
- Carefully lower the tonearm onto the record using the cue lever.

Image: The Reloop RP-7000 MK2 turntable with a record playing, demonstrating the tonearm's position.
3. Pitch Control and Reverse Function
Use the pitch fader to adjust the playback speed. The OBRNUTI button allows for reverse playback of the record.
Održavanje
1. Čišćenje gramofona
Regularly wipe the turntable's surface with a soft, dry cloth. For the dust cover, use a slightly damp cloth and avoid abrasive cleaners. The included Knox Gear Vinyl Record Care System can be used for cleaning records and the stylus.

Image: The Knox Gear Vinyl Record Care System, showing the velvet record brush, stylus brush, and cleaning solution bottle.
2. Njega olovke
Gently clean the stylus using the provided stylus brush. Always brush from back to front. A dirty stylus can degrade sound quality and damage records.
Rješavanje problema
| Problem | Mogući uzrok | Otopina |
|---|---|---|
| Nema struje | Kabel za napajanje nije spojen; utičnica je neispravna | Provjerite priključak kabela za napajanje; pokušajte s drugom utičnicom |
| Nema zvuka | RCA cables not connected; Amplifier/mixer input incorrect; Stylus damaged | Check RCA connections; Select correct input on amplifier/mixer; Inspect and replace stylus if necessary |
| Pjevušenje | Ground wire not connected; Interference | Ensure ground wire is securely connected; Move turntable away from other electronic devices |
| Netočna brzina reprodukcije | Wrong speed selected; Pitch fader not centered | Select correct RPM; Adjust pitch fader to center position |
Tehnički podaci
- Marka: Ponovno petlja
- Model: RP-7000 MK2
- Tehnologija povezivanja: Ožičeno
- Posebne karakteristike: Balanced S-shaped Tone Arm, Dual Start/Stop Buttons, Precise Motor Control, Reverse Function, Freely Movable Aluminum LED Target Light
- Materijal: Plastični
- Težina artikla: 4.5 Kilograms (per turntable)
- Boja: Deep black or classic silver metallic
- Kompatibilni uređaji: Zvučnik, slušalice
Jamstvo i podrška
Reloop products are designed and manufactured to the highest quality standards. For warranty information and technical support, please refer to the official Reloop webstranicu ili se obratite lokalnom distributeru. Sačuvajte dokaz o kupnji za slučaj zahtjeva za jamstvo.
Za dodatnu pomoć posjetite Reloop Store on Amazon.