
1. Uvod
This manual provides detailed instructions for the safe and efficient operation of your InFocus P120 INL412 Multimedia Projector (Model INL4128). Please read this manual thoroughly before using the projector and keep it for future reference. This projector is designed for high-quality image projection, suitable for various applications including presentations, home entertainment, and gaming.
2. Sigurnosne informacije
Pridržavajte se sljedećih sigurnosnih mjera opreza kako biste spriječili oštećenje projektora i osigurali sigurnost korisnika:
- Ventilacija: Osigurajte odgovarajuću ventilaciju oko projektora. Ne blokirajte ventilacijske otvore. Održavajte minimalnu udaljenost od 30 cm (12 inča) od zidova ili drugih predmeta.
- Izvor napajanja: Koristite samo navedeni izvor napajanja i glasnoćutage. Čvrsto spojite kabel za napajanje.
- toplina: The projector generates heat during operation. Do not touch the projector's vents or exhaust areas directly after use.
- Svjetlost: Ne gledajte izravno u objektiv projektora kada je lamp je uključen, jer intenzivno svjetlo može uzrokovati oštećenje oka.
- Plasman: Projektor postavite na stabilnu, ravnu površinu. Izbjegavajte postavljanje na izravnu sunčevu svjetlost, u blizinu izvora topline ili na mjesta s visokom vlagom ili prašinom.
- Čišćenje: Prije čišćenja isključite kabel za napajanje. Koristite meku, suhu krpu. Nemojte koristiti tekuća ili aerosolna sredstva za čišćenje.
- Servisiranje: Ne pokušavajte sami servisirati projektor. Za sve servisne radove obratite se kvalificiranom servisnom osoblju.
3. Proizvod je gotovview
3.1 Top Panel and Lens Area
The top panel features the control buttons for basic operation and the lens area with focus and zoom adjustments.

Slika 3.1: Vrh view of the InFocus P120 INL412 projector, highlighting the control panel on the right and the lens adjustment area on the left. The InFocus logo is visible on the top surface.
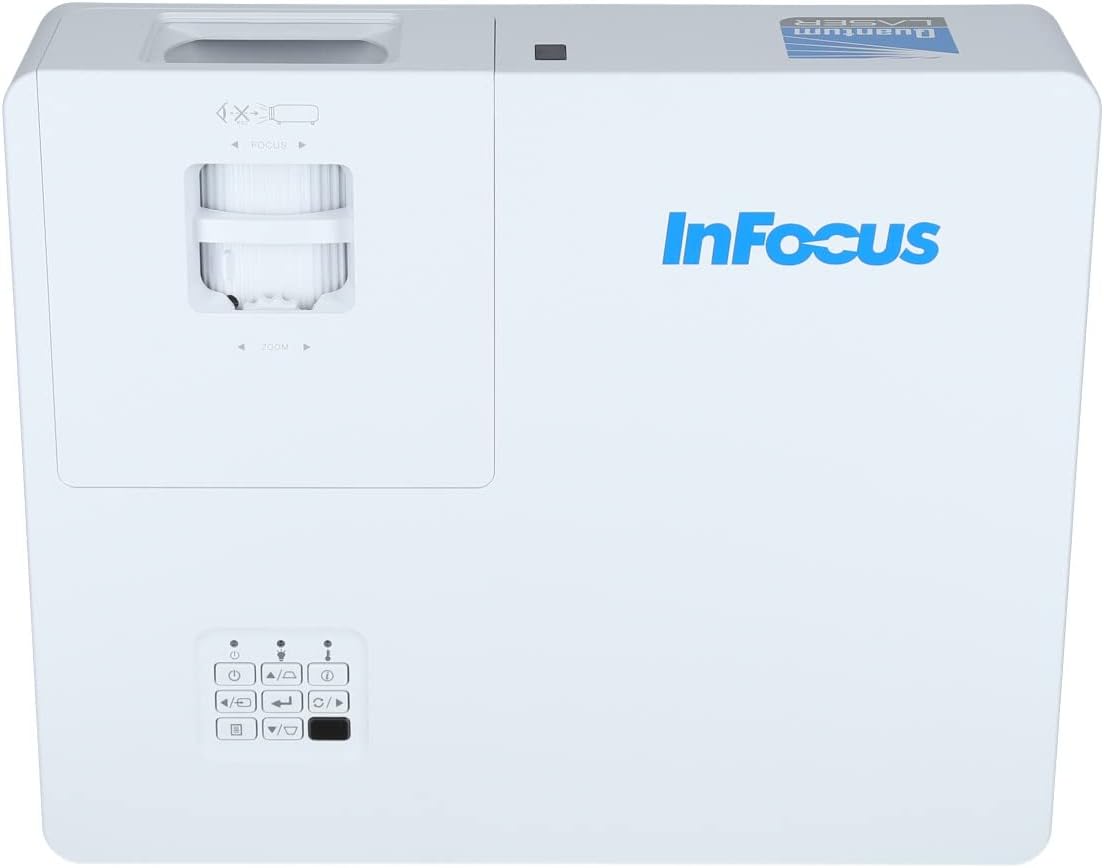
Slika 3.2: Zatvarač view of the projector's top panel, showing the focus and zoom rings near the lens opening and the array of control buttons for power, menu, source selection, and navigation.
3.2 Veze na stražnjoj ploči
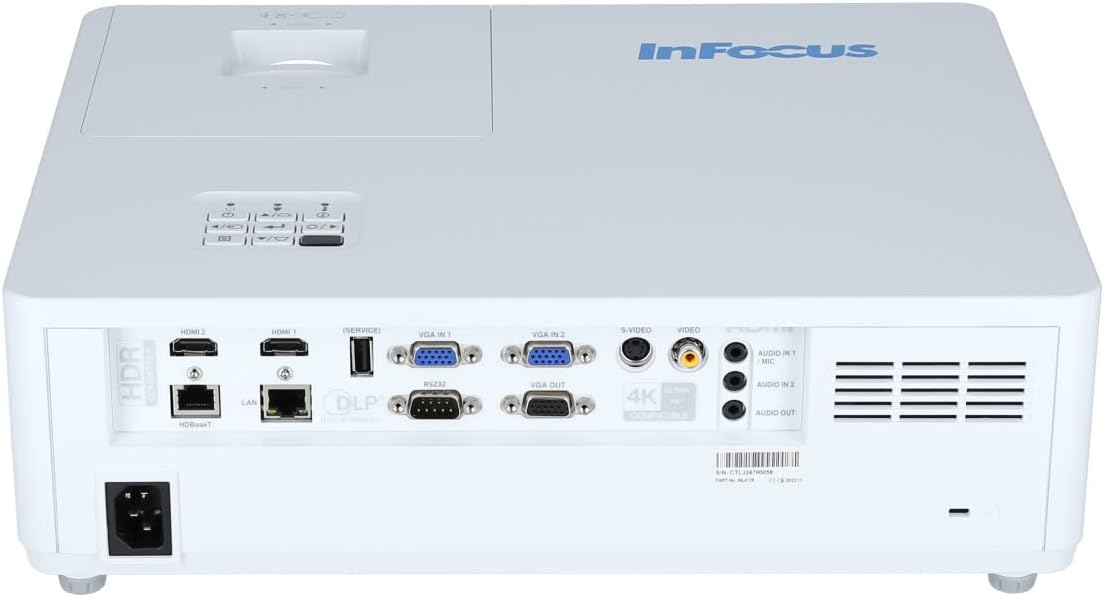
The rear panel provides various input and output ports for connecting external devices.

Figure 3.3: Rear panel of the InFocus P120 INL412 projector, displaying a comprehensive array of connectivity options including HDMI (x2), USB, S-Video, Ethernet (LAN), VGA In (x2), VGA Out, RS232, and Audio In/Out ports. The power input is located on the bottom left.
Ključni pristaništa uključuju:
- HDMI 1 i 2: For connecting high-definition digital video and audio sources.
- USB: For connecting USB devices, potentially for media playback or firmware updates.
- S-video: For connecting older video sources.
- VGA IN 1 & 2: For connecting computers or other devices with VGA output.
- VGA IZLAZ: Za spajanje na vanjski monitor.
- Ethernet (LAN): Za mrežnu povezivost i upravljanje.
- Audio IN 1 & 2 / Audio OUT: Za analogne audio veze.
- 232: Za serijsko upravljanje.
- Ulazna snaga: Za spajanje kabela za izmjenično napajanje.
3.3 Front and Side Panels
The front panel houses the projection lens and front ventilation, while the side panels feature additional ventilation grilles.

Slika 3.4: Prednja strana view of the InFocus P120 INL412 projector, displaying the main projection lens on the right and the extensive front ventilation grille on the left, crucial for heat dissipation.
Slika 3.5: Bočna strana view of the InFocus P120 INL412 projector, illustrating the side ventilation grilles that contribute to maintaining optimal operating temperature.
4. Postavljanje
4.1 Postavljanje projektora
Position the projector on a stable, flat surface or mount it securely. Ensure the projector is within the optimal projection distance for your screen size. Maintain clear space around the projector for proper ventilation.
4.2 Povezivanje uređaja
Before connecting any cables, ensure the projector and all source devices are powered off.
- HDMI veza: Connect an HDMI cable from your source device (e.g., laptop, Blu-ray player, gaming console) to either the HDMI 1 or HDMI 2 port on the projector.
- VGA veza: Connect a VGA cable from your computer to either VGA IN 1 or VGA IN 2. For audio, connect a separate audio cable from your computer's audio output to the corresponding Audio IN port on the projector.
- USB veza: Insert a USB drive into the USB port for media playback (if supported by firmware) or service functions.
- Ethernet (LAN) veza: Connect an Ethernet cable to the LAN port for network control or updates.
- Audio izlaz: If using external speakers, connect an audio cable from the Audio OUT port on the projector to your audio system.
4.3 Priključak za napajanje
Connect the power cord to the projector's power input and then plug the other end into a grounded electrical outlet.
5. Upute za rad
5.1 Uključivanje/isključivanje
- Uključivanje: Pritisnite tipku Vlast button on the projector's control panel or the remote control. The power indicator light will change.
- Isključivanje: Pritisnite tipku Vlast button again. A confirmation message may appear. Press the button a second time to confirm shutdown. Allow the projector to cool down before unplugging it.
5.2 Podešavanje fokusa i zumiranja
Okrećite prsten za fokusiranje oko objektiva dok slika ne postane oštra i jasna. Pomoću prstena za zumiranje prilagodite veličinu slike kako bi odgovarala vašem zaslonu.
5.3 Odabir ulaznog izvora
Pritisnite tipku Izvor button on the control panel or remote control to cycle through available input sources (HDMI 1, HDMI 2, VGA 1, VGA 2, S-Video, USB). Select the input corresponding to your connected device.
5.4 Navigacija izbornikom
Koristite Jelovnik button to access the on-screen display (OSD) menu. Use the arrow buttons to navigate through menu options and the Uđi gumb za odabir. Pritisnite Jelovnik opet za izlaz.
6. Održavanje
6.1 Čišćenje leće
Nježno obrišite leću mekom krpom koja ne ostavlja dlačice, posebno namijenjenom za optičke površine. Nemojte koristiti abrazivna sredstva za čišćenje ili pretjeranu silu jer to može ogrebati leću.
6.2 Cleaning the Projector Exterior
Za čišćenje projektora koristite meku, suhu krpuasing. Za tvrdokornu prljavštinu, dampen the cloth slightly with water, then wipe dry immediately. Avoid getting liquids into the projector's openings.
6.3 Ventilation Care
Regularly check the projector's ventilation grilles for dust accumulation. Use a soft brush or a vacuum cleaner with a brush attachment to gently remove dust from the vents to ensure proper airflow and prevent overheating.
7. Rješavanje problema
7.1 Nema prikazane slike
- Provjerite je li projektor uključen i svijetli li indikator napajanja.
- Verify that the video cable (HDMI, VGA, etc.) is securely connected to both the projector and the source device.
- Provjerite je li na projektoru odabran ispravan ulazni izvor.
- Confirm that the source device (laptop, player) is powered on and outputting a signal.
7.2 Slika je mutna ili izvan fokusa
- Podesite prsten za fokusiranje na objektivu projektora dok slika ne postane oštra.
- Provjerite je li projektor na ispravnoj udaljenosti od platna.
- Očistite leću projektora ako je prljava.
7.3 Nema zvuka
- If using HDMI, ensure the source device's audio output is set to HDMI.
- If using VGA, ensure a separate audio cable is connected from the source to the projector's Audio IN port.
- Provjerite postavke glasnoće i na projektoru i na izvornom uređaju.
- If using external speakers, ensure they are properly connected to the Audio OUT port and powered on.
8. Specifikacije
| Značajka | Detalj |
|---|---|
| Marka | InFocus |
| Proizvođač | U fokusu |
| Naziv modela | P120 INL412 |
| Broj modela | INL4128 |
| Godina | 2023 |
| Hardversko sučelje | Ethernet, HDMI, S-Video, USB |
| Broj stavki | 1 |
| Omjer slike | 16:9 |
| Wattage | 341 vata |
| Baterije uključene | Ne |
| Potrebne baterije | Ne |
| Form Factor | Radna površina |
| Vrsta montaže | Stolni nosač |
| Daljinski upravljač uključen | Da |
| Dimenzije proizvoda | 56.13 x 46.48 x 25.15 cm |
| Težina artikla | 5.5 kg |
| Maksimalna veličina slike | 308.28 inča |
| Minimalna veličina slike | 910.63 milimetara |
| Prvi dostupan datum | 5. siječnja 2022 |
9. Jamstvo i podrška
For warranty information and technical support, please refer to the documentation included with your purchase or visit the official InFocus webstranicu. Sačuvajte dokaz o kupnji za slučaj reklamacije.