
1. Uvod
The Beelink SER3 Mini PC is a compact and powerful computing solution designed for a variety of tasks, from business applications and home entertainment to online courses and light gaming. Equipped with an AMD Ryzen 3 3200U processor, 16GB of DDR4 RAM, and a 500GB PCIe SSD, it offers efficient performance in a small form factor. This manual provides essential information for setting up, operating, maintaining, and troubleshooting your Mini PC.

Slika 1: Prednja strana view Beelink SER3 Mini PC-ja, prikazanoasing its compact design and accessible front ports.
2. Što je u kutiji
Molimo provjerite sadržaj paketa nakon raspakiranja kako biste bili sigurni da su svi artikli prisutni:
- 1 x Mini računalo
- 1 x HDMI kabel
- 1 x strujni adapter
- 1 x korisnički priručnik

Figure 2: Included accessories for the Beelink SER3 Mini PC.
3. Proizvod je gotovview
3.1. External Features and Ports
The Beelink SER3 Mini PC features a sleek, compact design with strategically placed ports for easy connectivity.
Prednja ploča:
- Gumb za napajanje: Za uključivanje/isključivanje uređaja.
- USB 3.2 priključci (x2): Za brzi prijenos podataka s kompatibilnim uređajima.
- Audio priključak (HP i MIC): Za slušalice i mikrofon.
- CLR CMOS: Button to clear CMOS settings.

Figure 3: Front panel of the Mini PC with power button, USB ports, and audio jack.
Stražnji panel:
- Lokalna mreža (RJ-45): Gigabitni Ethernet priključak za žičanu mrežnu vezu.
- USB 3.2 priključci (x2): Dodatni USB priključci velike brzine.
- HDMI priključci (x2): Supports dual 4K@60Hz display output.
- DC priključak: Za spajanje strujnog adaptera.

Figure 4: Rear panel of the Mini PC with network, USB, HDMI, and power input.
3.2. Unutarnje komponente
The Mini PC is designed for easy access to its internal components for upgrades and maintenance.
Slika 5: Eksplodirano view illustrating the internal structure and components of the Mini PC.
4. Postavljanje
- Povežite periferne uređaje: Connect your keyboard, mouse, and monitor(s) to the appropriate USB and HDMI ports.
- Povežite se na mrežu: For wired connection, plug an Ethernet cable into the LAN port. For wireless, ensure your Wi-Fi network is available during initial setup.
- Priključite napajanje: Plug the power adapter into the DC Jack on the rear panel, then connect it to a power outlet.
- Uključivanje: Pritisnite gumb za napajanje na prednjoj ploči kako biste uključili Mini PC.
5. Upute za rad
- Prvo pokretanje: Upon first boot, the system will guide you through the Windows 11 setup process. Follow the on-screen instructions to configure your language, region, network, and user account.
- Uključivanje/isključivanje: Press the power button once to turn on the device. To shut down, use the standard Windows shutdown procedure (Start Menu > Power > Shut down). A short press on the power button will put the PC to sleep.
- Ponovno pokretanje: Use the standard Windows restart procedure (Start Menu > Power > Restart).
- Dvostruki zaslon: Connect up to two monitors via the HDMI ports for extended desktop functionality.
6. Nadogradnja komponenti
The Beelink SER3 Mini PC allows for easy upgrades of its RAM and storage components.
6.1. Nadogradnja RAM-a
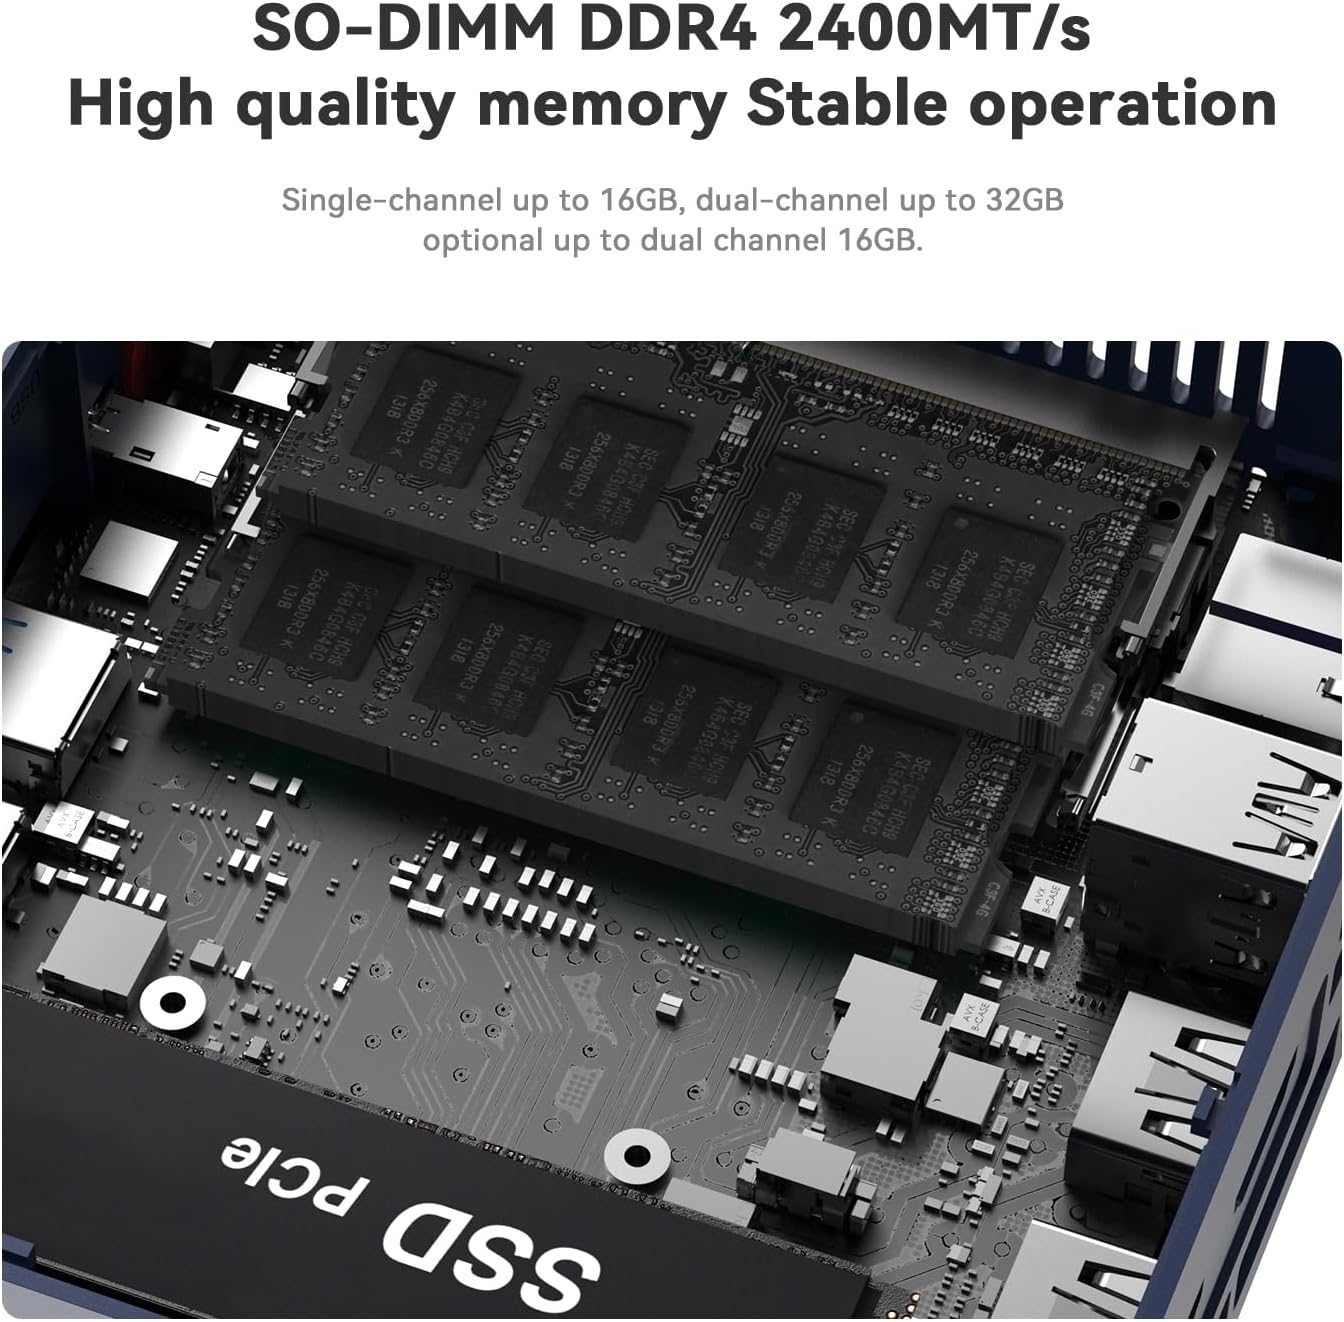
The device comes with 16GB DDR4 RAM (2400MHz) and can be upgraded to a maximum of 32GB (2 x 16GB).
6.2. SSD Upgrade
The Mini PC includes a 500GB M.2 PCIe 3.0 x4 (2280) SSD, which can be upgraded to a maximum of 2TB. It also supports adding a 2.5-inch SATA HDD/SSD (up to 2TB).
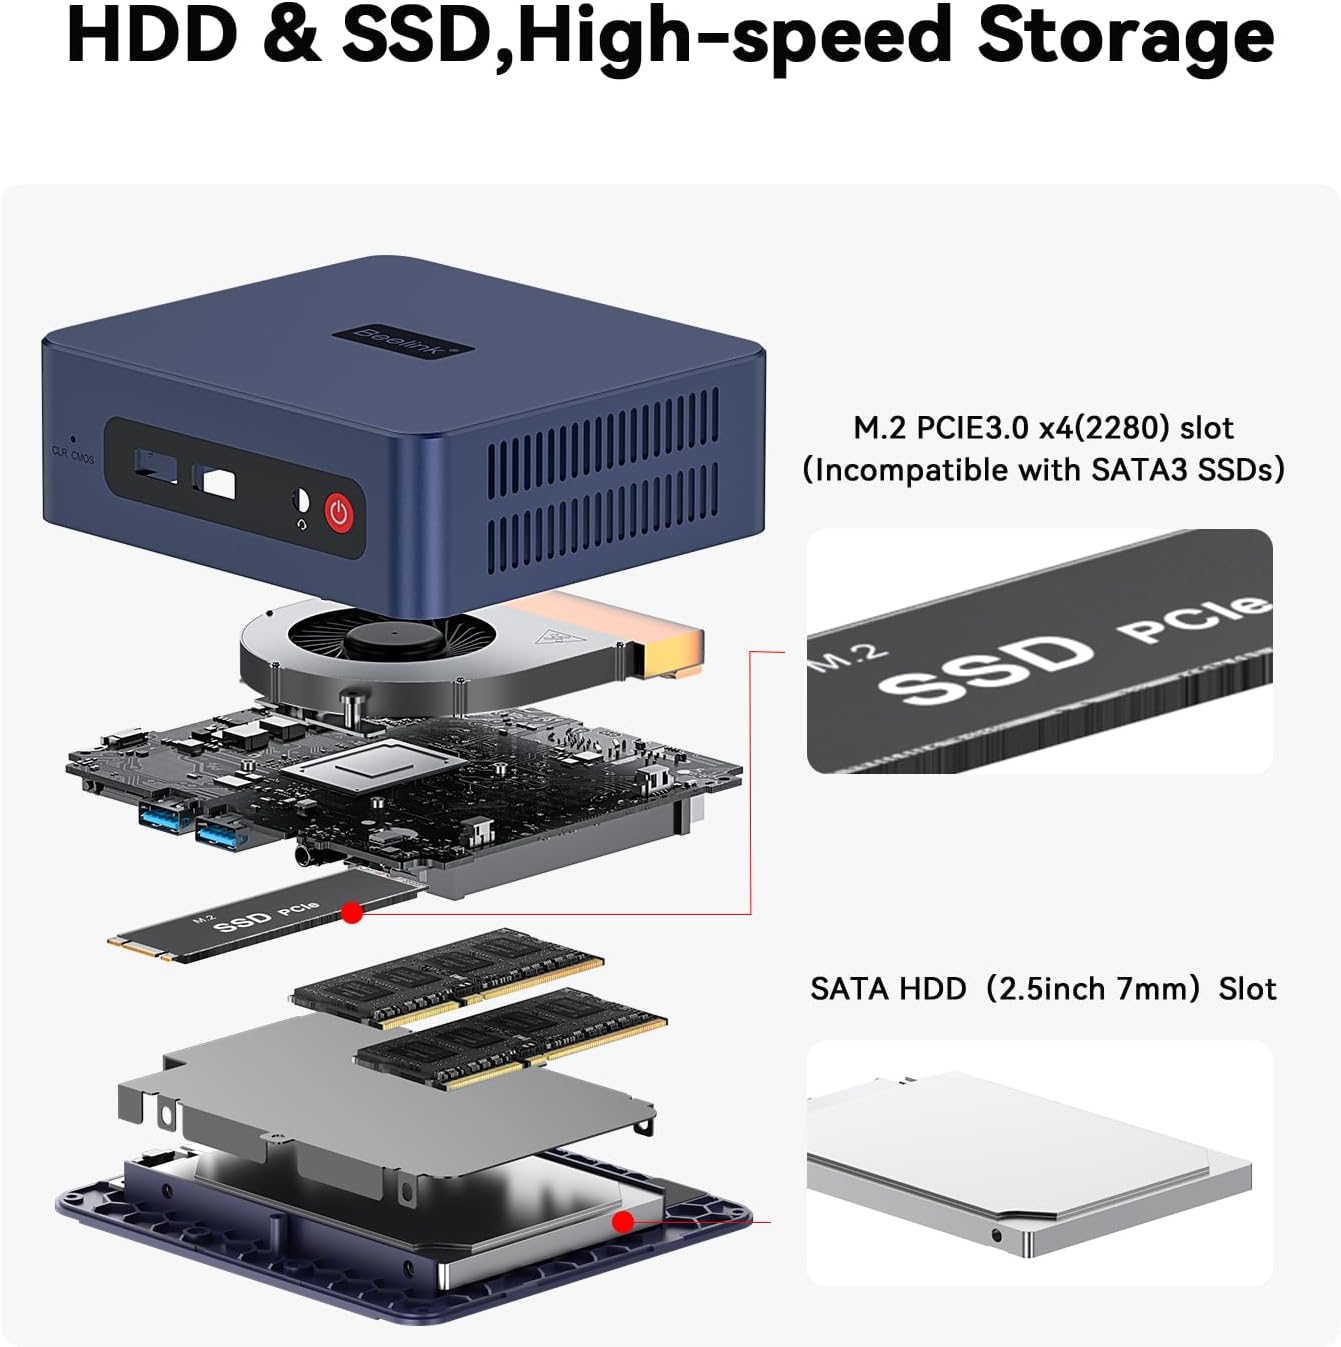
Figure 6: Internal layout highlighting the M.2 SSD and RAM slots for easy upgrades.
6.3. Upgrade Tutorial Video
For a detailed visual guide on upgrading the SSD, please refer to the official tutorial video:
Video 1: Official tutorial on how to replace the SSD in a Beelink Mini PC.
7. Windows 11 Installation
Your Beelink SER3 Mini PC comes pre-installed with Windows 11 Pro. If you need to reinstall the operating system, follow these general steps:
- Prepare Installation Media: Create a bootable USB drive with Windows 11 installation files using the Microsoft Media Creation Tool.
- Pokretanje s USB-a: Connect the bootable USB drive to the Mini PC. Power on the PC and repeatedly press the designated key (usually F7 or DEL, refer to your specific model's quick start guide) to enter the boot menu. Select your USB drive as the boot device.
- Slijedite upute na zaslonu: The Windows setup wizard will guide you through the installation process. Choose your language, time, and keyboard settings. Select the custom installation option to manage disk partitions.
- Disk Partitioning: If reinstalling, you may need to delete existing partitions on your SSD before creating new ones for a clean installation. Ensure you back up any important data beforehand.
- Kompletna instalacija: Follow the remaining prompts to complete the Windows 11 installation. The PC will restart several times.
7.1. Windows 11 Installation Tutorial Video
For a visual guide on installing Windows 11, please watch the official tutorial:
Video 2: Official tutorial demonstrating the steps to install Windows 11 on a Beelink Mini PC.
8. Instalacija upravljačkog programa
After installing Windows 11, it is crucial to install the correct drivers for optimal performance. While Windows Update may install some drivers automatically, it is recommended to download the latest drivers directly from the Beelink support webmjesto.
- Preuzmite upravljačke programe: Visit the official Beelink support webweb mjesto (www.bee-link.com/support). Navigate to the 'Drivers & Downloads' section.
- Locate Your Model: Tražiti 'SER3' or your specific model number to find the relevant drivers.
- Preuzmite i instalirajte: Download all necessary drivers (e.g., chipset, graphics, Wi-Fi, Bluetooth, audio). Unzip them if necessary and follow the installation instructions provided with each driver package. Restart your PC after installing all drivers.
9. Specifikacije
| Značajka | Specifikacija |
|---|---|
| Marka | Beelink |
| Naziv modela | Beelink SER3 |
| Model procesora | AMD Ryzen 3 3200U (2C/4T, do 3.5 GHz) |
| Grafički koprocesor | Radeon Vega 3 Graphics (3core 1200 MHz) |
| RAM memorija | 16 GB DDR4 2400 MHz (mogućnost nadogradnje do 32 GB) |
| tvrdi disk | 500GB M.2 PCIe 3.0 x4 (2280) SSD (Upgradeable to 2TB) |
| Dodatna pohrana | Supports 2.5" SATA HDD/SSD (up to 2TB) |
| Operativni sustav | Windows 11 Pro |
| Bežično povezivanje | WiFi6 (802.11ac), Bluetooth 5.2 |
| LAN | 1000M Gigabit Ethernet |
| Video izlaz | 2 x HDMI (4K@60Hz Dual Display) |
| USB priključci | 4 x USB 3.2 |
| Audio priključak | 1 x Audio Jack (HP&MIC) |
| Metoda hlađenja | Fan, Large fan and dual heat conduction tube |
| Dimenzije | 124x113x42 mm |
10. Rješavanje problema
If you encounter any issues with your Beelink SER3 Mini PC, please refer to the following general troubleshooting tips:
- Bez napajanja: Ensure the power adapter is securely connected to both the PC and a working power outlet. Try a different outlet if necessary.
- Nema zaslona: Check all HDMI cable connections. Ensure your monitor is set to the correct input source. Try a different HDMI cable or monitor.
- Sustav ne reagira: Press and hold the power button for 10 seconds to force a shutdown, then restart the PC. If the issue persists, try clearing the CMOS settings using the CLR CMOS button on the front panel (refer to the quick start guide for location).
- Problemi s mrežom: For wired connections, check the Ethernet cable and router. For Wi-Fi, ensure the network is available and you have the correct password. Update Wi-Fi drivers if needed.
- Problemi s upravljačkim programom: If devices are not working correctly, ensure all drivers are installed and up-to-date from the official Beelink support webmjesto.
11. Jamstvo i podrška
Beelink is committed to providing excellent after-sales service for your Mini PC.
- Jamstvo: Your Beelink SER3 Mini PC comes with a 3-year warranty.
- Tehnička podrška: We offer lifetime technical support.
- Servis nakon prodaje: 24/7 after-sales service is available.
If you have any questions or require assistance, please do not hesitate to contact us. We are 100% guaranteed to solve your problems.
11.1. How to Contact Us Video
For information on how to reach our support team, please watch the following video:
Video 3: Official guide on contacting Beelink customer support.