1. Uvod
This manual provides comprehensive instructions for the installation, operation, and maintenance of the Dngbymx 8.4" Uconnect Touch Screen Digitizer. This product is designed to replace the digitizer panel on compatible Uconnect 4, 4C, UAQ, and UAS 8.4-inch touch screen radios, restoring touch functionality and display clarity.
Namjena proizvoda: The digitizer addresses common issues such as unresponsive touch commands, screen bubbles due to viscous liquid leakage, layering, scratches, and cracked screens, without requiring a full LCD replacement.
1.1 Kompatibilnost
This digitizer is compatible with the following vehicle models equipped with 8.4-inch Uconnect 4, 4C, UAQ, or UAS radios:
- OVAN: 1500, 2500, 3500 Chassis Cab (2018-2022)
- Chrysler: 200, 300 (2017-2022)
- Izvrdati: Challenger (2017-2022), Durango (2018-2022), Charger (2017-2022)
- Džip: Wrangler JL body style only (2018-2021), Compass (2018-2022), Gladiator (2019-2022), Grand Cherokee Summit, Limited, Trailhawk, SRT & Cherokee (2018-2022)
Važno: Vehicle models may have multiple radio variations. Verify your radio model and part number (LA084X01(SL)(01)) before proceeding with installation to ensure compatibility.
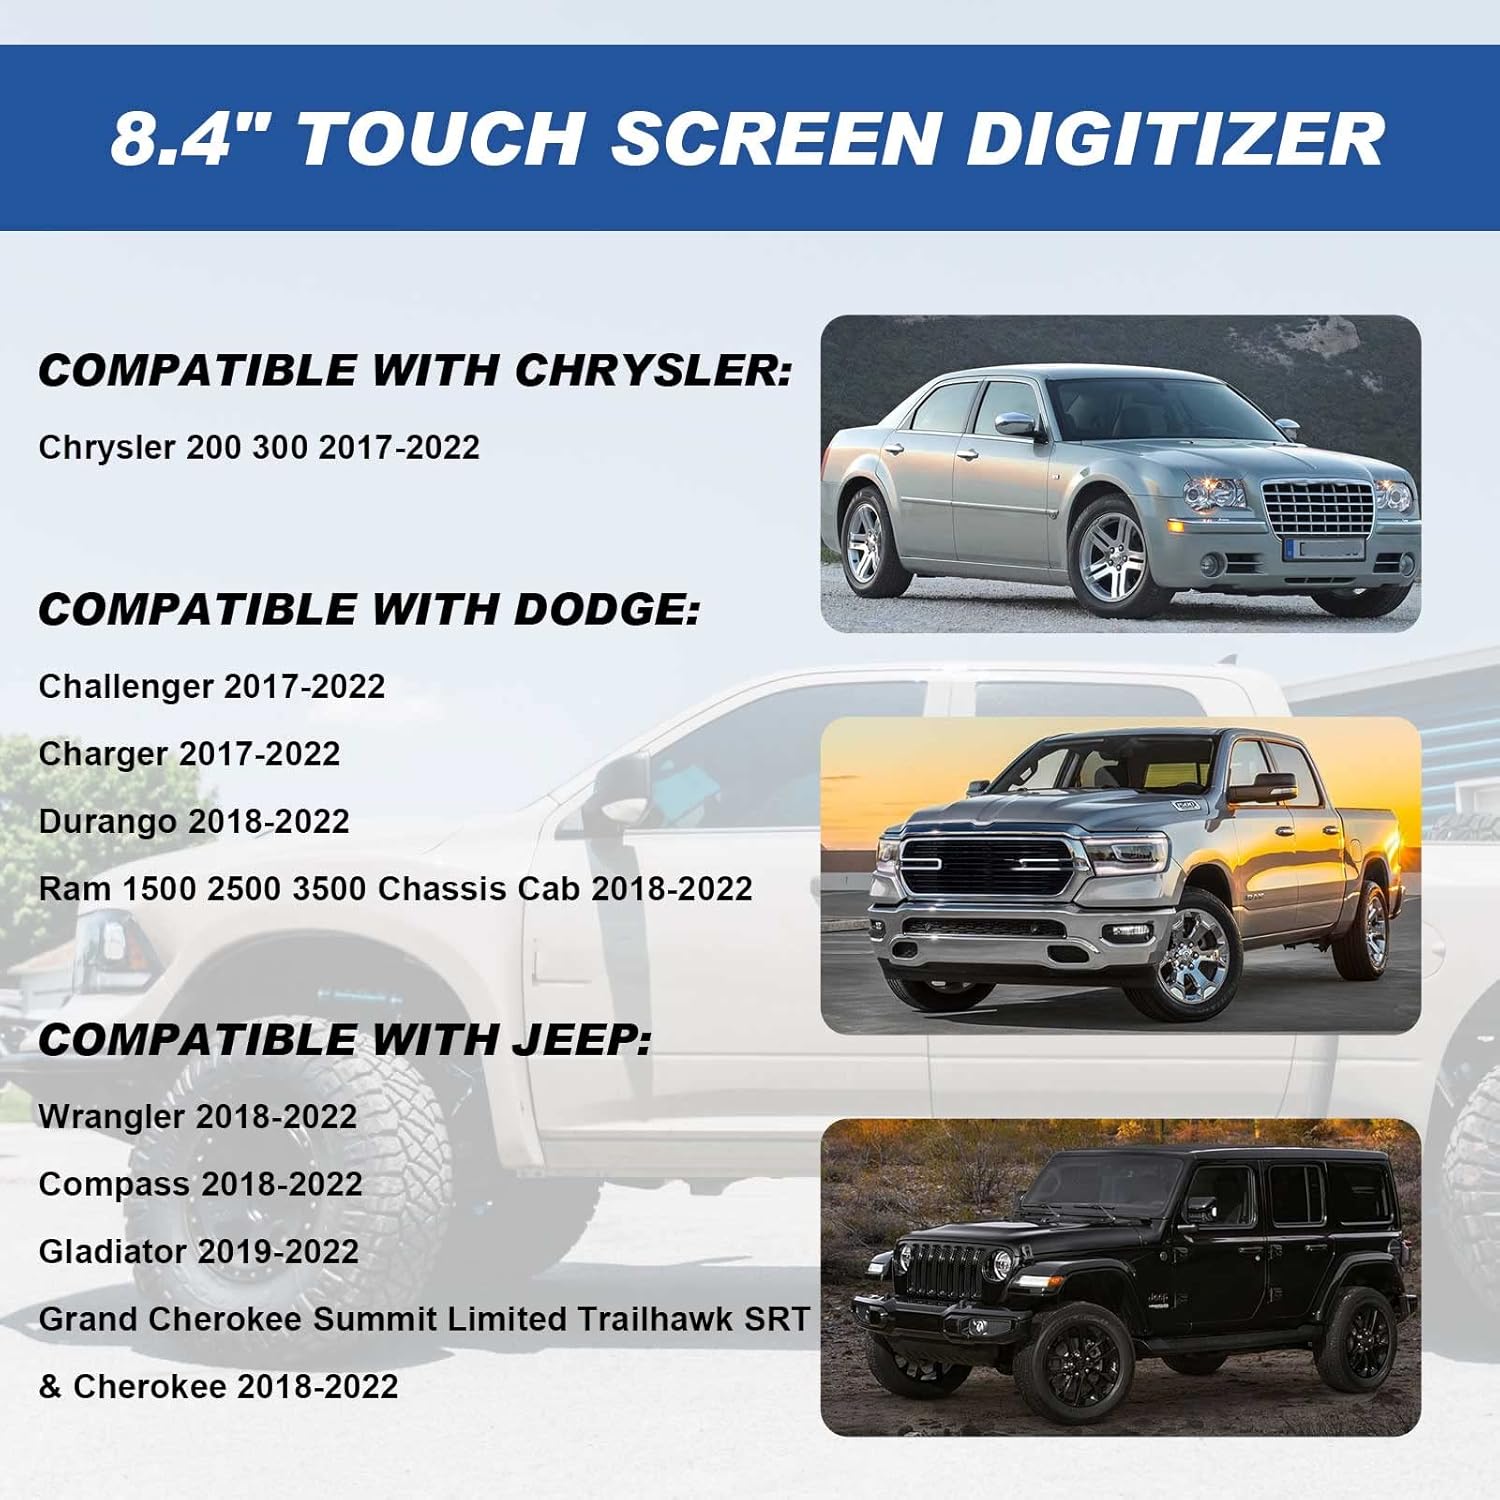
Image 1.1: Compatibility information for the 8.4" Uconnect Touch Screen Digitizer.
2. Postavljanje i instalacija
This section outlines the general procedure for replacing the touch screen digitizer. Professional installation is recommended. Exercise caution and consult vehicle-specific disassembly guides for your radio unit.
2.1 Potrebni alati (nisu uključeni)
- Heat gun or hair dryer
- Plastic pry tools or spatula
- Waxed dental floss or thin plastic card
- Adhesive remover (e.g., "Goop-off")
- Microfiber cloths and isopropyl alcohol
- Small Phillips head screwdriver (for radio disassembly)
2.2 Koraci instalacije
- Rastavljanje vozila: Carefully remove the vehicle's dashboard trim and radio unit according to your vehicle's service manual or a reliable online guide. Disconnect the battery before starting any electrical work.
- Radio Unit Disassembly: Disassemble the radio unit to access the existing screen assembly. This typically involves removing screws and clips.
- Old Digitizer Removal:
- Apply heat to the edges of the old digitizer using a hair dryer for approximately 30 seconds to soften the adhesive.
- Carefully use waxed dental floss or a thin plastic card to cut through the adhesive seal around the perimeter of the old digitizer.
- Gently pry the old digitizer away from the LCD panel using plastic pry tools. Avoid applying excessive force to prevent damage to the underlying LCD.
- Disconnect the ribbon cable of the old digitizer from the circuit board.
- Clean the LCD Panel:
- Thoroughly clean any residual adhesive from the LCD panel and the radio frame using adhesive remover and a plastic spatula.
- Wipe the surfaces clean with paper towels, then finish with a microfiber cloth and isopropyl alcohol to ensure a residue-free surface.
- New Digitizer Installation:
- The new digitizer comes with a pre-applied perimeter strip of adhesive. Carefully align the new digitizer with the LCD panel.
- Connect the ribbon cable of the new digitizer to the corresponding connector on the circuit board. The cable is pre-bent for proper fitment.
- Once aligned, gently press the digitizer onto the LCD panel, ensuring the adhesive makes full contact.
- Ponovno sastavljanje i testiranje: Reassemble the radio unit and reinstall it into the vehicle. Reconnect the battery. Power on the vehicle and test the touch screen functionality thoroughly before fully reassembling the dashboard trim.

Image 2.1: The new digitizer with pre-applied adhesive for installation.

Image 2.2: Visual demonstration of a successful digitizer replacement, showing a clear screen after installation.
3. Upute za rad
Once installed, the Dngbymx 8.4" Uconnect Touch Screen Digitizer restores the original touch functionality of your vehicle's infotainment system. No special operating procedures are required beyond the standard use of your Uconnect system.
- Odgovor dodirom: The digitizer provides precise and responsive touch performance, allowing you to interact with all on-screen controls, navigation, and applications as intended by the manufacturer.
- Jasnoća prikaza: The digitizer is designed to maintain the high resolution and visual quality of your existing LCD screen.
4. Održavanje
Proper maintenance ensures the longevity and optimal performance of your new touch screen digitizer.
- Čišćenje: Use a soft, lint-free microfiber cloth to gently wipe the screen. For stubborn smudges, lightly dampen the cloth with a screen cleaner specifically designed for automotive displays or a small amount of isopropyl alcohol. Avoid harsh chemicals or abrasive materials.
- Zaštita: Avoid placing heavy objects on the screen or applying excessive pressure, which can lead to damage.
- Temperatura: While designed for automotive environments, extreme temperature fluctuations can affect electronic components. Protect your vehicle from prolonged exposure to direct sunlight in hot climates when possible.
5. Rješavanje problema
If you encounter issues after installing the digitizer, refer to the following troubleshooting steps:
5.1 Uobičajeni problemi i rješenja
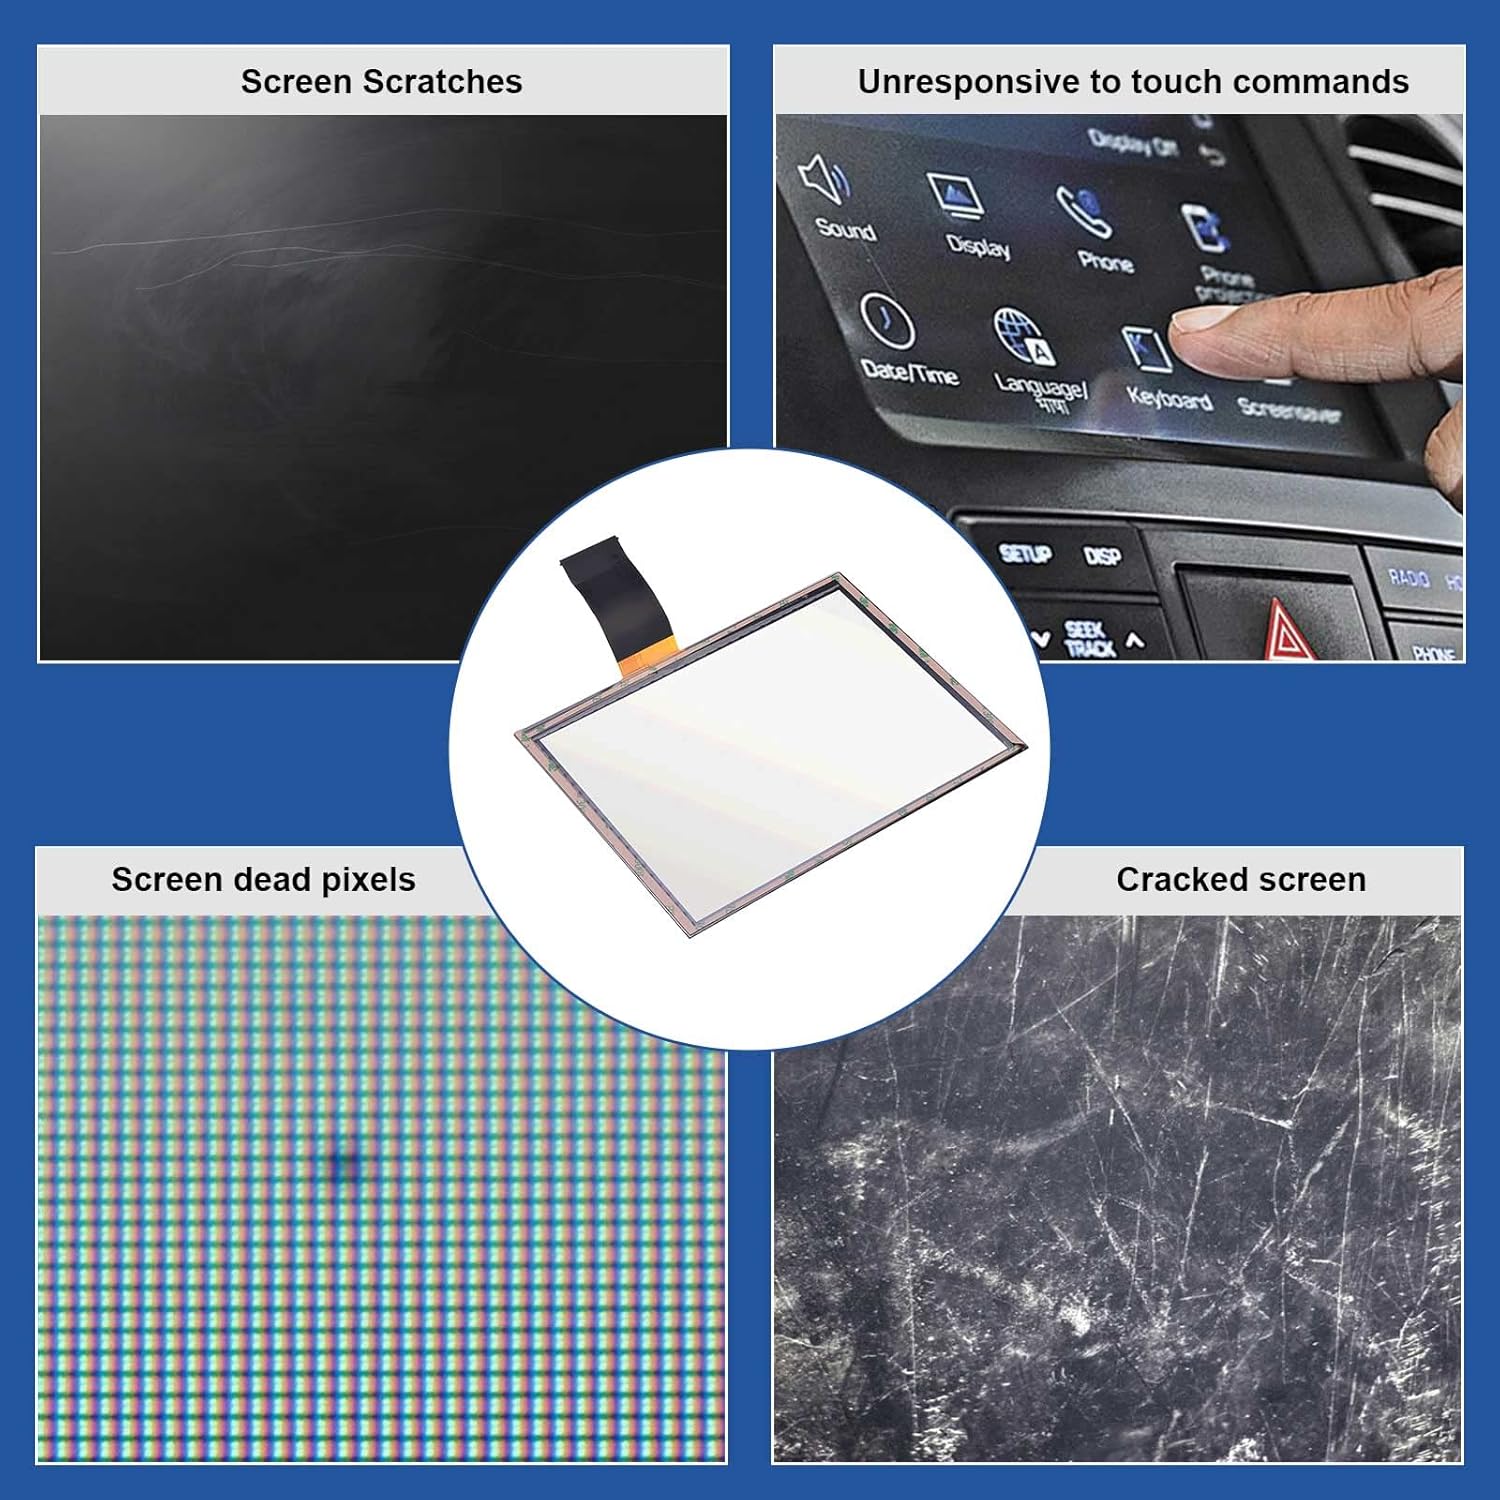
Slika 5.1: Primjeramples of common screen issues that the digitizer replacement can resolve.
- Neodzivan dodir:
- Provjerite trakasti kabel: Ensure the digitizer's ribbon cable is securely and correctly seated in its connector on the circuit board. A loose connection is a common cause of unresponsiveness.
- Rekalibracija: Some Uconnect systems may require a touch screen calibration after replacement. Consult your vehicle's manual for instructions on how to perform this.
- Ciklus snage: Disconnect the vehicle's battery for 10-15 minutes, then reconnect it to reset the system.
- Screen Bubbles/Delamination:
- This product is designed to prevent these issues. If bubbles or delamination occur shortly after installation, it may indicate an issue with the adhesive application or a defect. Ensure the screen was thoroughly cleaned of old adhesive before installation.
- Display Lines or No Display:
- Check LCD Connection: Ensure the LCD panel's ribbon cable (separate from the digitizer's) is securely connected.
- Digitizer Ribbon Cable: Verify the digitizer's ribbon cable is not pinched or damaged during reassembly.
- Kompatibilnost: Double-check that the digitizer model is correct for your specific radio unit.
- Ghost Touching/Erratic Behavior:
- This often indicates residual adhesive or debris on the LCD or digitizer, or a faulty digitizer. Re-clean the LCD surface thoroughly and ensure the new digitizer is free of defects.
If troubleshooting steps do not resolve the issue, contact Dngbymx Auto Parts customer support for further assistance.
6. Specifikacije
Key technical specifications for the Dngbymx 8.4" Uconnect Touch Screen Digitizer:
| Značajka | Specifikacija |
|---|---|
| Broj modela | LA084X01(SL)(01) |
| Veličina zaslona | 8.4 inča |
| Vrsta zaslona osjetljivog na dodir | Kapacitivni |
| Rezolucija | 1280 x 720 |
| Težina artikla | 8.4 unci |
| Dimenzije proizvoda | 6 x 0.4 x 9 inča (D x Š x V) |
| Vrsta veze | 60 PIN Precision circuit connection |

Image 6.1: Physical dimensions and connection type of the digitizer.
7. Jamstvo i podrška
Dngbymx Auto Parts is committed to providing quality products and customer satisfaction.
- Politika povrata: This product is eligible for returns or replacements within 30 days of purchase, subject to the seller's return policy.
- Korisnička podrška: For any questions regarding the product, installation, or troubleshooting, please contact Dngbymx Auto Parts directly. Contact information can typically be found on the seller's store page or through your purchase platform.