1. Uvod
Thank you for choosing the CREATE NETBOT S40 Robot Vacuum and Mop. This manual provides essential information for the safe operation, maintenance, and troubleshooting of your device. Please read it thoroughly before first use and retain it for future reference.
2. Sigurnosne upute
Kako biste smanjili rizik od ozljeda ili oštećenja, pridržavajte se sljedećih sigurnosnih mjera opreza:
- Ovaj uređaj mogu koristiti djeca starija od 8 godina i osobe sa smanjenim fizičkim, osjetilnim ili mentalnim sposobnostima ili s nedostatkom iskustva i znanja ako su pod nadzorom ili su ih dobili upute u vezi s korištenjem uređaja na siguran način i razumiju opasnosti koje su uključene .
- Djeca se ne smiju igrati s uređajem. Čišćenje i korisničko održavanje ne smiju obavljati djeca bez nadzora.
- Ensure the robot is placed on a stable, level surface.
- Do not expose the robot to water or other liquids.
- Držite kosu, široku odjeću, prste i sve dijelove tijela dalje od otvora i pokretnih dijelova.
- Ne koristite robota u područjima s otvorenim plamenom ili eksplozivnim materijalima.
- Use only the original charging adapter and battery provided by the manufacturer.
- Before cleaning or maintenance, always switch off the robot and unplug it from the power source.
3. Sadržaj paketa
Provjerite jesu li svi artikli prisutni u vašem paketu:
- CREATE NETBOT S40 Robot Vacuum and Mop
- Dock za punjenje
- Adapter napajanja
- Daljinski upravljač
- Bočne četke (2 para)
- Main Brush (pre-installed + 1 spare)
- Kanta za prašinu
- Water Tank with Mop Pad
- Alat za čišćenje
- korisnički priručnik
4. Proizvod je gotovview
Familiarize yourself with the components of your CREATE NETBOT S40.

Slika 4.1: Vrh view of the CREATE NETBOT S40 robot vacuum, showing the main unit, a roller brush, a smartphone displaying the control app, and the remote control.

Slika 4.2: Donji dio view of the robot, illustrating the main brush, side brushes, wheels, and various sensors.
Komponente robota
- Gornji poklopac: Houses the dust bin/water tank.
- Gumb za napajanje/pokretanje: Initiates or pauses cleaning.
- Kontakti za punjenje: Za automatsko punjenje na priključnoj stanici.
- Bočne četke: Pometite otpad u glavni put četke.
- Glavna četka: Skuplja prašinu i prljavštinu s poda.
- Kanta za smeće: Skuplja suhi otpad.
- Spremnik za vodu: Drži vodu za brisanje.
- Krpa za brisanje: Attaches to the water tank for wet cleaning.
- Senzori za pad na stijeni: Otkrijte rubove i spriječite padove.
- Branik: Detektira prepreke.
- Pogonski kotači: Pokreni robota.
- Univerzalni kotač: Provides steering.

Image 4.3: Close-up of the robot's top cover, showing the 'CREATE NETBOT S40' branding.
5. Postavljanje
5.1 Postavljanje priključne stanice za punjenje
Place the charging dock against a wall in an open, uncluttered area. Ensure there is at least 1 meter (3 feet) of clear space on both sides and 2 meters (6 feet) in front of the dock. Plug the power adapter into the dock and then into a wall outlet.

Image 5.1: The robot positioned next to its charging dock, illustrating proper placement.
5.2 Početno punjenje
Place the robot onto the charging dock, ensuring the charging contacts align. The robot will emit a sound and the indicator light will illuminate, indicating it is charging. Fully charge the robot for 4-6 hours before its first use.
5.3 App Connection (Wi-Fi & Alexa)
For full functionality, download the CREATE Home app from your smartphone's app store. Follow the in-app instructions to connect your NETBOT S40 to your home Wi-Fi network. Once connected, you can link the app to Alexa for voice control.
- Download the 'CREATE Home' app.
- Registrirajte se ili prijavite na svoj račun.
- Add your device by selecting 'Robot Vacuum' and following the pairing instructions.
- Provjerite je li vaša Wi-Fi mreža 2.4 GHz.

Image 5.2: The robot shown alongside a smartphone displaying the CREATE Home app interface, indicating successful connection and mapping capabilities.
6. Upute za rad
6.1 Pokretanje/pauziranje čišćenja
- Od Robota: Press the power button on the robot's top cover.
- From Remote Control: Press the 'Start/Pause' button.
- Iz aplikacije: Tap the 'Start' button in the CREATE Home app.
6.2 Načini čišćenja
NETBOT S40 nudi različite načine čišćenja:
- Automatsko čišćenje: Robot inteligentno navigira i čisti cijelu površinu poda.
- Čišćenje mjesta: Concentrates cleaning on a specific small area.
- Čišćenje rubova: Čisti uz zidove i rubove namještaja.
- Planirano čišćenje: Set specific times for the robot to clean automatically via the app.
6.3 Funkcija brisanja
Za korištenje funkcije brisanja:
- Napunite spremnik za vodu čistom vodom. Nemojte koristiti deterdžente ili jake kemikalije.
- Čvrsto pričvrstite krpu za brisanje na spremnik za vodu.
- Insert the filled water tank into the robot.
- Pokrenite ciklus čišćenja. Robot će istovremeno usisavati i brisati podove.

Slika 6.1: Krupni plan view of the mop pad attached to the water tank, ready for installation into the robot.
7. Održavanje
Redovito održavanje osigurava optimalne performanse i produžuje vijek trajanja vašeg robota.
7.1 Čišćenje spremnika za prašinu i filtera
Empty the dust bin after each use and clean the filter regularly.
- Press the release button to remove the dust bin.
- Otvorite poklopac posude za prašinu i ispraznite njen sadržaj.
- Remove the filter and tap it gently to remove dust. Do not wash the HEPA filter with water.
- Po potrebi isperite spremnik za prašinu vodom, pazeći da je potpuno suh prije ponovne ugradnje.
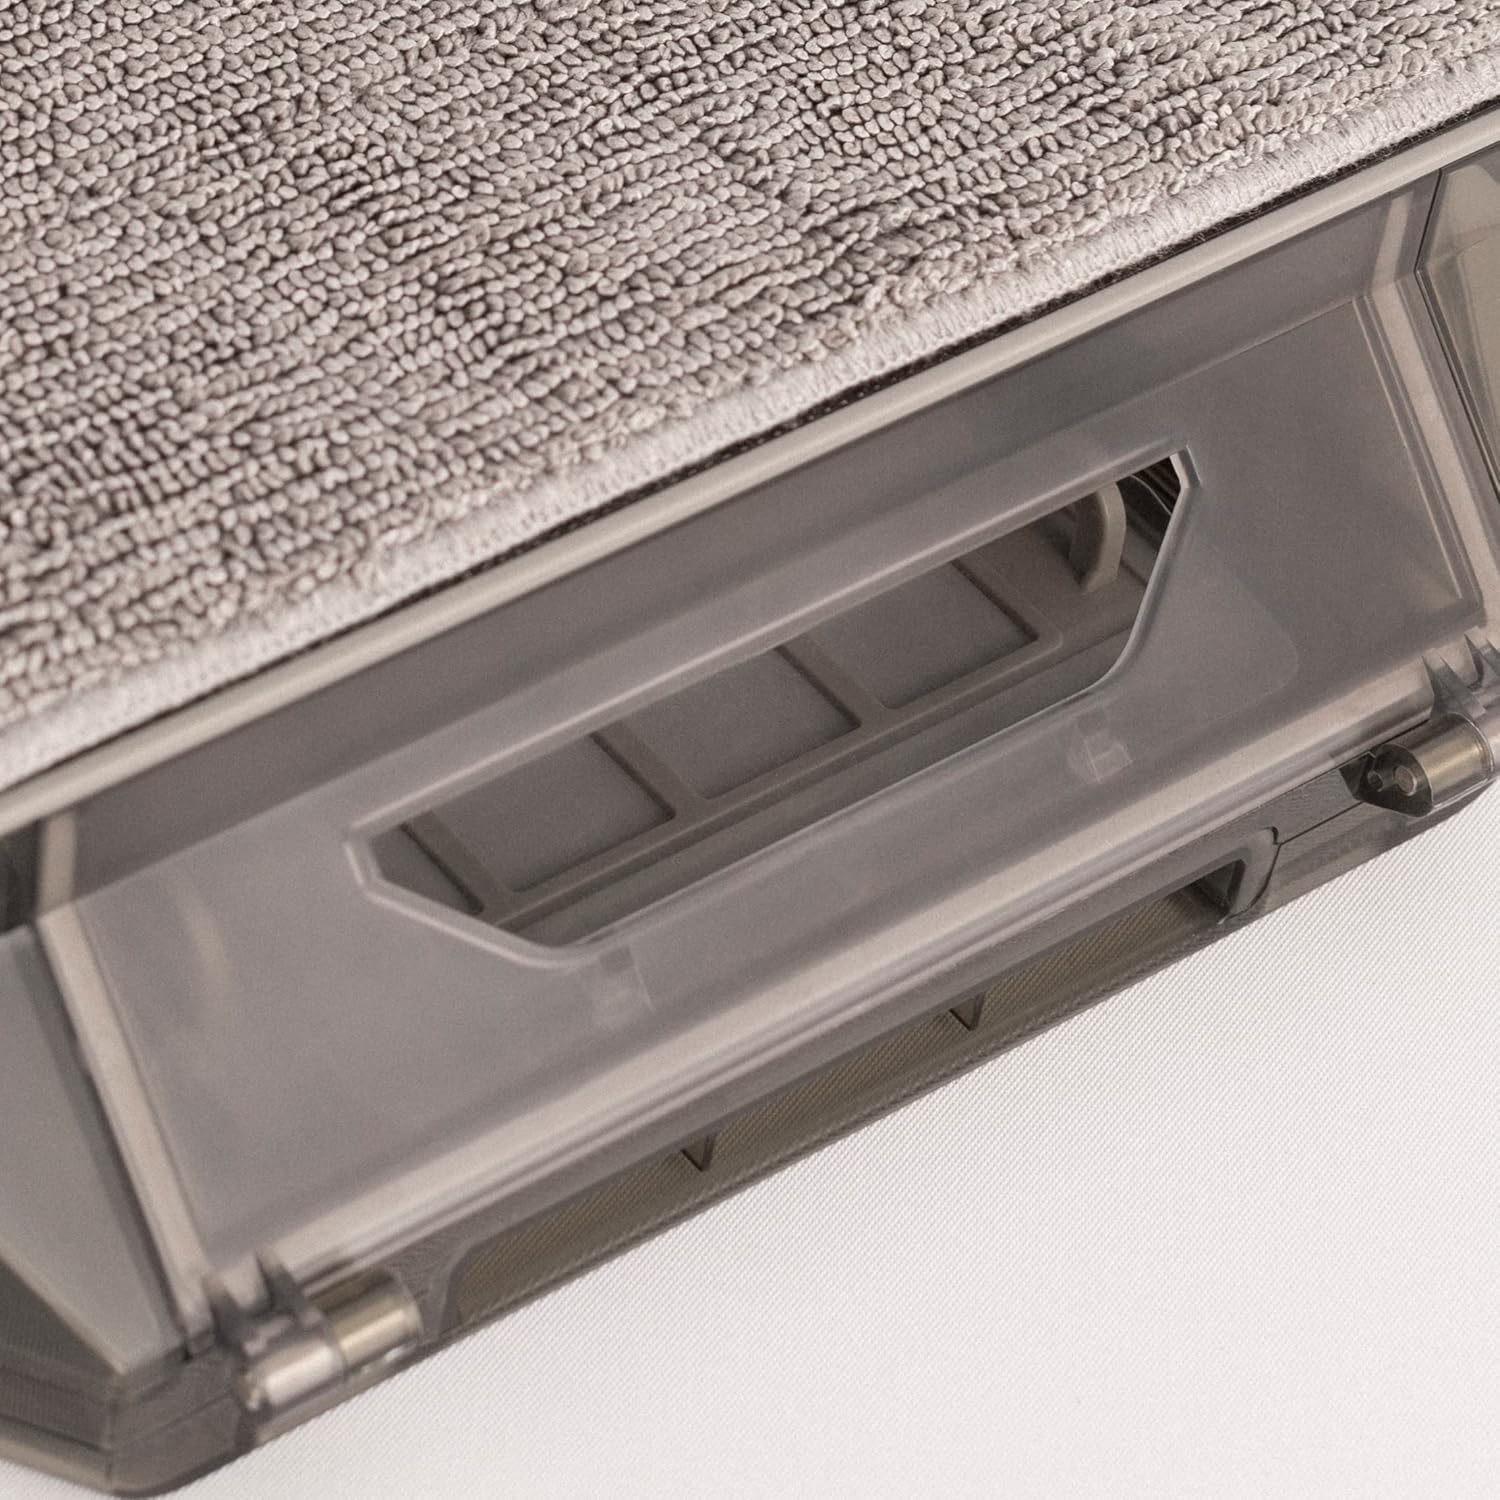
Slika 7.1: Detaljno view of the dust bin and its filter compartment, showing how it integrates into the robot.
7.2 Čišćenje glavne četke
Clean the main brush weekly to remove tangled hair and debris.
- Turn the robot over and locate the main brush cover.
- Remove the cover and lift out the main brush.
- Use the provided cleaning tool to cut and remove tangled hair.
- Ponovno postavite glavnu četku i poklopac.
7.3 Čišćenje bočne četke
Inspect side brushes regularly for wear and tear, and clean them as needed.
- Lagano povucite bočne četke prema gore kako biste ih uklonili.
- Uklonite sve dlake ili ostatke.
- If brushes are damaged, replace them with new ones.
- Press the new brushes firmly onto their posts until they click into place.
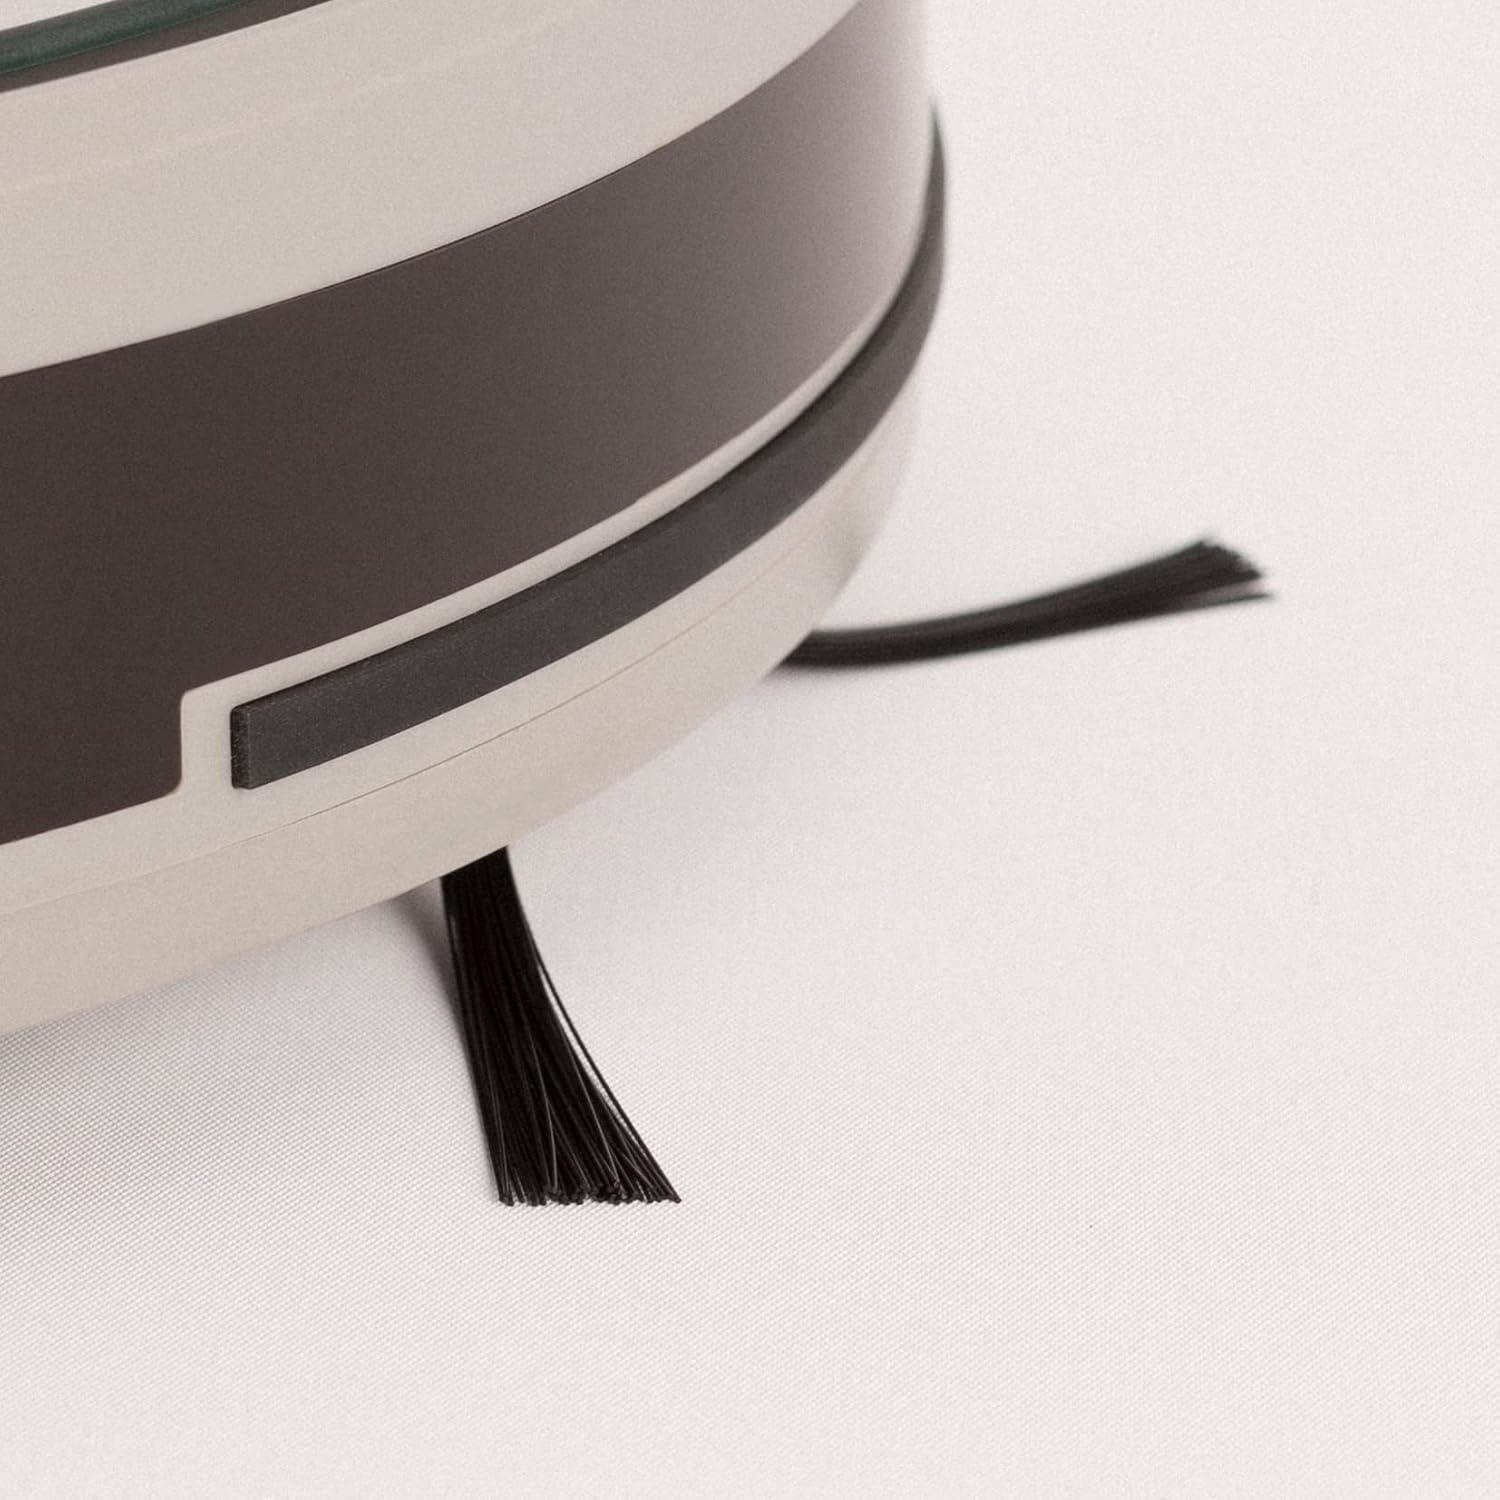
Image 7.2: Close-up of a side brush, showing its bristles and attachment point.
7.4 Čišćenje spremnika za vodu i krpe za brisanje
Nakon svakog brisanja:
- Ispraznite preostalu vodu iz spremnika.
- Remove the mop pad and rinse it thoroughly with water. Allow it to air dry.
- Očistite spremnik za vodu s adamp tkanina.
7.5 Čišćenje senzora
Wipe all sensors (cliff sensors, bumper sensor) with a clean, dry cloth monthly to ensure proper navigation.
8. Rješavanje problema
If you encounter issues with your robot, refer to the following table:
| Problem | Mogući uzrok | Otopina |
|---|---|---|
| Robot se ne uključuje | Slaba baterija; Isključeno napajanje | Napunite robota; Provjerite je li prekidač za napajanje uključen |
| Robot se ne može puniti | Kontakti za punjenje prljavi; Priključna stanica nije uključena | Očistite kontakte za punjenje; Provjerite priključak adaptera za napajanje |
| Cleaning performance is poor | Spremnik za prašinu pun; Četke zapetljane; Filter začepljen | Empty dust bin; Clean main/side brushes; Clean/replace filter |
| Robot se često zaglavi | Prepreke na podu; Prljavi senzori za padinu | Očistite podnu površinu; Očistite senzore za padinu |
| Povezivanje aplikacije nije uspjelo | Incorrect Wi-Fi password; Router too far; 5GHz Wi-Fi | Verify password; Move robot closer to router; Ensure 2.4GHz Wi-Fi |
Ako se problem nastavi, obratite se korisničkoj podršci.
9. Specifikacije
- Marka: STVORITI
- Naziv modela: NETBOT S40
- Broj modela: 130436_269434
- Usisna snaga: 4000 Pa (as per product description)
- Trajanje baterije: Up to 220 minutes (as per product description)
- Povezivost: Wi-Fi, App Control, Alexa compatible
- Dimenzije: 64 x 40 x 12 cm (dimenzije pakiranja)
- Težina artikla: 116 Grams (as per specifications, likely product weight is higher, but using provided data)
- Baterija uključena: Da
10. Jamstvo i podrška
Your CREATE NETBOT S40 comes with a standard manufacturer's warranty. Please refer to the warranty card included in your package for specific terms and conditions, including warranty period and coverage.
For technical support, troubleshooting assistance, or to inquire about replacement parts, please contact CREATE customer service through their official webweb-mjesto ili kontaktne podatke navedene u dokumentaciji proizvoda.