
BlitzWolf BW-VT2EU
BlitzWolf BW-VT2 Mini projektor - korisnički priručnik
Your comprehensive guide to setting up, operating, and maintaining your BlitzWolf BW-VT2 Mini Projector.
1. Proizvod je gotovview
1.1 Sadržaj paketa
Molimo provjerite jesu li svi artikli prisutni u vašem paketu:
- BlitzWolf BW-VT2 Mini Projector
- Daljinski upravljač
- Adapter napajanja
- HDMI kabel
- Korisnički priručnik (ovaj dokument)
1.2 Izgled uređaja
Familiarize yourself with the various parts and ports of your projector.
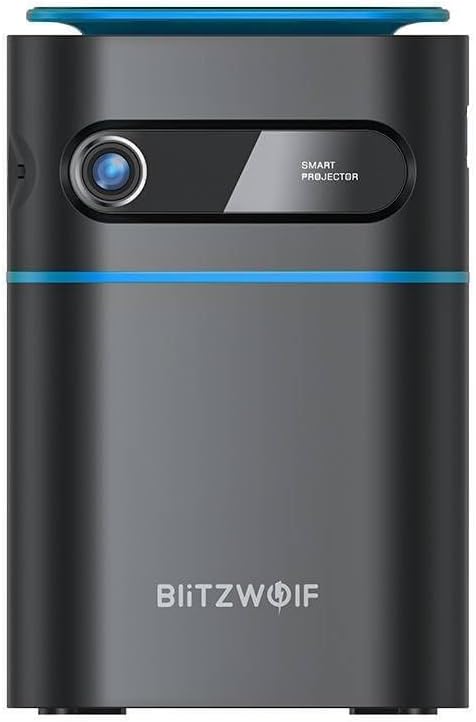
Slika 1.1: Prednja strana View. This image displays the front of the BlitzWolf BW-VT2 Mini Projector, highlighting the projection lens and the 'SMART PROJECTOR' branding.

Figure 1.2: Projector with Remote Control. This image shows the BlitzWolf BW-VT2 Mini Projector alongside its dedicated remote control, illustrating the compact size of both devices.
Slika 1.3: Stražnji dio View. The rear of the projector is shown, featuring ventilation grilles and various input/output ports.

Slika 1.4: Bočna strana View. This image highlights the side of the projector where additional connectivity options such as USB and HDMI ports are located.

Slika 1.5: Vrh View. The top surface of the projector is visible, featuring the integrated touch control panel for direct interaction.
1.3 Priključci i kontrole
- HDMI priključak: Connect to laptops, game consoles, Blu-ray players, etc.
- USB priključak: Spojite USB flash pogone za reprodukciju medija.
- Audio Out (3.5mm) Port: Spojite vanjske zvučnike ili slušalice.
- DC IN priključak: Spojite strujni adapter.
- Gumb za napajanje: Uključuje/isključuje projektor.
- Fokusni kotač: Podešava jasnoću slike.
- Upravljačka ploča na dodir: Navigate menus and control playback directly on the device.
2. Vodič za postavljanje
2.1 Uključivanje
- Spojite adapter za napajanje na DC IN priključak na projektoru.
- Uključite strujni adapter u zidnu utičnicu.
- Press and hold the Power Button on the projector or the remote control until the device powers on.
2.2 Početno smještaj
Za optimalno viewing experience, consider the following:
- Postavite projektor na stabilnu, ravnu površinu.
- Ensure there is adequate ventilation around the projector to prevent overheating.
- Position the projector perpendicular to the projection surface (wall or screen) for a rectangular image.
- Adjust the distance to achieve your desired screen size.
2.3 Podešavanje fokusa
After powering on, adjust the focus to ensure a clear image:
- Rotate the focus wheel located near the lens until the projected image appears sharp and clear.
2.4 Postavljanje daljinskog upravljača
Insert batteries into the remote control before first use:
- Otvorite poklopac pretinca za baterije na stražnjoj strani daljinskog upravljača.
- Umetnite dvije AAA baterije (nisu uključene), pazeći na ispravan polaritet (+/-).
- Zatvorite poklopac odjeljka za baterije.
3. Upute za rad
3.1 Navigacija
You can navigate the projector's interface using either the remote control or the touch control panel on top of the device.
- Daljinski upravljač: Use the directional buttons (up, down, left, right) to move through menus and the 'OK' button to select.
- Upravljačka ploča na dodir: Swipe and tap on the touch-sensitive surface to navigate.
3.2 Povezivanje uređaja
The BW-VT2 supports various input sources:
- HDMI ulaz: Connect your laptop, game console, or other HDMI-enabled devices using an HDMI cable. Select the HDMI input source from the projector's menu.
- USB ulaz: Insert a USB flash drive into the USB port. The projector's media player will typically detect the drive automatically, allowing you to browse and play supported media files (videos, photos, music).
- Wi-Fi povezivanje: Navigate to the 'Settings' menu, then 'Network' or 'Wi-Fi'. Select your Wi-Fi network and enter the password to connect the projector to the internet. This enables access to online streaming apps and updates.
3.3 Značajke Android OS-a
As an Android-powered projector, the BW-VT2 offers smart functionalities:
- Pristup aplikaciji: Download and install various streaming apps (e.g., Netflix, YouTube) directly from the pre-installed app store or by sideloading APKs.
- postavke: Customize display settings, audio output, network configurations, and system preferences through the Android settings menu.
- Zrcaljenje zaslona: Utilize built-in screen mirroring features (e.g., Miracast, AirPlay compatible apps) to project content from your smartphone or tablet wirelessly.
3.4 Audio izlaz
The projector has built-in speakers, but you can also connect external audio devices:
- 3.5 mm audio izlaz: Connect headphones or external speakers via the 3.5mm audio jack for enhanced sound.
4. Održavanje
Pravilno održavanje osigurava dugotrajnost i optimalne performanse vašeg projektora.
4.1 Čišćenje leća
To maintain clear image quality, clean the projector lens regularly:
- Koristite meku krpu bez dlačica, posebno namijenjenu za optičke leće.
- Lagano obrišite leću kružnim pokretima.
- Avoid using abrasive cleaners or excessive force, which can scratch the lens.
4.2 Ventilacija
Ensure proper airflow to prevent overheating:
- Do not block the ventilation vents on the projector.
- Projektor koristite u dobro prozračenom prostoru.
- Periodically clean dust from the vents using a soft brush or compressed air.
4.3 Skladištenje
When not in use, store your projector properly:
- Projektor čuvajte na hladnom i suhom mjestu, dalje od izravne sunčeve svjetlosti i ekstremnih temperatura.
- Use the original packaging or a protective case to prevent dust accumulation and physical damage.
5. Rješavanje problema
U ovom odjeljku potražite uobičajene probleme i njihova rješenja.
| Problem | Mogući uzrok | Otopina |
|---|---|---|
| Projector does not power on. | Nema priključka za napajanje; neispravan adapter za napajanje. | Ensure power adapter is securely connected to both projector and outlet. Try a different outlet. |
| Nije projicirana slika. | Incorrect input source selected; loose HDMI/USB cable. | Verify the correct input source is selected in the menu. Check cable connections. |
| Slika je mutna. | Focus not adjusted; projector too close/far. | Rotate the focus wheel until the image is clear. Adjust projection distance if necessary. |
| Nema zvuka. | Volume too low; external audio device not connected properly. | Increase volume. Check connections to external speakers/headphones. Ensure audio output is set correctly in settings. |
| Problemi s Wi-Fi vezom. | Netočna lozinka; problemi s usmjerivačem; smetnje signala. | Re-enter Wi-Fi password. Restart router. Move projector closer to router. |
| Daljinski upravljač ne radi. | Prazne baterije; prepreka; daljinski upravljač nije uparen. | Replace batteries. Ensure no obstruction between remote and projector. |
6. Tehničke specifikacije
Key specifications of the BlitzWolf BW-VT2 Mini Projector:
| Značajka | Specifikacija |
|---|---|
| Marka | BlitzWolf |
| Broj modela | BW-VT2EU |
| Boja | Crna |
| Tehnologija povezivanja | HDMI, USB, VGA, Wi-Fi |
| Razlučivost zaslona | 1920 x 1080 (puni HD) |
| Vrsta zaslona | LCD, LED |
| Form Factor | Prijenosni |
| Posebne značajke | Portable, Android OS, Wi-Fi, HDMI, USB, VGA |
| Kompatibilni uređaji | Laptops, Smartphones, Game Consoles, Blu-ray Players, Media Players, Wi-Fi enabled devices |
| Preporučena upotreba | Kućno kino |
7. Jamstvo i podrška
7.1 Jamstvo proizvođača
The BlitzWolf BW-VT2 Mini Projector comes with a 2-godišnje jamstvo proizvođačaOvo jamstvo pokriva nedostatke u materijalu i izradi pri normalnoj uporabi. Molimo sačuvajte dokaz o kupnji za potrebe jamstvenog zahtjeva.
7.2 Korisnička podrška
If you encounter issues not covered in the troubleshooting section or require further assistance, please contact BlitzWolf customer support. Refer to the product packaging or the official BlitzWolf webstranicu za najnovije kontaktne podatke.
Ask a question about this manual
Ask about setup, troubleshooting, compatibility, parts, safety, or missing instructions. Manuals+ will review the question and use this page’s manual context to help answer it.