
1. Uvod
This manual provides detailed instructions for the setup, operation, maintenance, and troubleshooting of your GEEKOM A6 Mini PC. Please read this manual thoroughly before using the device to ensure optimal performance and longevity.
The GEEKOM A6 is a compact and powerful mini PC designed for various applications, from office productivity and multimedia consumption to light gaming and creative tasks. It features an AMD Ryzen 7 6800H processor, Radeon 680M graphics, 16GB DDR5 RAM, and a 1TB SSD, running on Windows 11 Pro.
2. Što je u kutiji
Carefully unpack your GEEKOM A6 Mini PC and check for the following items:
- GEEKOM A6 Mini PC
- Adapter napajanja
- HDMI kabel
- VESA Mount with Screws
- Upute za korištenje
- Zahvalnica

Slika 2.1: Sadržaj paketa
3. Postavljanje
3.1 Fizičke veze
Prije uključivanja Mini PC-a, spojite sve potrebne periferne uređaje:
- Poveži se sa zaslonom: Use the provided HDMI cable to connect the Mini PC to your monitor or TV. The device supports up to four 4K displays via its two USB4 ports and two HDMI ports.
- Povežite periferne uređaje: Plug in your keyboard, mouse, and other USB devices into the available USB ports.
- Mrežna veza: For a wired connection, connect an Ethernet cable to the 2.5Gbps LAN port. For wireless, ensure your Wi-Fi network is available.
- Priključak za napajanje: Spojite adapter za napajanje na DC-in priključak na Mini PC-ju, a zatim uključite adapter u utičnicu.
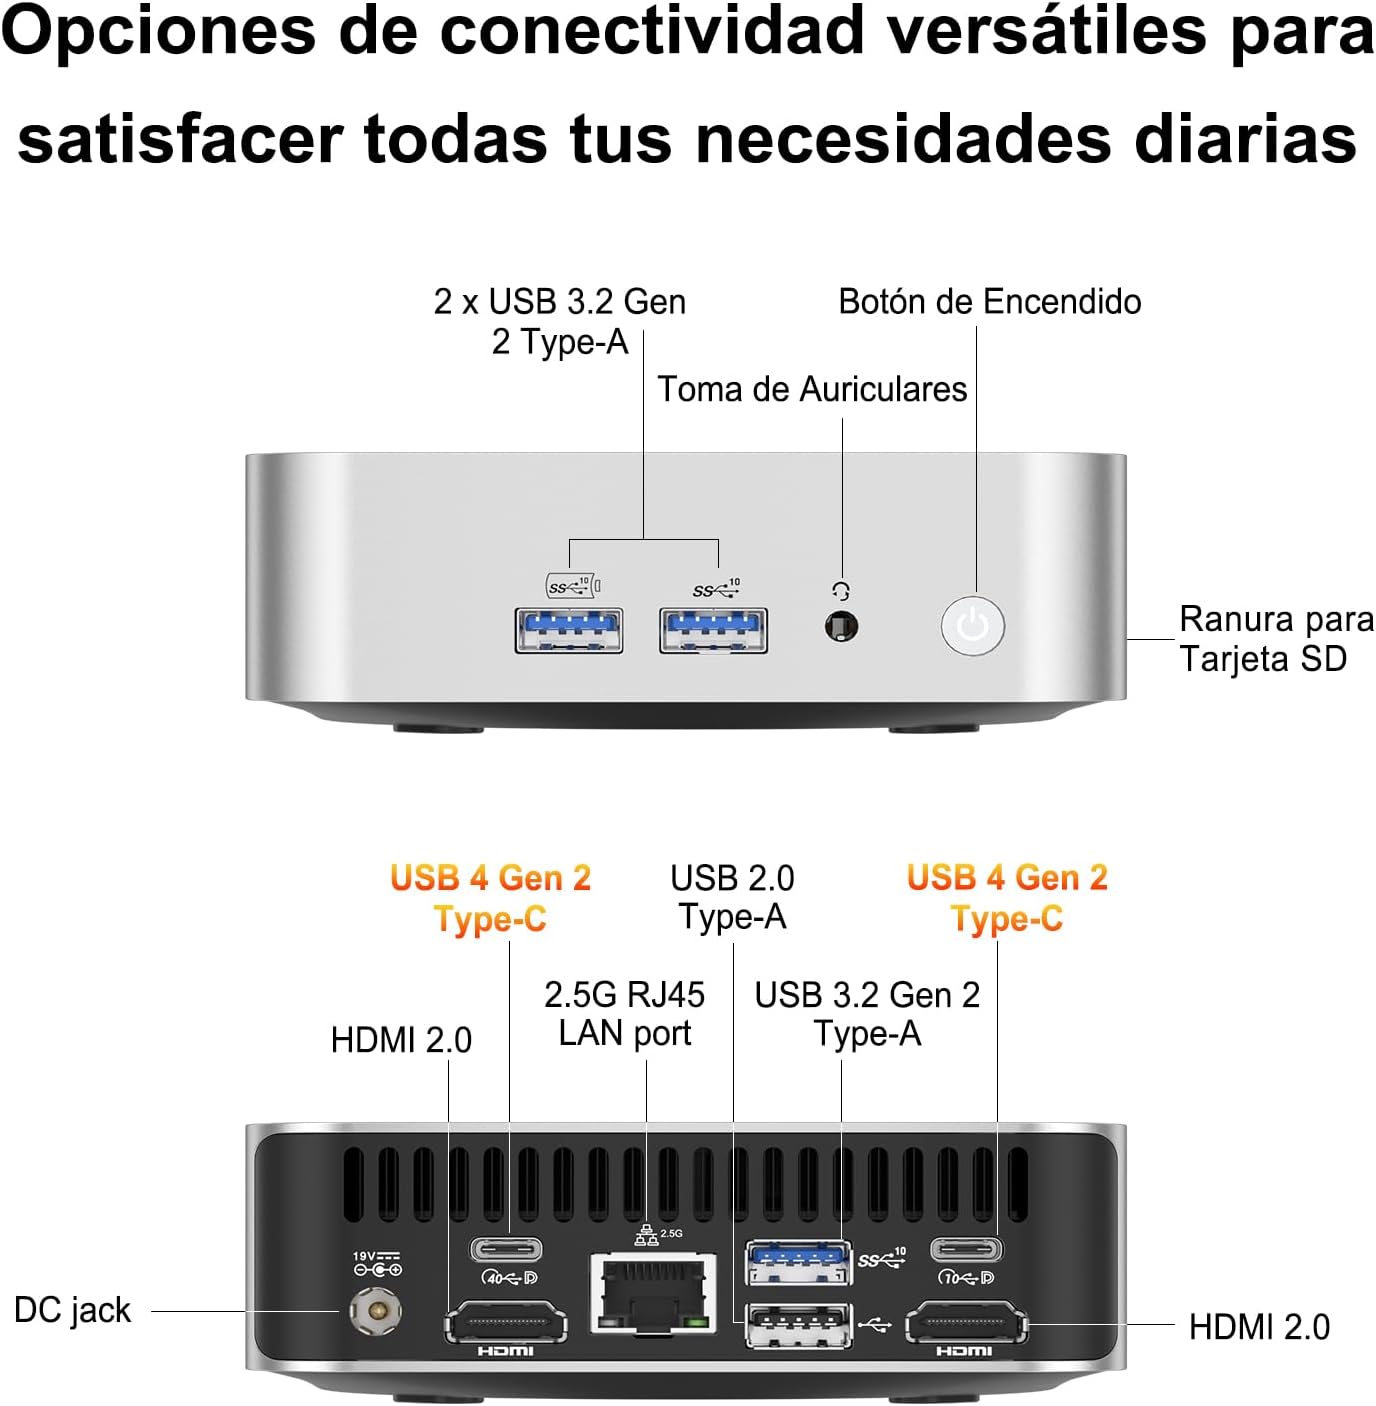
Figure 3.1: Port Layout
3.2 Ugradnja VESA nosača
The GEEKOM A6 Mini PC includes a VESA mount for flexible installation behind a monitor or on a wall. This helps save desk space and keeps your workspace tidy.
- Attach the VESA mount bracket to the back of your monitor using the provided screws. Ensure the mount is securely fastened.
- Slide the GEEKOM A6 Mini PC onto the VESA mount until it clicks into place.

Slika 3.2: Ugradnja VESA nosača
3.3 Uključivanje
Press the power button located on the front of the Mini PC. The system will boot up, and Windows 11 Pro will load. Follow the on-screen instructions for initial Windows setup if it's your first time using the device.
4. Operativni
4.1 Operativni sustav
The GEEKOM A6 comes with Windows 11 Pro pre-installed, offering a secure and efficient computing experience. It also supports other operating systems like Linux, providing flexibility for various user needs.

Slika 4.1: Kompatibilnost operativnog sustava
4.2 Konfiguracija više zaslona
The GEEKOM A6 supports up to four displays simultaneously, with resolutions up to 8K via USB4 and 4K via HDMI. This capability enhances productivity for multitasking and provides an immersive entertainment experience.

Figure 4.2: Multi-Display Setup
4.3 Povezivost
The Mini PC offers comprehensive connectivity options:
- USB priključci: Multiple USB 3.2 Gen 2 Type-A ports and two USB4 Gen 2 Type-C ports for high-speed data transfer and peripheral connections.
- HDMI priključci: Two HDMI 2.0 ports for display output.
- LAN priključak: A 2.5Gbps RJ45 LAN port for high-speed wired network access.
- Bežični: Integrated Wi-Fi 6E for fast and reliable wireless internet, and Bluetooth 5.2 for connecting wireless peripherals.
- Čitač SD kartica: A built-in SD card slot for easy access to photos and videos.

Slika 4.3: Bežična povezivost
4.4 Izvedba iznadview
The GEEKOM A6 is equipped with high-performance components:
- Procesor: AMD Ryzen 7 6800H with 8 cores, 16 threads, and a max boost clock of 4.7 GHz, providing robust processing power.
- Grafika: Integrated AMD Radeon 680M GPU, capable of handling demanding visual tasks and light to medium gaming.
- Memorija: 16GB of high-speed DDR5 RAM, expandable up to 64GB, ensuring smooth multitasking.
- Skladištenje: 1TB PCIe Gen4x4 SSD for rapid boot times and quick application loading.
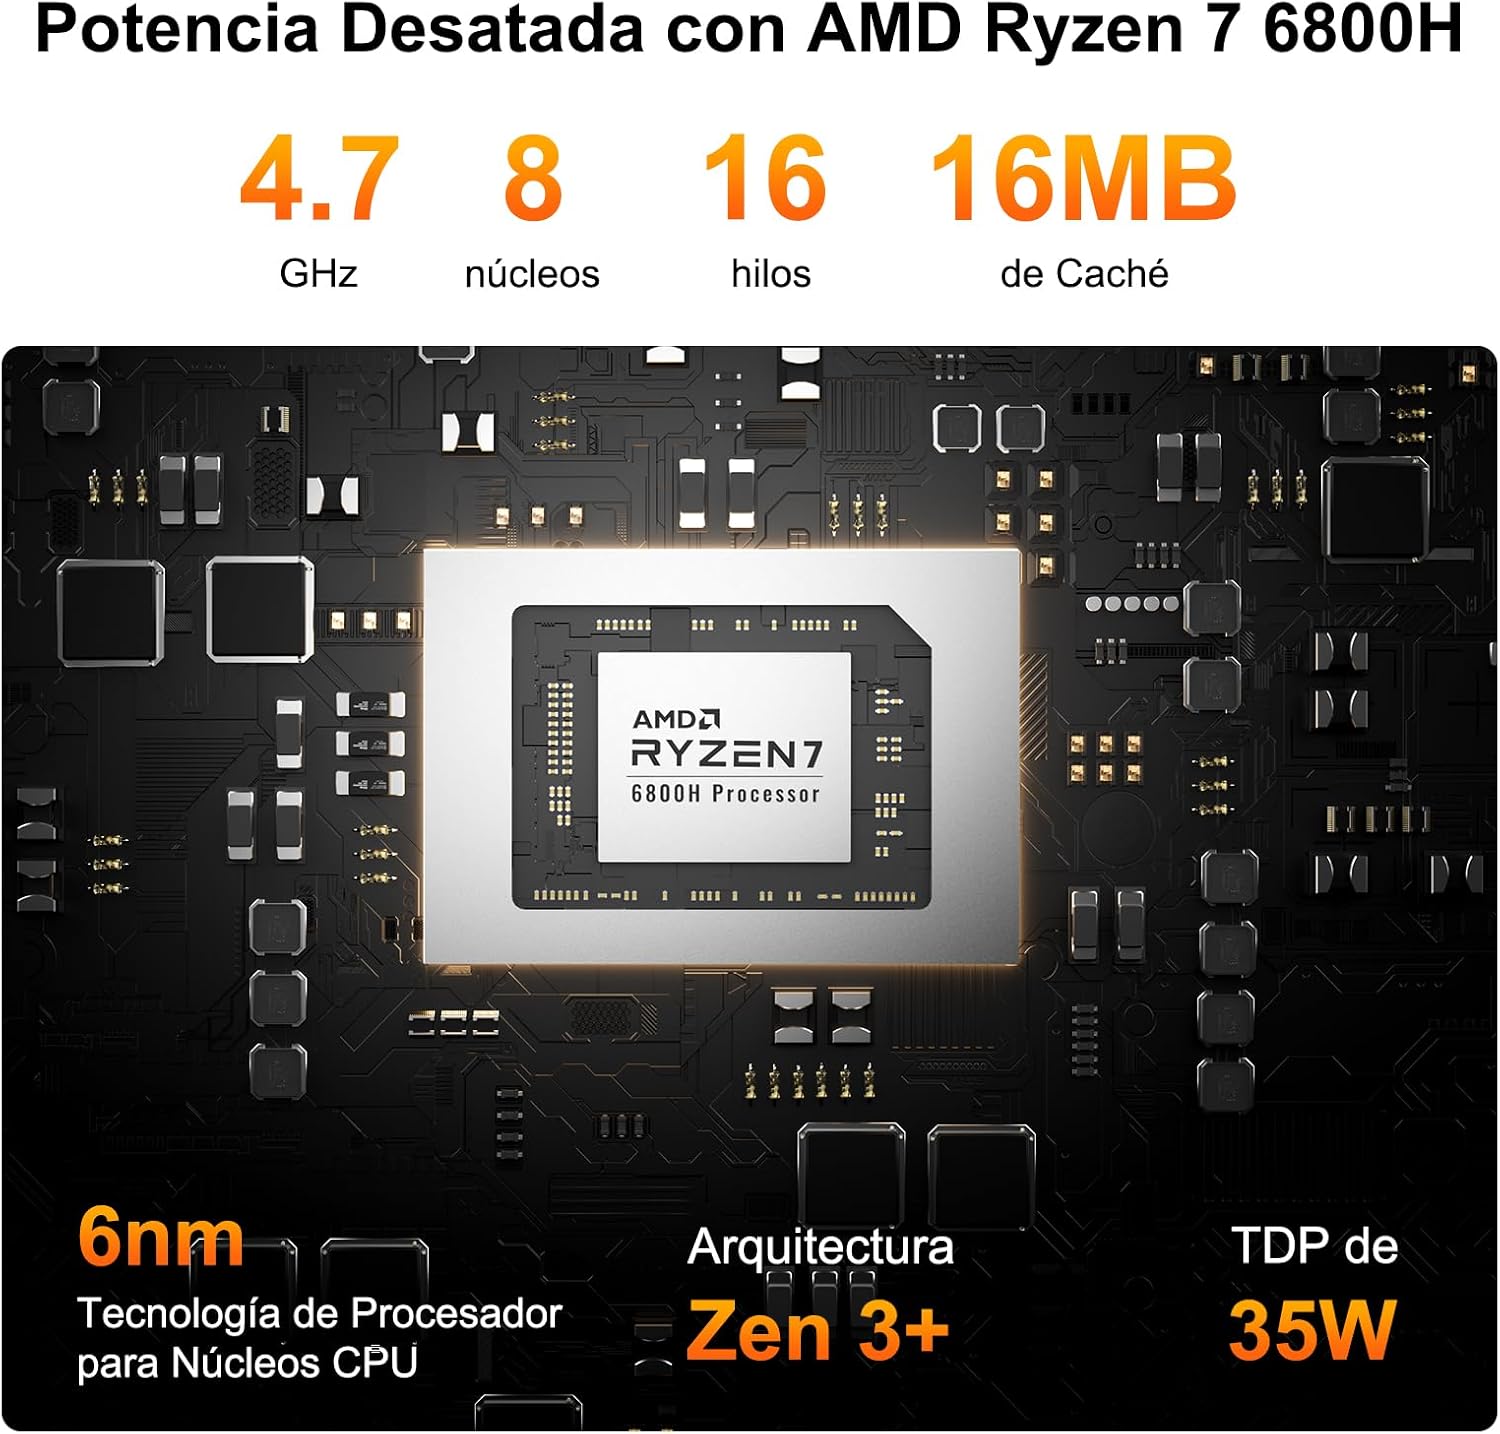
Figure 4.4: AMD Ryzen 7 6800H Processor Details

Figure 4.5: AMD Radeon 680M Graphics Performance
4.5 Sustav hlađenja
The GEEKOM A6 features IceBlast 2.0 cooling technology, designed to maintain optimal operating temperatures and ensure stable performance even under heavy workloads. The system utilizes large fan blades and copper heat sinks for efficient heat dissipation, resulting in quiet operation.

Figure 4.6: IceBlast 2.0 Cooling System
5. Održavanje
5.1 RAM and SSD Upgrades
The GEEKOM A6 is designed for user-friendly upgrades. It features two DDR5 memory slots, with one 16GB module pre-installed and one slot free for expansion up to 64GB. The 1TB PCIe Gen4x4 SSD can also be upgraded or expanded.
- Isključivanje: Ensure the Mini PC is completely powered off and disconnected from the power source.
- Pristup unutarnjim komponentama: Carefully remove the bottom panel of the Mini PC. Refer to the exploded view diagram for component locations.
- Upgrade RAM: Locate the DDR5 memory slots. Gently press the clips on either side of the RAM module to release it. Insert new RAM modules, ensuring they are seated correctly.
- Upgrade/Add SSD: Locate the M.2 2280 NVMe PCIe 4.0 SSD slot. If upgrading, remove the existing SSD. Insert the new SSD at an angle and secure it with the retaining screw.
- Ponovno sastavite: Carefully replace the bottom panel and secure it.

Figure 5.1: RAM and SSD Upgrade Options

Slika 5.2: Unutarnje komponente
5.2 Čišćenje
To maintain optimal performance and prevent overheating, regularly clean your Mini PC:
- Za brisanje vanjskog dijela uređaja koristite meku, suhu krpu.
- Use compressed air to clear dust from the ventilation grilles and ports. Do not insert any objects into the vents.
- Prije čišćenja provjerite je li uređaj isključen i izvučen iz struje.
6. Rješavanje problema
If you encounter issues with your GEEKOM A6 Mini PC, refer to the following common problems and solutions:
| Problem | Mogući uzrok | Otopina |
|---|---|---|
| Nema napajanja/Uređaj se ne uključuje | Adapter za napajanje nije spojen, neispravna utičnica, problem s gumbom za uključivanje/isključivanje. | Check power connections, try a different outlet, ensure power adapter is functional. |
| Nema izlaza na zaslonu | Incorrect cable connection, monitor input not selected, faulty cable/monitor. | Verify HDMI/USB4 cable connections, select correct input on monitor, test with another cable/monitor. |
| Intermittent Wi-Fi/Bluetooth connection | Driver issues, interference, weak signal. | Update Wi-Fi/Bluetooth drivers from GEEKOM's official website or AMD's website. Ensure no physical obstructions or interference sources. |
| Unexpected reboots or shutdowns | Overheating, software conflicts, power supply issues, outdated drivers (e.g., AMD ERP Mode related). | Ensure proper ventilation. Update all system drivers, especially chipset and graphics drivers. Check for Windows updates. If issues persist, contact support. |
| USB peripherals not recognized | Driver issues, faulty port, incompatible device. | Try different USB ports. Update USB drivers. Test peripherals on another computer. |
7. Specifikacije
| Značajka | Detalj |
|---|---|
| Procesor | AMD Ryzen 7 6800H (8 jezgri, 16 niti, do 4.7 GHz) |
| Grafika | AMD Radeon 680M (integrirana) |
| Memorija (RAM) | 16GB DDR5 (4800 MHz), 2 SO-DIMM slots, expandable up to 64GB |
| Skladištenje | 1TB PCIe Gen4x4 SSD (expandable up to 4TB) |
| Operativni sustav | Windows 11 Pro (pre-installed), Linux compatible |
| Video izlaz | 2x HDMI 2.0, 2x USB4 (supports up to 4 displays, 8K resolution) |
| USB priključci | 2x USB4 Gen 2 Type-C, 2x USB 3.2 Gen 2 Type-A, 1x USB 2.0 Type-A |
| Mreža | 2.5Gbps RJ45 LAN, Wi-Fi 6E |
| Bluetooth | Bluetooth 5.2 |
| Ostale luke | SD Card Reader, 3.5mm Headphone Jack, DC-in |
| Dimenzije | 11.18 x 11.18 x 3.56 cm |
| Težina | 500 g |
| Hlađenje | IceBlast 2.0 Technology (Air Cooling) |
| Sigurnosne značajke | Windows Defender, Windows Hello, BitLocker, TPM 2.0 |
8. Jamstvo i podrška
The GEEKOM A6 Mini PC comes with a comprehensive warranty and dedicated customer support:
- 3-godišnje jamstvo kvalitete: Covers defects in design and manufacturing.
- Besplatna zamjena u roku od 1 godine: For eligible issues within the first year.
- 2-Years Free Maintenance: For eligible issues within the first two years.
- 24/7 Online Customer Support: Professional assistance is available at all times.
For any inquiries or support, please contact GEEKOM customer service through your Amazon account (Order History > Get Help) or via email at pan.he@geekom.tw. You will receive a response within 24 hours.

Slika 8.1: Informacije o jamstvu i podršci