
1. Uvod
Thank you for choosing the hygger Programmable LED Aquarium Light, Model HG160. This light is designed to provide a full spectrum lighting solution for planted aquariums, featuring a 24/7 sunrise and sunset cycle, adjustable colors, and brightness levels. This manual provides detailed instructions for installation, operation, and maintenance to ensure optimal performance and longevity of your aquarium light.
2. Sigurnosne upute
- Always unplug the light from the power outlet before performing any maintenance, cleaning, or installation.
- This product is designed for indoor use only. Do not expose to rain or extreme moisture.
- Ensure your hands are dry when handling the power adapter and controller.
- Do not operate the light if any part is damaged, especially the power cord or adapter.
- Čuvati izvan dohvata djece.
- Ensure the light is securely mounted on the aquarium to prevent accidental falls into the water.
- The light unit is IP68 waterproof, but the controller and power adapter are not. Keep them away from water.
3. Sadržaj paketa
Provjerite jesu li svi artikli prisutni u paketu:
- LED Aquarium Light Unit
- Vanjski kontroler
- Extendable Brackets (pre-attached or separate)
- Power Adapter (100-240V AC to 24V/2A DC)
- Korisnički priručnik (ovaj dokument)
4. Postavljanje i instalacija
Follow these steps to install your hygger LED Aquarium Light:
- Raspakirajte komponente: Pažljivo izvadite sve predmete iz ambalaže.
- Pričvrstite zagrade: If the extendable brackets are not pre-attached, slide them onto the ends of the light unit.
- Pozicijsko svjetlo: Place the light unit on top of your aquarium. Adjust the extendable brackets to fit your tank size (e.g., 29-35 inches for the L size model) securely. Ensure the light is centered and stable.
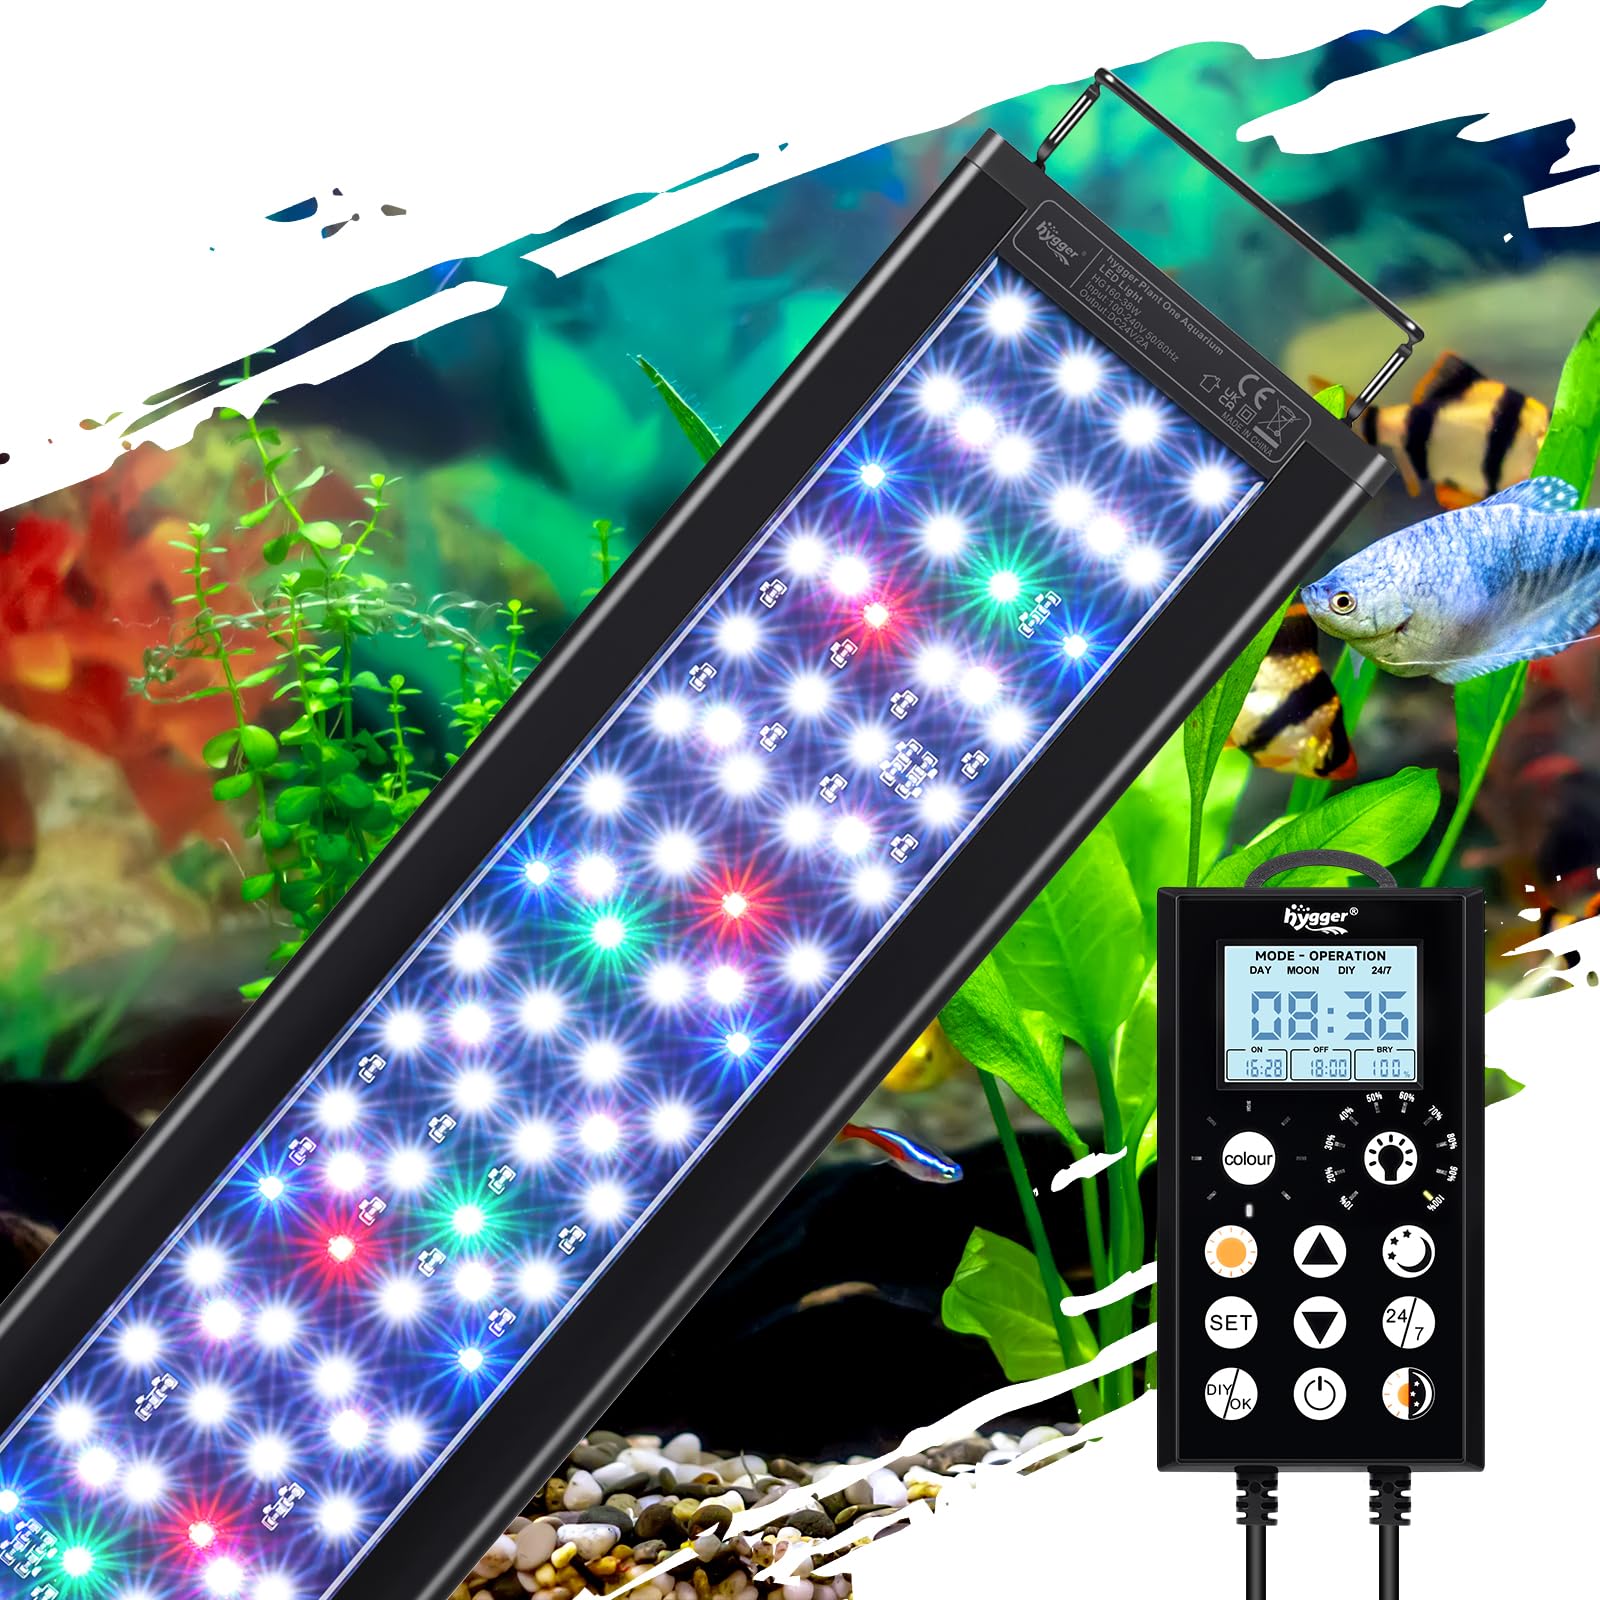
Image: hygger LED Aquarium Light mounted on an aquarium.

Image: Close-up of the adjustable extendable brackets.
- Povežite kontroler: Plug the light unit's cable into the designated port on the external controller.
- Priključite napajanje: Plug the power adapter into the controller, then plug the adapter into a standard electrical outlet.
5. Upute za rad
5.1 Prekid kontroleraview
The external controller features an LCD display and several buttons for programming and adjusting the light settings. Familiarize yourself with the button functions:

Image: Detailed diagram of the controller and its functions.
- HOUR/MIN: Adjusts time values.
- POSTAVITE: Enters settings, confirms selections, or switches between hours/minutes.
- BOJA: Cycles through 8 available colors in DIY mode.
- SVJETLINA: Adjusts 10 levels of brightness.
- Strelice GORE/DOLJE: Adjusts values (time, brightness, color).
- ON/OFF: Short press to turn on, long press (3 seconds) to turn off.
- 24/7: Activates the 24/7 automatic daylight cycle.
- DAN: Activates Sunlight constant mode. Long press (3 seconds) to set the daylight timer.
- NOĆ: Activates Moonlight constant mode. Long press (3 seconds) to set the moonlight timer.
- DAY+NIGHT: Switches between daylight mode and moonlight mode. Long press (3 seconds) to set the day/night mode timer.
- DIY/OK: Enters DIY mode, confirms end time of each segment.
5.2 Setting Local Time
Before using timed modes, set the current local time on the controller. Refer to the video below for a visual guide on operating the light, which includes time setting.
Video: Instructions on how to operate the hygger HG160 smart aquarium light, including initial setup and time setting.
5.3 24/7 Default Mode
This mode simulates a natural 24-hour sunrise and sunset pattern, providing a stable lighting environment for your aquarium. It turns on at 6:00 AM and off at 11:00 PM with smooth transitions.
- Ensure the local time is set correctly.
- Kratko pritisnite tipku 24/7 button to activate this mode.

Image: Light intensity graph for the 24/7 mode, illustrating sunrise, daylight, dusk, and moonlight phases.
Video: Demonstrates the hygger IP68 Waterproof LED Aquarium Light with Timer, showing its operation.
Video: Shows the Day and Nightlight functionality of the aquarium light.
Video: Demonstrates the Nightlight Mode of the LED Aquarium Light.
Video: Demonstrates the Daylight Mode of the LED Aquarium Light.
5.4 Uradi sam način rada
The DIY mode allows you to customize the timing, color, and brightness for up to 5 distinct stages (L1-L5) throughout the day, tailoring the lighting to your specific aquatic ecosystem needs.
- Pritisnite tipku DIY/OK button to enter DIY mode.
- For each segment (L1-L5) in sequence:
- Pritisnite GORE/DOLJE arrows to set the start time. Press SET to switch between hours/minutes. Press SET potvrditi.
- Kratko pritisnite tipku BOJA button to select a color. Press SET potvrditi.
- Kratko pritisnite tipku SVJETLINA button to adjust brightness levels (10%-100%). Press SET potvrditi.
- Kratko pritisnite GORE/DOLJE arrows to set the end time for the current segment.
- Pritisnite DIY/OK to proceed to the next segment.
- Repeat for all 5 segments.

Image: Illustration of the DIY 5 Stages Mode, demonstrating customizable light phases.
Video: Demonstrates the DIY Mode of the LED Aquarium Light, showing customization options.
5.5 Manual Modes (Day, Night, Daylight & Moonlight)
These modes allow for constant lighting at specific settings:
- Dnevni način rada: Kratko pritisnite tipku DAN button for constant sunlight. Long press (3 seconds) to set a specific timer for this mode.
- Noćni način rada: Kratko pritisnite tipku NOĆ button for constant moonlight. Long press (3 seconds) to set a specific timer for this mode.
- Daylight & Moonlight Mode: Kratko pritisnite tipku DAY+NIGHT button to switch between daylight and moonlight. Long press (3 seconds) to set a specific timer for this combined mode.

Image: Comparison of Day Mode and Night Mode settings with the controller.

Image: Controller displaying Daylight & Moonlight Mode.
5.6 Podešavanje boje i svjetline
In DIY or manual modes, you can adjust the light's appearance:
- Boje: Choose from 8 colors: White, Blue, Red, Green, Yellow, Azure, Orange, Purple. Use the BOJA button to cycle through options.
- Svjetlina: Adjust between 10 brightness levels (10% to 100%). Use the SVJETLINA gumb ili GORE/DOLJE strijele.

Image: Visual representation of the 8 color options and 10 brightness levels.
5.7 Funkcija pametne memorije
The light features intelligent power recovery. In case of a power outage, all settings are restored. However, the local time may need to be reset. The 24/7 cycle will seamlessly resume if no adjustments are made within 5 minutes of reboot.

Image: Illustration of the Smart Memory Function, showing light states before and after a power interruption.
6. Održavanje
Redovito održavanje osigurava dugotrajnost i optimalne performanse svjetla vašeg akvarija.
- Čišćenje: Unplug the light before cleaning. Wipe the aluminum alloy shell with a soft, damp cloth. Do not use abrasive cleaners or immerse the controller or power adapter in water.
- Rasipanje topline: The light features a fin-like texture for efficient heat dissipation. Ensure these fins are not obstructed to maintain proper cooling.
- Pregled kabela: Povremeno provjeravajte kabel za napajanje i spojeve na znakove istrošenosti ili oštećenja.

Image: Close-up of the aluminum alloy housing with fin-type design for heat dissipation.
Video: Gotovoview of the IP68 Waterproof Full Spectrum Aquarium Plant Light, highlighting its features and design.
7. Rješavanje problema
If you encounter issues with your hygger LED Aquarium Light, refer to the following common problems and solutions:
| Problem | Mogući uzrok | Otopina |
|---|---|---|
| Svjetlo se ne pali. | Nema napajanja, labav spoj, oštećen adapter. | Check power outlet. Ensure all connections are secure. Inspect power adapter for damage; replace if necessary. |
| Controller screen is blank or malfunctioning. | Problem s napajanjem, unutarnji kvar. | Unplug and replug the power. If issue persists, contact customer support. |
| Specific colors are not working. | LED fault, wiring issue. | Ensure the light is not in a mode that restricts color. If problem persists, contact customer support. |
| 24/7 mode not starting or ending correctly. | Incorrect local time setting. | Verify and reset the local time on the controller. |
If troubleshooting steps do not resolve the issue, please contact hygger customer support for assistance.
8. Specifikacije
Key technical specifications for the hygger Programmable LED Aquarium Light (Model HG160):
| Značajka | Detalj |
|---|---|
| Broj modela | HG160 |
| Wattage | 38 vata |
| LED količina | 150 (94 white, 6 red, 14 blue, 6 green, 30 RGB) |
| Lumeni | 1398 lm |
| Temperatura boje | 12781 tisuća |
| CRI (indeks reprodukcije boja) | >90 |
| Dimenzije proizvoda | 28.5"D x 4.3"W x 0.5"H (72.5 cm length) |
| Primjenjiva veličina spremnika | 29-35 inča (75-90 cm) |
| Izvor napajanja | Corded Electric (100-240V AC to 24V/2A DC adapter) |
| Materijal | Aluminijska legura |
| Ocjena vodootpornosti | IP68 (light unit only) |
| Životni vijek | 50,000 sata |
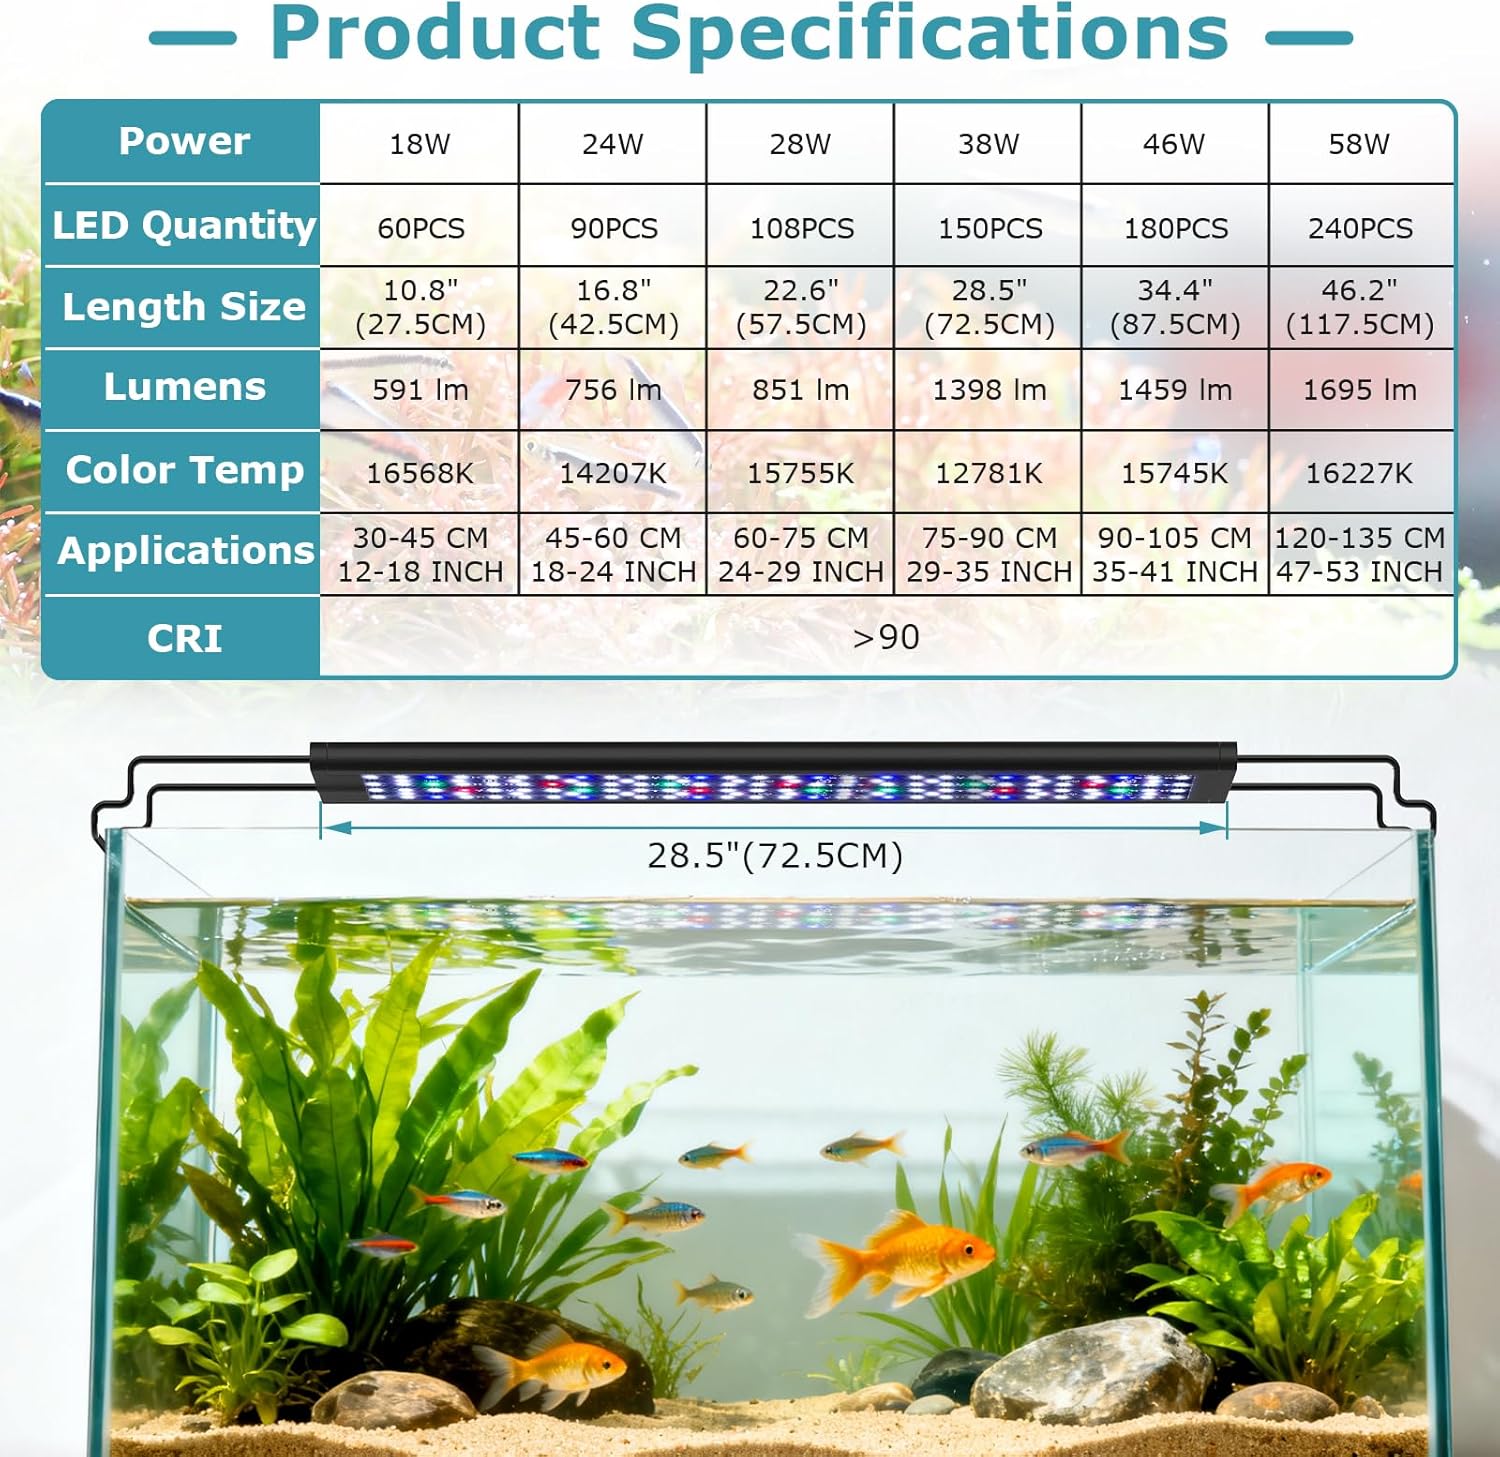
Image: Comprehensive product specifications table for different light sizes.

Image: Details on the 38W full spectrum and high rendering index (CRI >90).
9. Jamstvo i podrška
This hygger LED Aquarium Light comes with a 2-godišnje jamstvo proizvođača. Ovo jamstvo pokriva nedostatke u materijalu i izradi pri normalnoj uporabi.
For warranty claims, technical support, or any questions regarding your product, please contact hygger customer service:
- Webstranica: www.hygger-online.com (Molimo provjerite službenu webstranicu za najnovije kontaktne podatke.)
- Email: Pogledajte pakiranje proizvoda ili službene webstranica za e-poštu podrške.
Please have your model number (HG160) and proof of purchase ready when contacting support.