1. Uvod i krajview
The AT&T Air 4920 Airties Smart Wi-Fi Extender is designed to expand the coverage and improve the signal strength of your existing Wi-Fi network. It creates a seamless mesh network, allowing your devices to automatically connect to the strongest Wi-Fi signal as you move around your home or office. This manual provides detailed instructions for setting up, operating, maintaining, and troubleshooting your Wi-Fi extender.

Slika 1: Prednja strana view of the AT&T Air 4920 Airties Smart Wi-Fi Extender.
2. Sadržaj paketa
Molimo provjerite jesu li svi artikli prisutni u vašem paketu:
- AT&T Air 4920 Airties Smart Wi-Fi Extender Unit
- Adapter napajanja
- Kratki vodič (ovaj priručnik služi kao sveobuhvatan vodič)
3. Značajke i komponente proizvoda
Familiarize yourself with the various ports, buttons, and indicator lights on your Wi-Fi Extender.

Slika 2: Prednji i stražnji dio view of the Wi-Fi Extender with labeled components.
- 5 GHz Wi-Fi Indicator: Prikazuje status Wi-Fi pojasa od 5 GHz.
- 2.4 GHz Wi-Fi Indicator: Prikazuje status Wi-Fi pojasa od 2.4 GHz.
- Power Indicator / On/Off Button: Indicates power status. Can also be used to turn the device on/off.
- Gumb WPS: Used for Wi-Fi Protected Setup to quickly connect to your router.
- Gigabit Ethernet Ports (1 & 2): For wired connections to devices like computers, gaming consoles, or smart TVs.
- Prekidač za uključivanje/isključivanje: A physical switch to turn the device completely off or on.
- Ulaz istosmjerne struje (12 V): Ovdje spojite priloženi adapter za napajanje.
- Gumb za resetiranje: Used to restore the device to factory default settings. (Requires a paperclip or similar pointed object).
4. Vodič za postavljanje
Follow these steps to set up your AT&T Air 4920 Wi-Fi Extender:
4.1 Početno smještaj
For initial setup, place the Wi-Fi Extender near your AT&T gateway (router). Once paired, you can move it to a more central location in your home where Wi-Fi signal is weak.
4.2 Priključak za napajanje
- Connect the provided power adapter to the DC Power Input (7) on the back of the extender.
- Uključite strujni adapter u zidnu utičnicu.
- Ensure the Power On/Off Switch (6) is in the 'On' position. The Power Indicator (3) should light up.
4.3 Pairing with Your AT&T Gateway (Router)
There are two primary methods for pairing:
Method A: Using WPS (Wi-Fi Protected Setup) - Recommended
- Pritisnite i držite WPS Button (4) on the front of the Wi-Fi Extender for 2-3 seconds until the indicator lights start blinking.
- U roku od dvije minute pritisnite Gumb WPS on your AT&T gateway (router). Refer to your gateway's manual for the exact location of its WPS button.
- Wait for the indicator lights on the extender (1, 2, and 3) to turn solid green, indicating a successful connection. This may take a few minutes as the extender updates its firmware and synchronizes with your gateway.
Method B: Using an Ethernet Cable (If WPS fails or is not preferred)
- Connect one end of an Ethernet cable (not included) to one of the Gigabit Ethernet Ports (5) on the back of the extender.
- Connect the other end of the Ethernet cable to an available LAN port on your AT&T gateway (router).
- The extender will automatically detect the connection and begin pairing. Wait for the indicator lights (1, 2, and 3) to turn solid green.
- Once paired, you can disconnect the Ethernet cable if you wish to use the extender wirelessly.
4.4 Optimalno postavljanje
After successful pairing, unplug the extender and move it to a location roughly halfway between your AT&T gateway and the area where you need improved Wi-Fi coverage. Ensure the extender is placed in an open area, away from large metal objects, concrete walls, or other electronic devices that might cause interference. Plug it back into a power outlet. The indicator lights should turn solid green again, confirming a good connection.

Figure 3: The Wi-Fi Extender connected to its power adapter.
5. Operating Your Wi-Fi Extender
Once set up, the AT&T Air 4920 operates automatically to extend your Wi-Fi network. Your devices will seamlessly connect to the strongest signal, whether from your gateway or the extender, using your existing Wi-Fi network name (SSID) and password.
Status svjetlosnog indikatora:
- Stalno zeleno: Excellent connection and operation.
- Solid Amber/Orange: Fair connection. Consider repositioning the extender closer to your gateway.
- Čvrsto crveno: No connection or poor signal. Reposition the extender or check connections.
- Trepće: During WPS pairing or firmware update.
- isključeno: Uređaj je isključen ili ne prima napajanje.
Žičane veze:
You can connect wired devices (e.g., desktop computers, smart TVs, gaming consoles) to the Gigabit Ethernet Ports (5) on the back of the extender for a stable, high-speed connection.
6. Održavanje
To ensure optimal performance and longevity of your Wi-Fi Extender:
- Čišćenje: Gently wipe the exterior with a soft, dry cloth. Do not use liquid cleaners or aerosols.
- Ventilacija: Pazite da ventilacijski otvori nisu blokirani kako biste spriječili pregrijavanje.
- Ažuriranja firmvera: The extender typically receives automatic firmware updates from AT&T. Ensure it remains connected to power and your network for these updates to occur.
- Ciklus snage: If you experience minor issues, try unplugging the extender from the power outlet for 10 seconds and then plugging it back in.
7. Rješavanje problema
If you encounter issues with your Wi-Fi Extender, refer to the following common problems and solutions:
| Problem | Mogući uzrok | Otopina |
|---|---|---|
| Extender lights are off. | Nema struje. | Ensure the power adapter is securely connected and plugged into a working outlet. Check the Power On/Off Switch (6). |
| Indicator lights are red or amber. | Poor or no connection to the gateway. |
|
| Wi-Fi signal is still weak in extended areas. | Suboptimal placement. | Move the extender to a more central location between your gateway and the weak signal area. Avoid placing it in corners or behind furniture. |
| Devices not connecting to the extender. | Extender not properly paired or network issues. |
|
| Need to reset to factory settings. | Configuration issues or preparing for new setup. | With the extender powered on, use a paperclip or similar pointed object to press and hold the Gumb za resetiranje (8) for about 10 seconds until the lights flash. The extender will restart with factory defaults. |
8. Specifikacije
| Značajka | Detalj |
|---|---|
| Broj modela | ZRAK-4920 |
| Dimenzije proizvoda (V x Š x D) | 3.94 x 4.27 x 1.63 inča (približno) |
| Težina artikla | 15 unci |
| Standard bežične komunikacije | 802.11ac |
| Brzina prijenosa podataka | Do 1000 megabita u sekundi |
| Vrsta konektora | RJ45 (Ethernet) |
| Boja | Bijela |
| Proizvođač | AirTies |
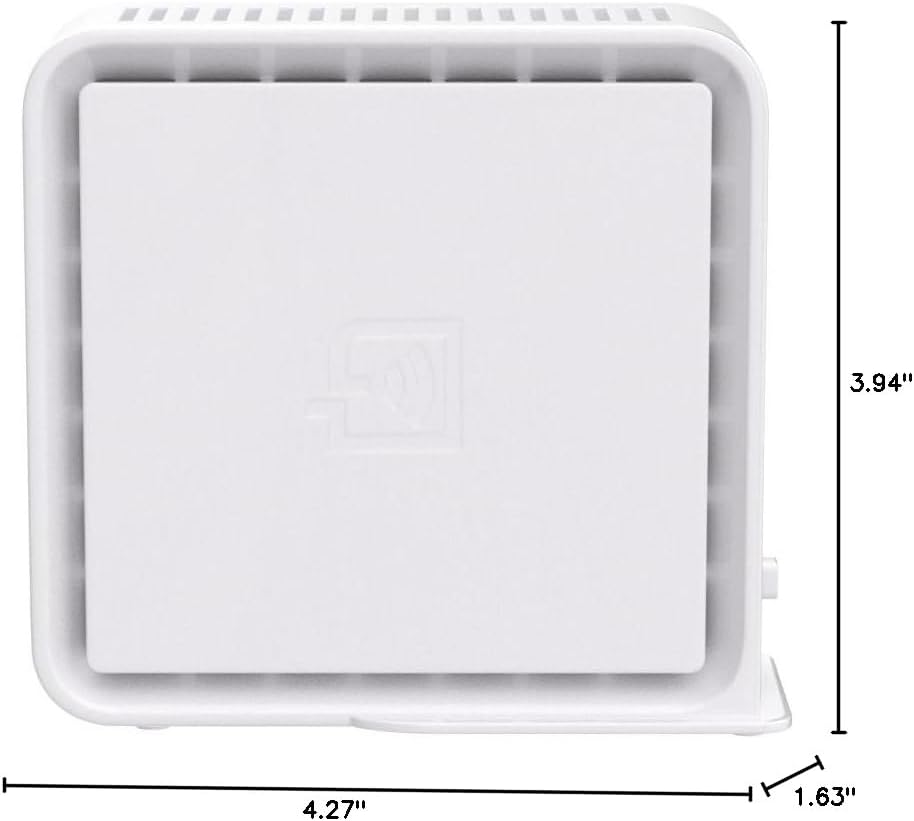
Figure 4: Approximate dimensions of the Wi-Fi Extender.


