1. Uvod
This manual provides detailed instructions for the installation, programming, operation, and maintenance of your LaView LV-D01-R Electronic Deadbolt Lock. Please read this guide thoroughly before installation and use to ensure proper function and security.

Slika 1: LaView LV-D01-R Electronic Deadbolt Lock (Exterior and Interior Units)
2. Kontrolni popis prije instalacije
Prije početka ugradnje, provjerite ispunjavaju li vaša vrata sljedeće specifikacije:
- Promjer otvora za vrata: 2-1/8 inches (54 mm).
- Backset: Adjustable to either 2-3/8 inches (60 mm) or 2-3/4 inches (70 mm).
- Promjer rupe na rubu vrata: 1 inch (25 mm).
- Debljina vrata: 1-3/8 inches to 2 inches (35 mm to 50 mm).
If drilling is required, refer to the provided cutout template in your product packaging.

Figure 2: Door Measurement and Component Diagram
3. Vodič za instalaciju
Slijedite ove korake za uspješnu instalaciju:
- Adjust Latch (if necessary): The latch can be adjusted for 2-3/8" (60mm) or 2-3/4" (70mm) backsets. Rotate and pull the backset as instructed to extend the latch if needed.
- Instalirajte zasun: Insert the latch into the door edge hole. Ensure the latch plate is flush with the door edge and secure with screws.
- Ugradnja vanjskog sklopa: Postavite sklop vanjske tipkovnice na vrata, poravnavajući vreteno kroz zasun.
- Ugradite montažnu ploču: Pričvrstite unutarnju montažnu ploču na vanjski sklop pomoću priloženih vijaka.
- Spojite kabele: Carefully connect the cable from the exterior assembly to the interior assembly.
- Ugradnja unutarnjeg sklopa: Pričvrstite unutarnji sklop na montažnu ploču, pazeći da se osovina okretnog gumba ispravno učvrsti. Pričvrstite vijcima.
- Instalirajte baterije: Umetnite 4 AA baterije u odjeljak za baterije.
- Testna operacija: Test the lock with the default master code and the physical key to ensure smooth operation.
4. Programiranje i rad
The default master PIN code is 12345678. For security, you will be prompted to change this code before adding any other user codes.
4.1 Promijenite glavni kod
Za promjenu glavnog koda:
- Pritisnite **.
- Enter the current master code (default: 12345678).
- Pritisnite #.
- Pritisnite 1.
- Pritisnite #.
- Unesite svoj novi glavni kod (4-10 znamenki).
- Pritisnite #.
- Re-enter your new master code to verify.
- Pritisnite # to store the new master code.
A green indicator light confirms successful setting; a red light indicates failure.
4.2 Add User Codes
You can program up to 20 unique user codes (4-10 digits) for family and friends.
- Pritisnite **.
- Unesite glavni kôd.
- Pritisnite #.
- Pritisnite 2.
- Pritisnite #.
- Enter a new user code (4-10 digits).
- Pritisnite #.
- Re-enter the new user code to verify.
- Pritisnite # to store the user code.
4.3 Add One-Time Codes
One-time codes are useful for temporary access and expire after a single use.
- Pritisnite **.
- Unesite glavni kôd.
- Pritisnite #.
- Pritisnite 7.
- Pritisnite #.
- Enter a new one-time code (4-10 digits).
- Pritisnite #.
- Re-enter the new one-time code to verify.
- Pritisnite # to add the one-time code.
The one-time code will expire after unlocking the lock once.
4.4 Enable/Disable Auto-Lock
The Auto-Lock function automatically locks the door after 30 seconds of inactivity. It is disabled by default.
- To Enable Auto-Lock: Pritisnite ** + Glavni kod + # + 51 + #.
- To Disable Auto-Lock: Pritisnite ** + Glavni kod + # + 52 + #.

Figure 3: Auto-Lock Feature
4.5 Enable Vacation Mode
Vacation mode provides enhanced security when you are away. If the lock is unlocked by key or thumb turn in this mode, it will beep for 1 minute.
- Pritisnite **.
- Unesite glavni kôd.
- Pritisnite #.
- Pritisnite 6.
- Pritisnite # to enable Vacation Mode.
To disable Vacation Mode, repeat the same steps.
4.6 Key Override
The lock includes a physical key override for manual access, especially useful if batteries are depleted.

Figure 4: Key Override for Manual Access
5. Održavanje
5.1 Zamjena baterije
The lock is powered by 4 AA batteries. A low battery indicator will alert you when replacement is needed.
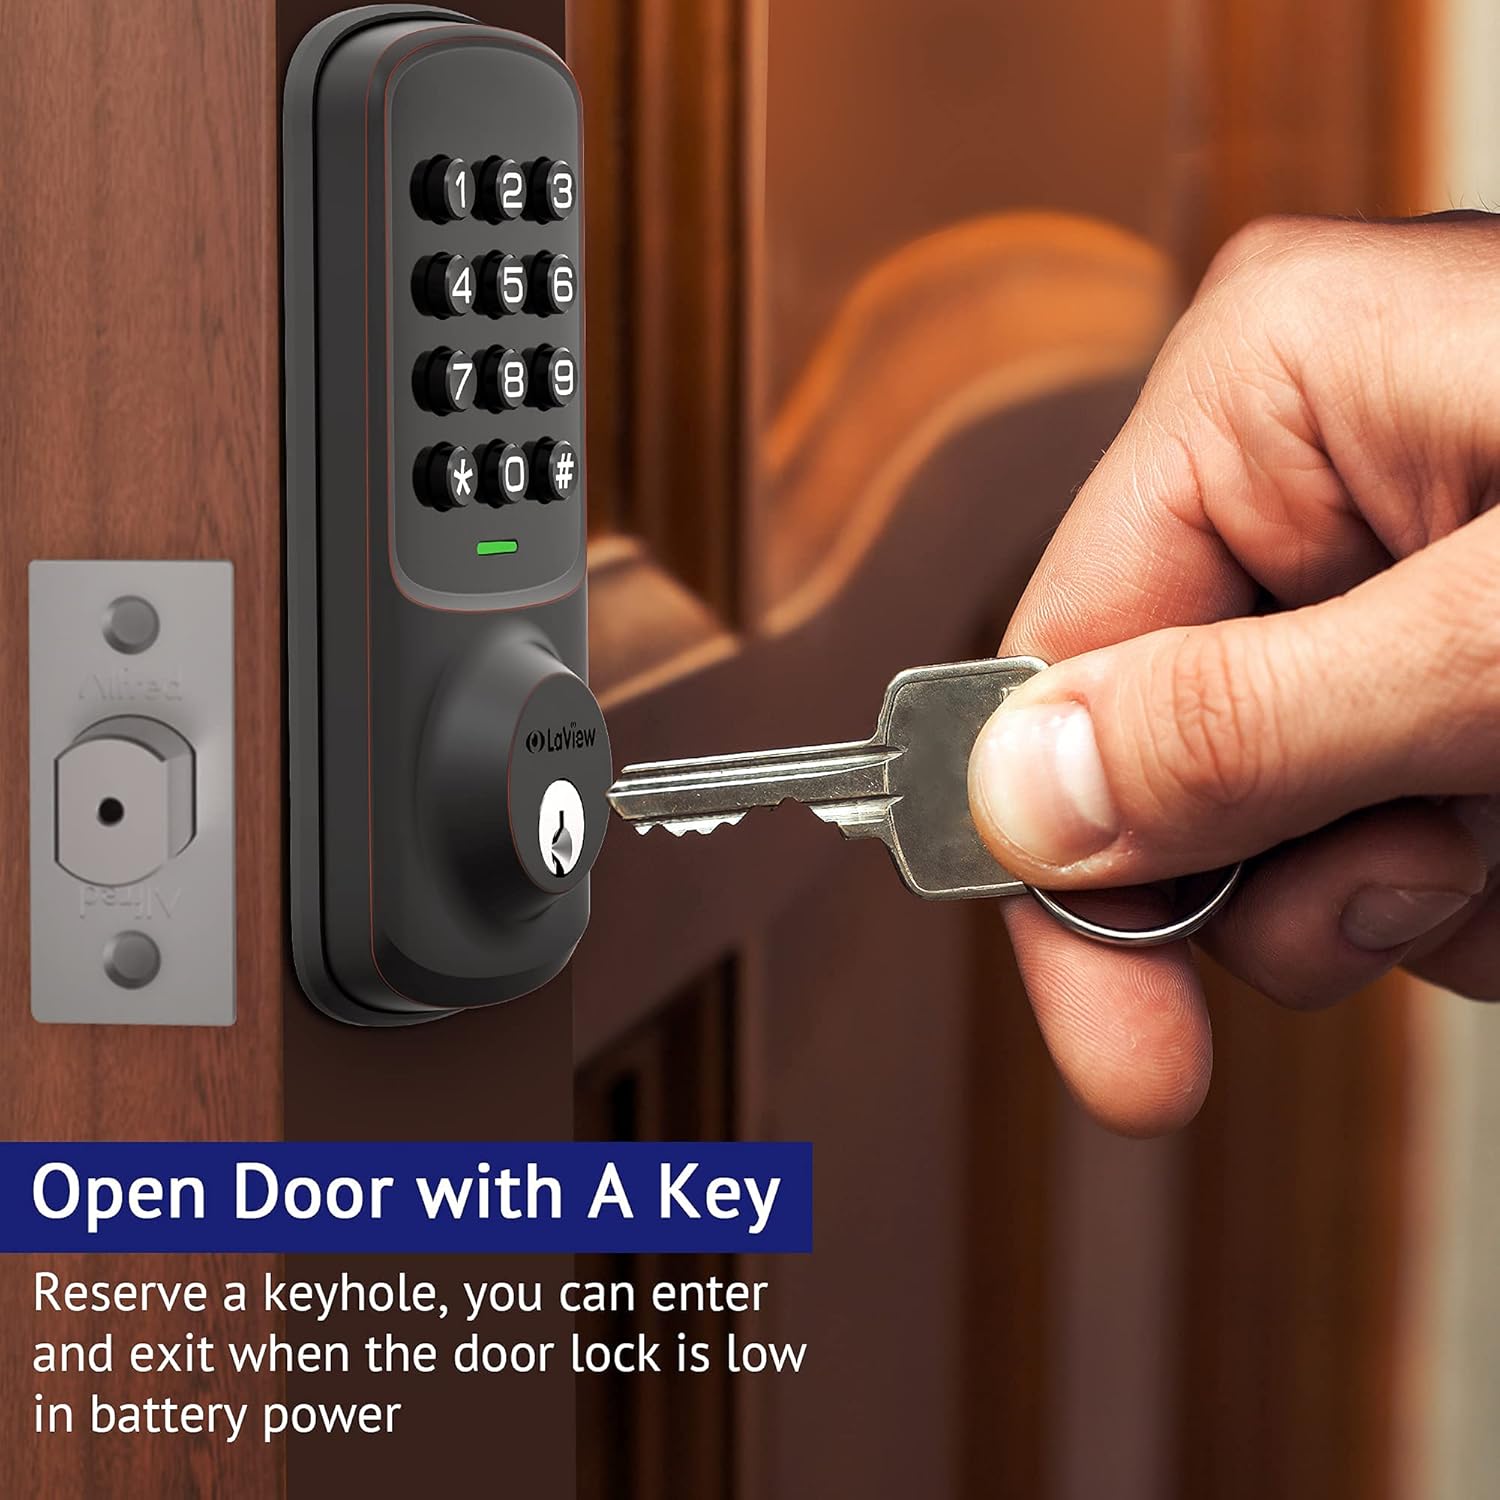
Figure 5: Low Battery Alert
To replace batteries, remove the interior cover, replace the old batteries with new ones, and reattach the cover.
5.2 Čišćenje
Očistite vanjski dio brave mekom krpomamp krpom. Izbjegavajte abrazivna sredstva za čišćenje ili otapala koja bi mogla oštetiti završnu obradu ili elektroničke komponente.
6. Specifikacije
| Značajka | Detalj |
|---|---|
| Proizvođač | LaView |
| Broj modela | LV-D01-R |
| Dimenzije proizvoda | 17.78 x 12.7 x 10.16 cm |
| Težina artikla | 454 g |
| Boja | bronca |
| Materijal | Metal |
| Vrsta brave | Tipkovnica |
| Posebne značajke | Keyless Entry, Auto Lock, 20 User Codes, 1-Touch Motorized Locking |
| Potrebne baterije | Da (4 AA baterije) |
| Uključene komponente | Backup Key*1, Deadbolt/Latch*1, Exterior Assembly*1, Mounting Plate*1, Strike Screws*2, Strike*1 |
7. Rješavanje problema
- Brava ne reagira: Check battery levels. Replace batteries if the low battery indicator is active.
- Incorrect Code Entry: Ensure you are pressing the correct sequence and the '#' key after each code entry.
- Setting Failure: If the indicator light flashes red after attempting a setting change, the operation was unsuccessful. Re-attempt the steps carefully.
- Fizički ključ ne radi: Ensure the key is fully inserted and turned correctly. Check for any obstructions in the keyway.
- Kvar automatskog zaključavanja: Verify that the Auto-Lock function is enabled (refer to section 4.4).
8. Jamstvo i podrška
LaView offers lifetime technical support from the date of purchase. For any concerns or assistance, please contact their customer service team:
- Online Phone Calls: Monday to Friday, 9 am to 5 pm PDT.
- 24/7 Online After-Sales Email Service.
Refer to your product packaging or the official LaView webstranicu za konkretne kontaktne podatke.


