1. Uvod
The Waveshare Triple LCD HAT is an expansion board designed for Raspberry Pi series boards, including Raspberry Pi Zero, Zero W, Zero WH, 2B, 3B, 3B+, and 4B. It integrates a 1.3-inch IPS LCD main screen and two 0.96-inch IPS LCD secondary screens, along with two user-defined keys. All screens communicate via SPI, offering a versatile display solution for various embedded applications.

Image 1.1: Waveshare Triple LCD HAT overview.
2. Sadržaj paketa
Provjerite jesu li svi artikli prisutni u vašem paketu:
- Zero LCD HAT (A) x1
- Standoffs pack x1 (includes screws and nuts for mounting)
3. Ključne značajke
- Standard Raspberry Pi 40PIN GPIO Header: Ensures compatibility with various Raspberry Pi models.
- 1.3-inch IPS LCD Main Screen: Features a built-in ST7789 driver chip, SPI communication, 240x240 resolution, and supports 65K color display with a wide viewing kut.
- Dual 0.96-inch IPS LCD Secondary Screens: Each screen has a built-in ST7735S driver chip, SPI communication, 160x80 resolution, and supports 65K color display. Ideal for displaying key information, status indicators, or small graphics.
- Two User-Defined Keys: Onboard K1 and K2 keys allow for custom functionality in your applications.
- Online Development Resources: Access to documentation and example code for Raspberry Pi, VisionFive2, Arduino, STM32, and other platforms.

Image 3.1: Detailed specifications of the main and secondary LCD screens.
4. Vodič za postavljanje
4.1 Hardverska veza
- Align the 40-pin GPIO header of the Triple LCD HAT with the corresponding GPIO pins on your Raspberry Pi board.
- Gently press down to ensure the HAT is securely seated on the Raspberry Pi's GPIO header.
- Use the provided standoffs and screws to mechanically secure the HAT to the Raspberry Pi board, if desired, for added stability.

Image 4.1: Triple LCD HAT connected to a Raspberry Pi.
4.2 Konfiguracija softvera
To enable the LCD screens and user keys, specific software drivers and libraries are required. Waveshare provides comprehensive online development resources and example code for various platforms, including Raspberry Pi OS.
- Visit the official Waveshare Wiki or product page for the Triple LCD HAT to access the latest documentation and code examples.
- Follow the instructions provided in the online resources to install the necessary drivers and configure your Raspberry Pi for SPI communication.
- Example code typically includes demonstrations for displaying text, graphics, and reading input from the user-defined keys.
5. Operacija
The Triple LCD HAT offers three independent display areas and two programmable input buttons.
5.1 Display Functionality
- Main Screen (1.3-inch): This central display is suitable for primary graphical interfaces, detailed information, or larger visual elements. Its 240x240 resolution and IPS technology provide clear and vibrant output.
- Secondary Screens (Dual 0.96-inch): Positioned on either side of the main screen, these 160x80 resolution displays are ideal for showing system status, sensor readings, small icons, or other auxiliary data.
- All screens utilize SPI for communication, allowing for efficient data transfer from the Raspberry Pi.
5.2 User-Defined Keys (K1, K2)
The two onboard keys, K1 and K2, are connected to specific GPIO pins on the Raspberry Pi. These can be programmed to trigger various actions within your application, such as menu navigation, data toggling, or system commands.

Image 5.1: Triple LCD HAT in operation, displaying various data.
6. Definicija pinova
The Triple LCD HAT connects to the Raspberry Pi via its 40-pin GPIO header. Understanding the pin assignments is crucial for proper software development and custom wiring.
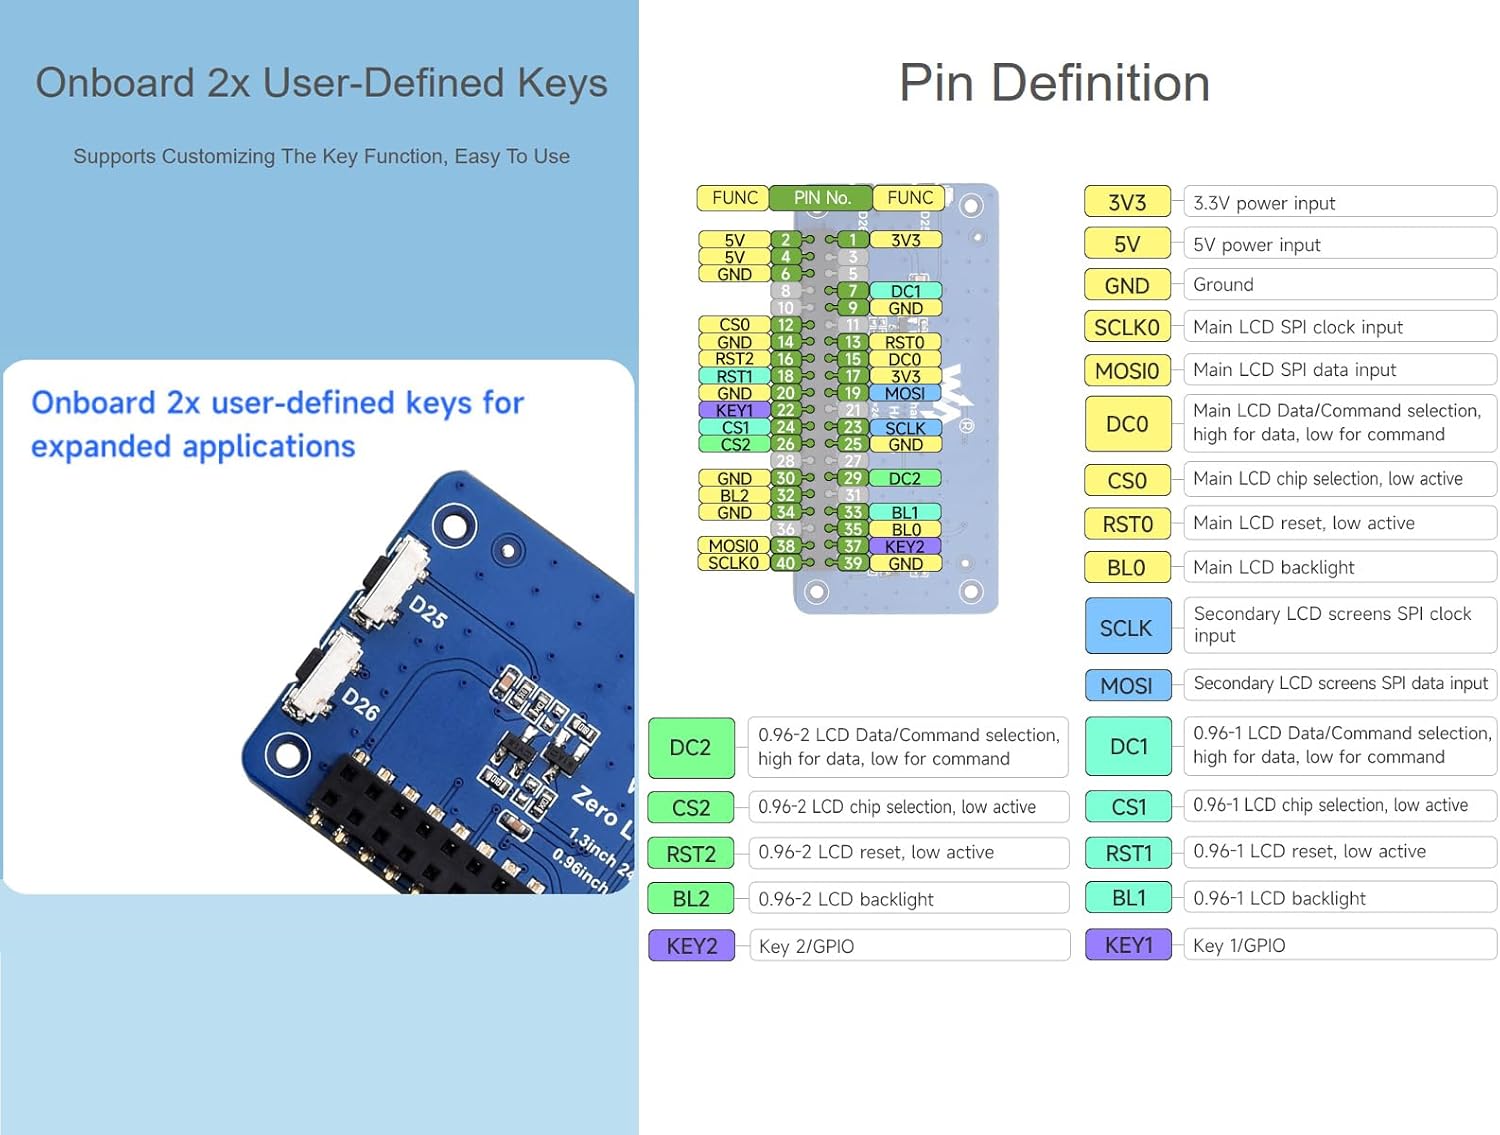
Image 6.1: Pinout diagram of the Triple LCD HAT.
| Pin br. | Funkcija | Pin br. | Funkcija |
|---|---|---|---|
| 1 | 3V3 | 2 | 5V |
| 3 | DCI | 4 | 5V |
| 5 | SCLK0 | 6 | GND |
| 7 | DCI | 8 | GND |
| 9 | GND | 10 | RST0 |
| 11 | CS0 | 12 | BL0 |
| 13 | KLJUČ1 | 14 | GND |
| 15 | CS1 | 16 | SCLK |
| 17 | TRAĆITI VRIJEME | 18 | GND |
| 19 | DC0 | 20 | GND |
| 21 | DC1 | 22 | RST1 |
| 23 | CS2 | 24 | BL1 |
| 25 | GND | 26 | KLJUČ2 |
7. Scenariji primjene
The Triple LCD HAT's multi-screen capability and user-defined keys make it suitable for a variety of projects:
- Multi-screen Collaboration: Display a primary interface on the 1.3-inch screen while using the 0.96-inch screens for real-time data, status updates, or secondary controls.
- Fleksibilna primjena: Ideal for Raspberry Pi projects, IoT applications, embedded systems, and DIY projects requiring compact and informative visual feedback.
- Jednostavna integracija: The standard 40-pin GPIO header allows for straightforward integration into existing Raspberry Pi setups.

Slika 7.1: Primjeramples of how the Triple LCD HAT can be used in various projects.
8. Tehničke specifikacije
| Značajka | Detalj |
|---|---|
| Marka | Waveshare |
| Naziv modela | Triple LCD HAT for Raspberry Pi |
| Broj modela artikla | 24.9 |
| Veličina glavnog zaslona | 1.3 inča |
| Razlučivost glavnog zaslona | 240x240 |
| Main Screen Driver | ST7789 |
| Secondary Screen Size | 0.96 inch (x2) |
| Secondary Screen Resolution | 160x80 (x2) |
| Secondary Screen Driver | ST7735S |
| Komunikacijsko sučelje | SPI |
| User Keys | 2 (K1, K2) |
| Kompatibilnost | Raspberry Pi Zero/Zero W/Zero WH/2B/3B/3B+/4B |
| Podrška za operativni sustav | Raspberry Pi OS (based on Debian Linux) |
| Dimenzije proizvoda (DxŠxV) | 2.55 x 1.22 x 0.39 inča (65 x 31 x 10 mm) |
| Težina artikla | 0.352 unci |
9. Obrisne dimenzije
The physical dimensions of the Triple LCD HAT are important for enclosure design and project planning.

Image 9.1: Outline dimensions of the Triple LCD HAT (Unit: mm).
The HAT measures approximately 65mm in length, 31mm in width, and 10mm in height (including the screens and components).
10. Rješavanje problema
- Screens not displaying:
- Ensure the HAT is correctly seated on the Raspberry Pi's GPIO header.
- Verify that the SPI interface is enabled in your Raspberry Pi's configuration (e.g., via
raspi-config). - Check your software code for correct initialization of the ST7789 and ST7735S drivers and proper SPI communication.
- Confirm that the power supply to your Raspberry Pi is adequate.
- User keys not responding:
- Ensure your software is correctly reading the GPIO pins assigned to K1 and K2.
- Check for any conflicts with other GPIO usage in your project.
- Display artifacts or incorrect colors:
- Review your display initialization code, especially parameters like color mode and orientation.
- Ensure the correct driver (ST7789 for main, ST7735S for secondary) is being used for each screen.
11. Podrška i resursi
For further assistance, detailed documentation, and the latest code examples, please refer to the official Waveshare online resources. These resources typically include:
- Product Wiki pages with setup guides and programming tutorials.
- Preuzimanje prample code for various programming languages and platforms.
- Technical support contact information.
If you encounter any issues not covered in this manual or the online resources, please contact Waveshare technical support for assistance.


